Nureva has determined that the Logitech RoomMate will work with the following Nureva devices when configured as shown in this article.
- HDL200
- HDL300
- Dual HDL300
- HDL410
NOTE: Ensure Logitech RoomMate firmware version 1.7.202 or newer is installed to avoid possible issues.
HDL200
Follow the steps below to integrate an HDL200 system with a Logitech RoomMate.
On the HDL200
- Plug in the 54VDC power supply to the back of the HDL200
- Connect a Windows® or macOS® computer using a USB-A to USB-B cable
- Ensure the HDL200 is securely mounted to a wall or display mount
- Download and run Nureva Console client
- Follow the on-screen instructions to install any firmware updates
- Navigate to Settings and adjust the settings as needed
- Recalibrate the system for the best HDL200 experience
- Exit Nureva Console client and disconnect the USB-A connection from the computer
On the Logitech RoomMate
- Ensure the Logitech RoomMate is using the latest firmware (version 1.7.xxx or newer)
- Connect the HDL200 cable to any USB-A port on the Logitech RoomMate
-
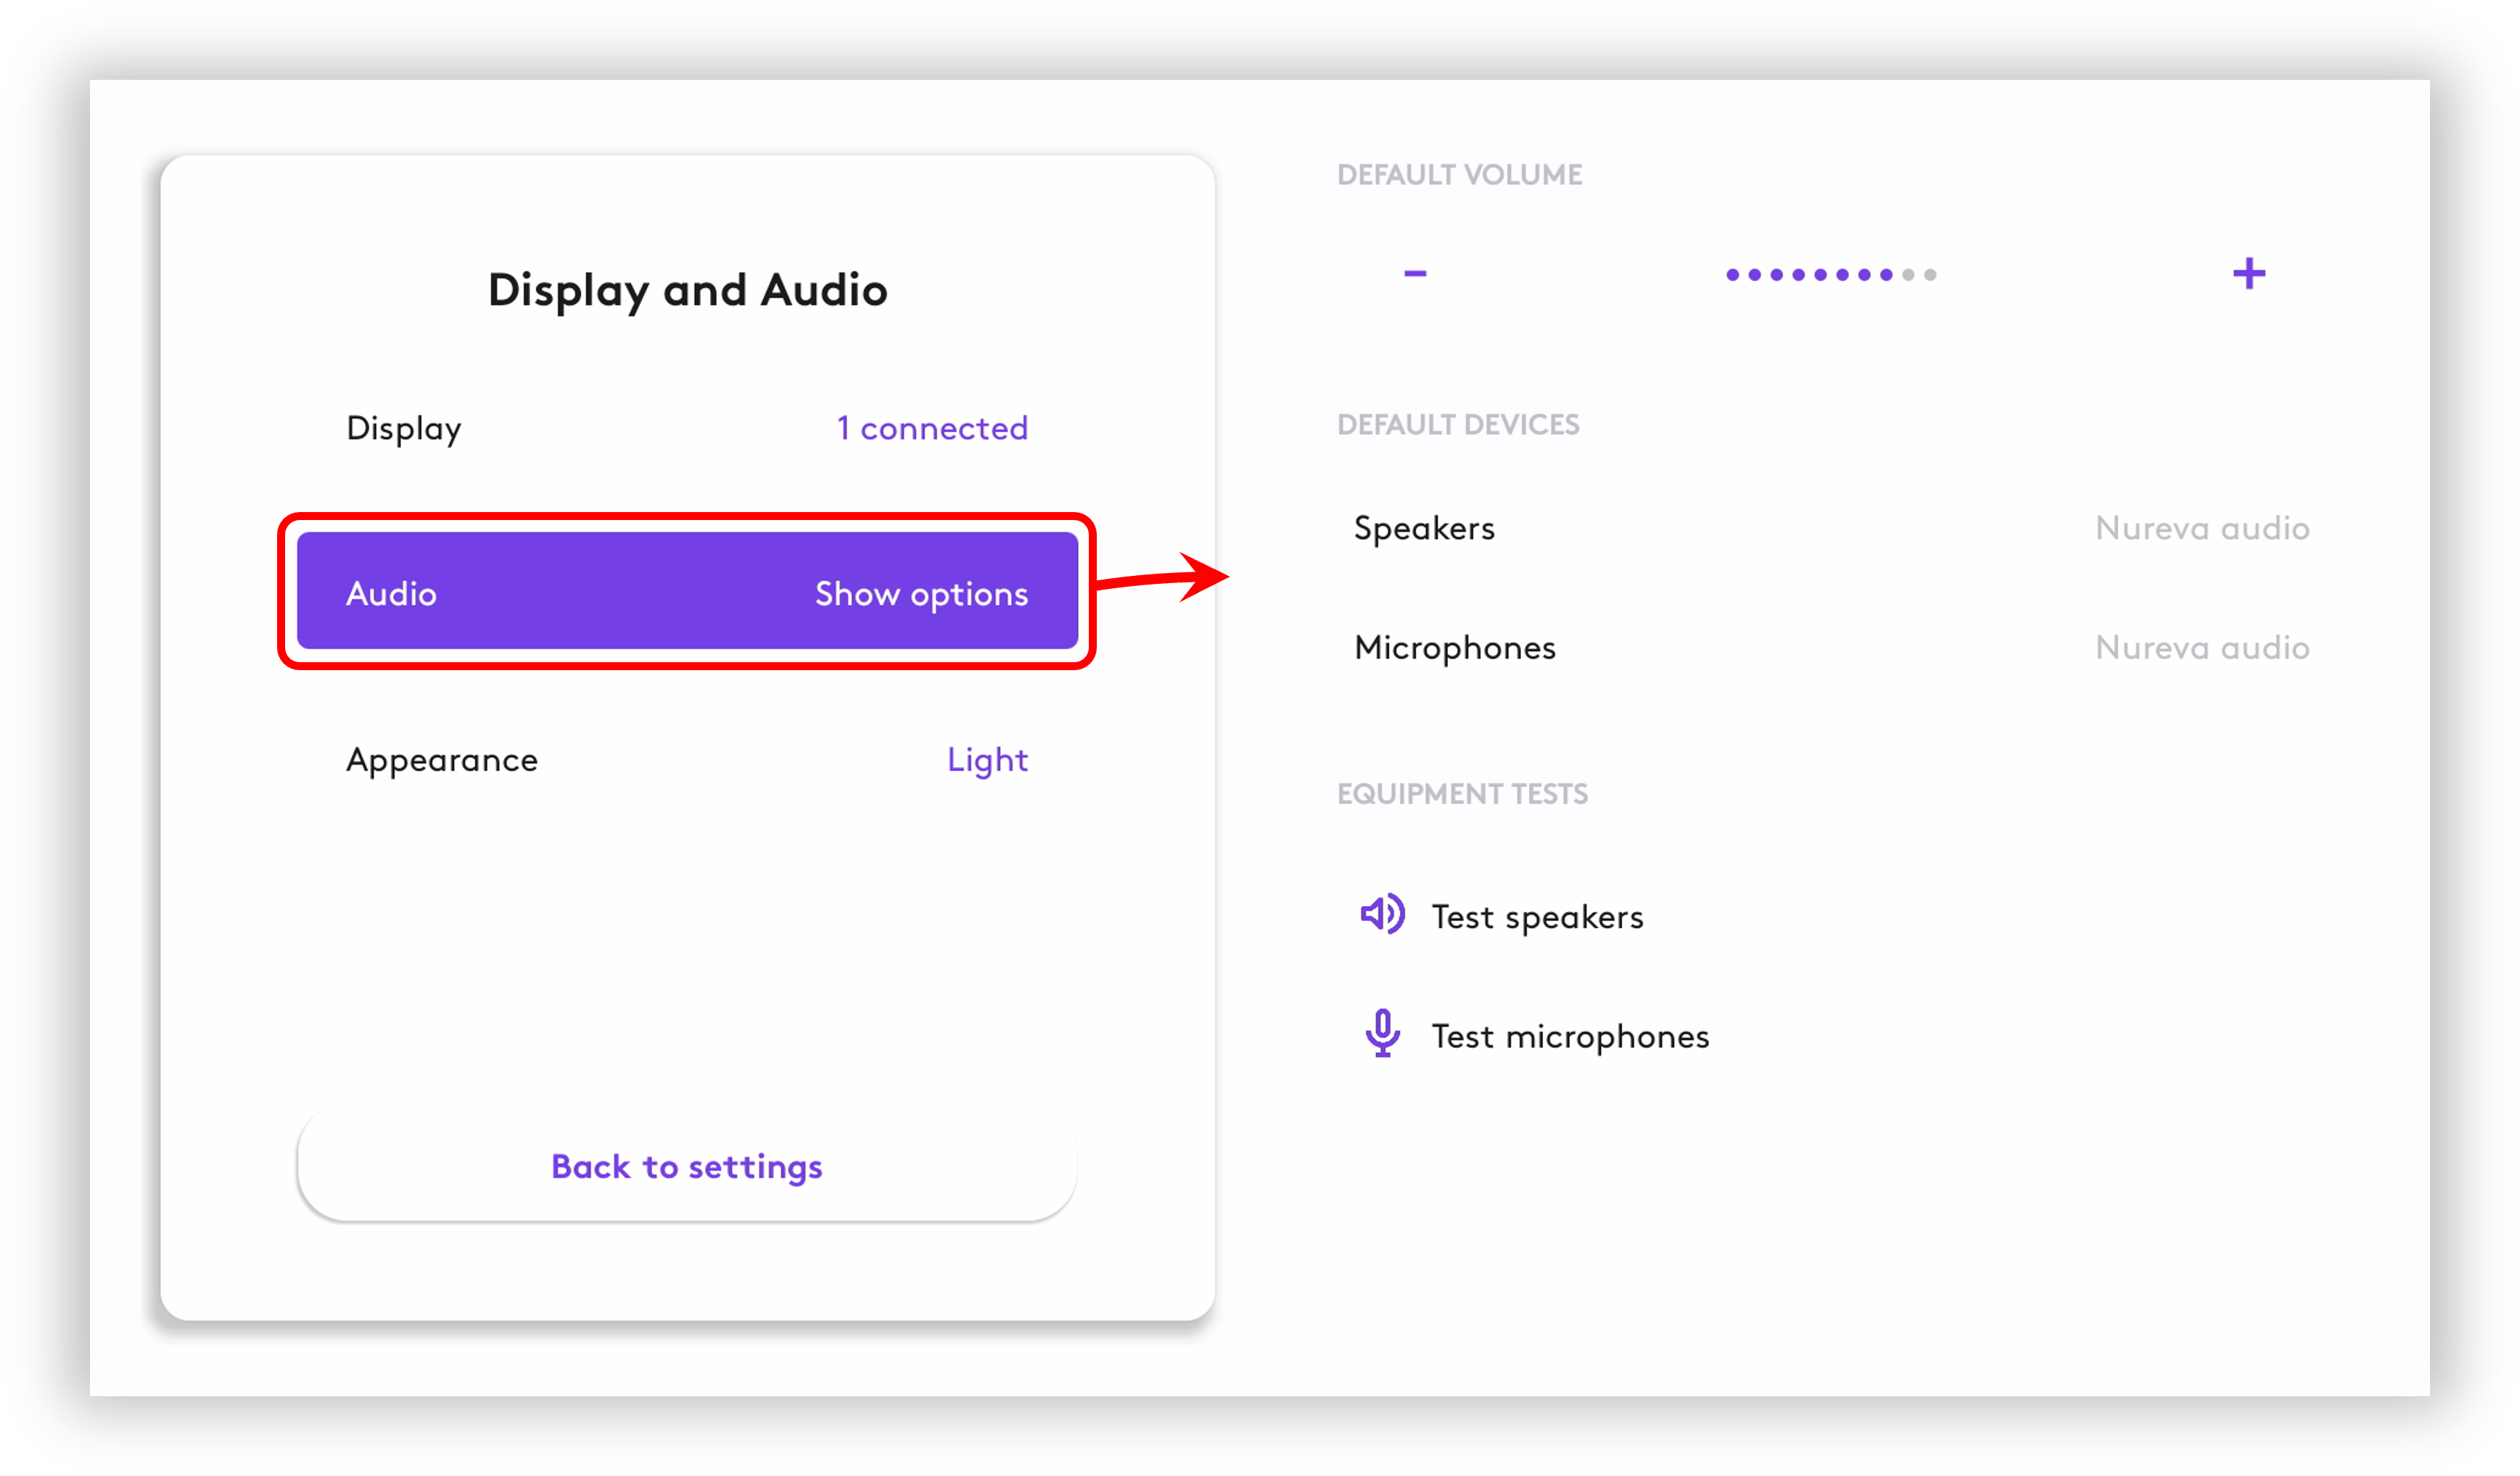
Navigate to the RoomMate system settings > Display and Audio > Audio section:
- Set the default speaker volume
- Ensure the default speakers and microphones are set to HDL200
- Test the speakers and microphones using the equipment test tool at the bottom
- Exit the system settings and return to the conferencing application (e.g. Zoom Rooms, Microsoft Teams Rooms, etc.)
- If applicable, set the HDL200 as the default speaker and microphone device inside the conferencing application
- The HDL200 and RoomMate are ready to be used
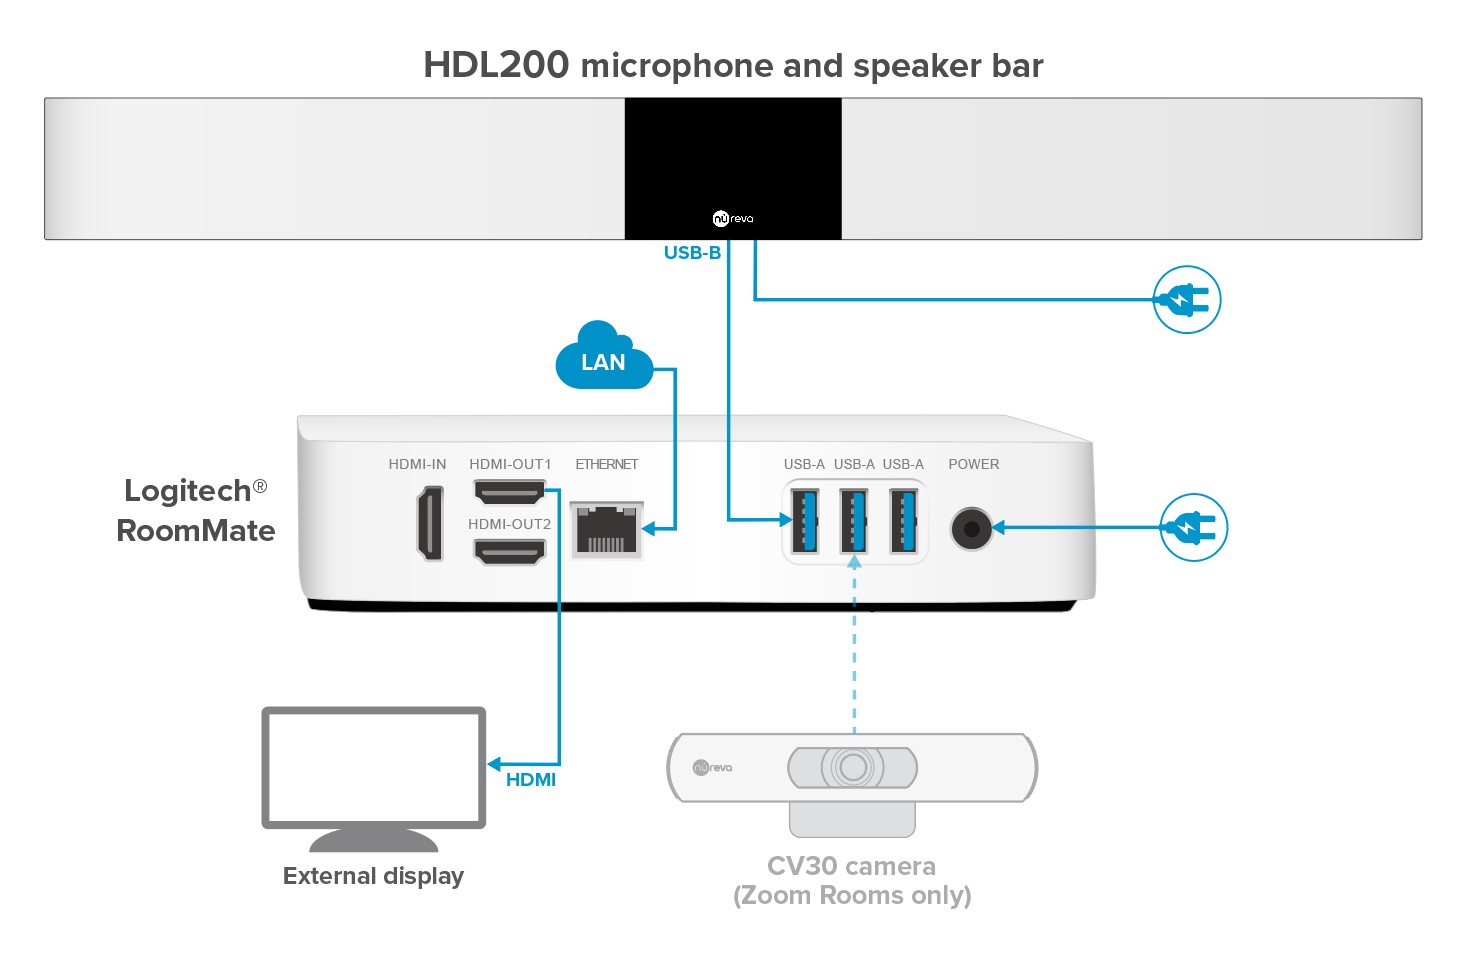
Connection diagram
HDL300
Follow the steps below to integrate an HDL300 system with a Logitech RoomMate.
On the HDL300
- Connect the microphone and speaker bar to the RJ45-1 port on the connect module using the provided Ethernet cable
- Plug in the 54VDC power supply to the back of the connect module
- Connect a Windows® or macOS® computer using a USB-A to USB-B cable
- Ensure the microphone and speaker bar is securely mounted to the wall or mobile stand
-
Download and run Nureva Console client
- Follow the on-screen instructions and install any firmware updates
- Navigate to Settings and adjust the settings as needed
- Recalibrate the system for the best HDL300 experience
- Exit Nureva Console client and disconnect the USB-A connection from the computer
On the Logitech RoomMate
- Ensure the Logitech RoomMate is using the latest firmware (version 1.7.202 or newer)
- Connect the HDL300 cable to any USB-A port on the Logitech RoomMate
-
Navigate to the RoomMate system settings > Display and Audio > Audio section
- Set the default speaker volume
- Ensure the default speakers and microphones are set to HDL300
- Test the speakers and microphones using the equipment test tool at the bottom
- Exit the system settings and return to the conferencing application (e.g. Zoom Rooms, Microsoft Teams Rooms, etc.)
- If applicable, set the HDL300 as the default speaker and microphone device inside the conferencing application
- The HDL300 and RoomMate are ready to be used
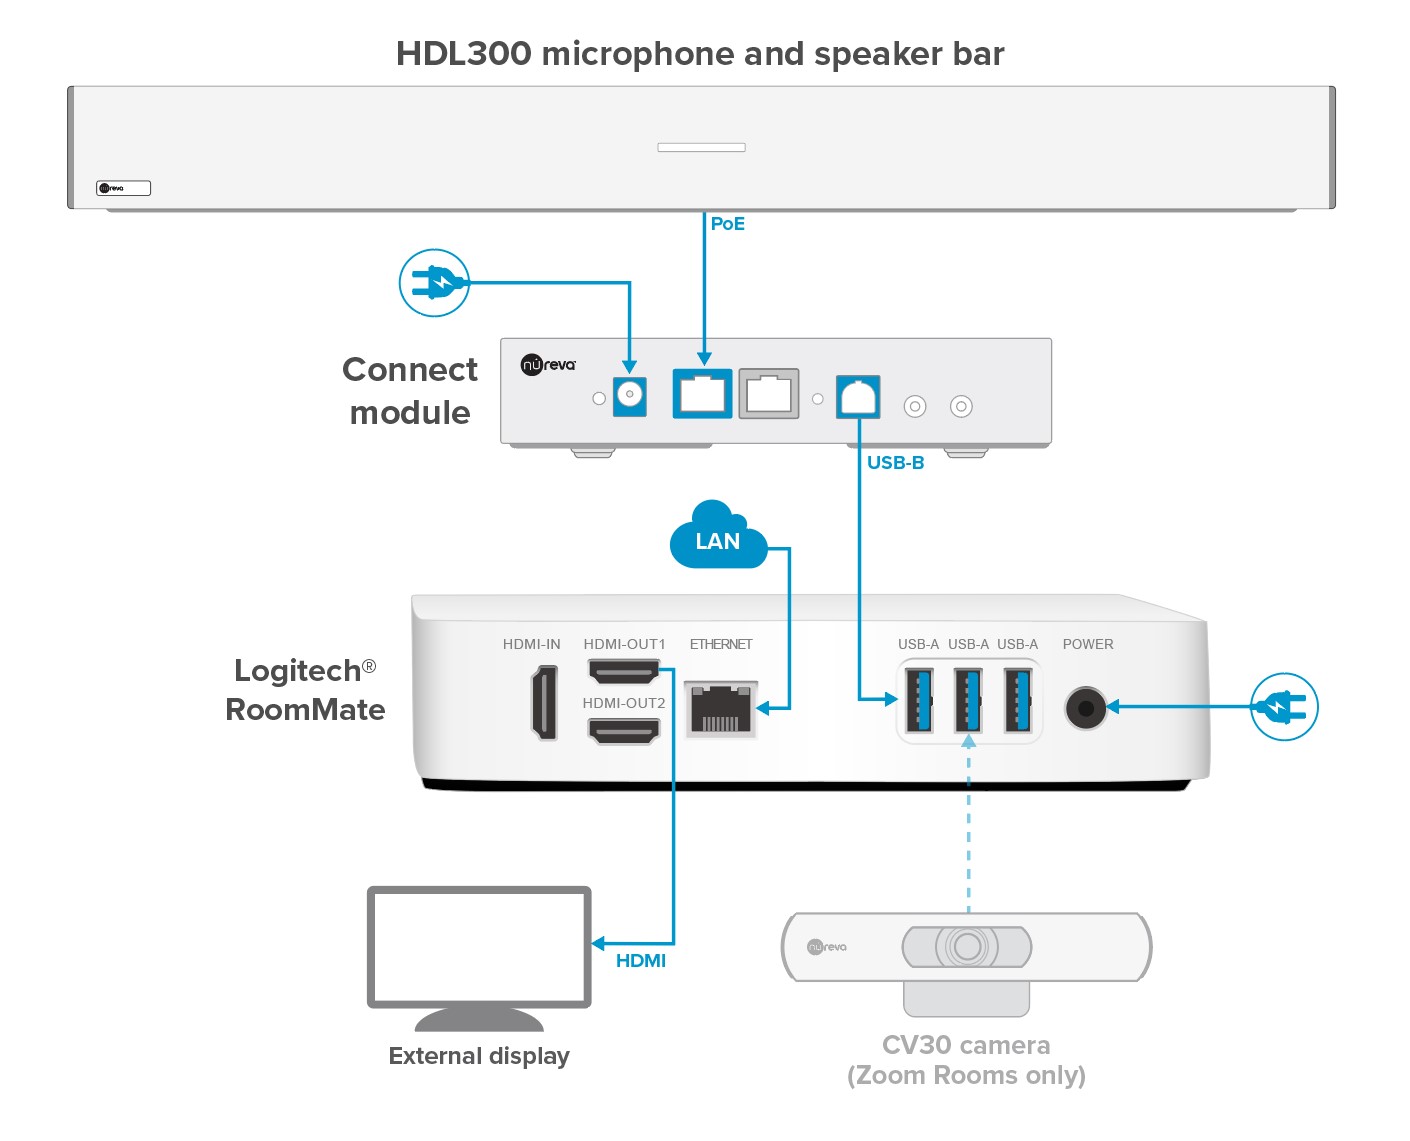
Connection diagram
Dual HDL300
Follow the steps below to integrate a Dual HDL300 system with a Logitech RoomMate.
On the Dual HDL300
- Connect all microphone and speaker bars to the RJ45 ports on the connect module using the provided Ethernet cables
- Plug in the 54VDC power supply to the back of the connect module
- Connect a Windows® or macOS® computer using a USB-A to USB-B cable
- Ensure both microphone and speaker bars are securely mounted to a wall or mobile stand
- Download and run Nureva Console client
- Follow the on-screen instructions and install any firmware updates
- Navigate to Settings and adjust the settings as needed
- Recalibrate the system for the best HDL300 experience
- Exit Nureva Console client and disconnect the USB-A connection from the computer
On the Logitech RoomMate
- Ensure the Logitech RoomMate is using the latest firmware (version 1.7.202 or newer)
- Connect the USB cable from the Dual HDL300 to any USB-A port on the Logitech RoomMate
- Navigate to the RoomMate system settings > Display and Audio > Audio section
- Set the default speaker volume
- Ensure the default speakers and microphones are set to Dual HDL300
- Test the speakers and microphones using the equipment test tool at the bottom
- Exit the system settings and return to the conferencing application (e.g. Zoom Rooms, Microsoft Teams Rooms, etc.)
- If applicable, set the Dual HDL300 as the default speaker and microphone device inside the conferencing application
- The Dual HDL300 system and RoomMate are ready to be used
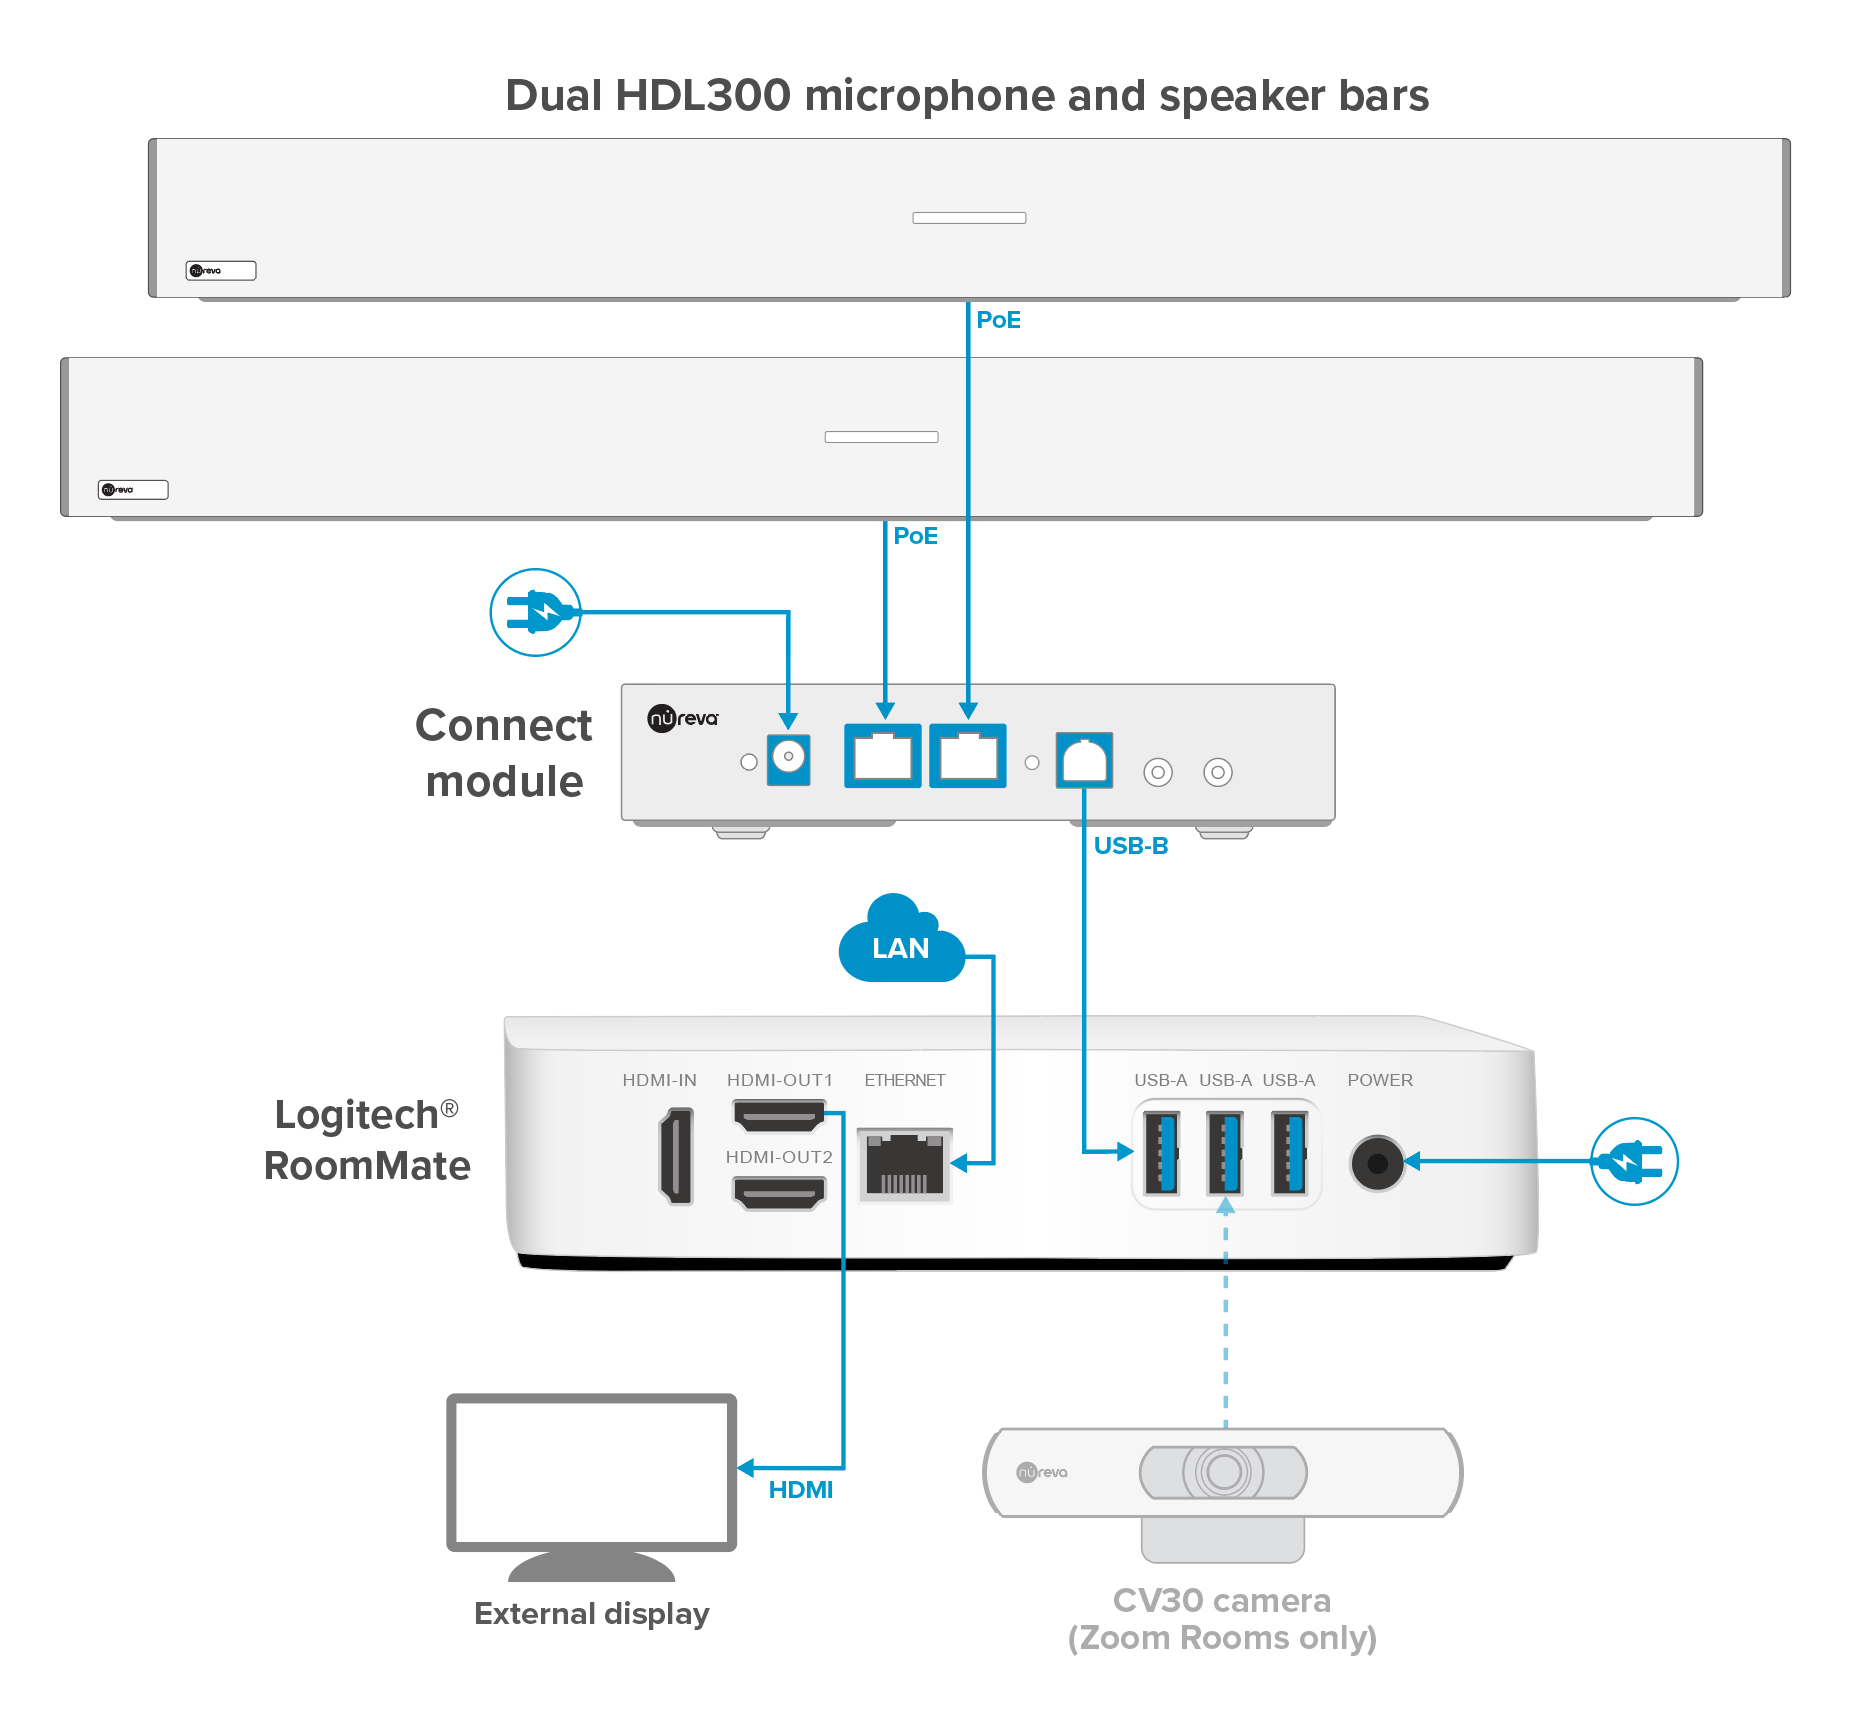
Connection diagram
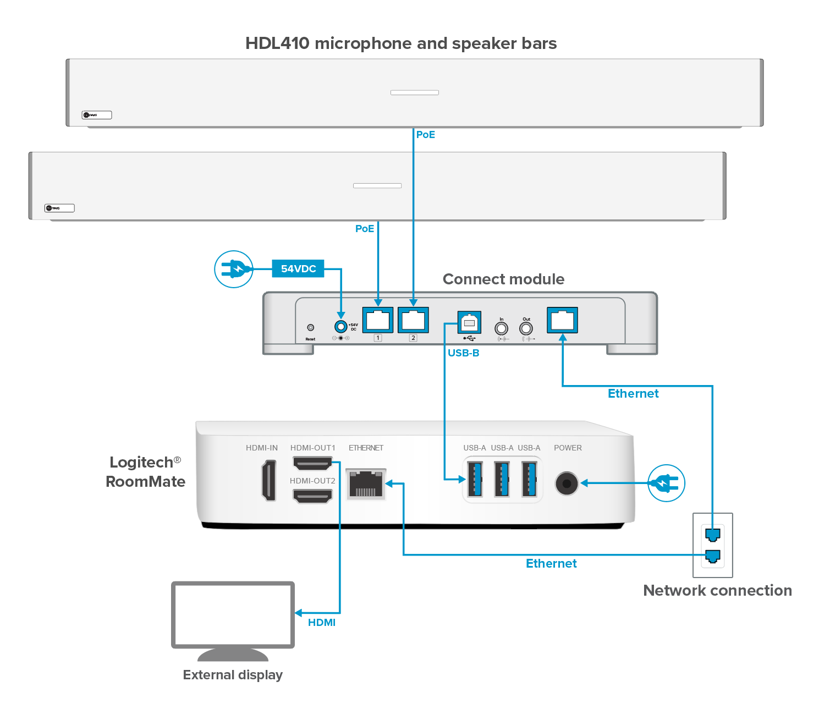
HDL410
Follow the steps below to integrate an HDL410 system with a Logitech RoomMate.
On the HDL410
- Ensure both microphone and speaker bars are securely mounted to a wall or mobile stand
- Connect the microphone and speaker bars to the RJ45-1 and RJ45-2 ports on the connect module with the provided Ethernet cables
- Connect an Ethernet cable from the LAN port on the connect module to the local network
- Plug in the 54VDC power supply to the back of the connect module
- Complete the Getting started steps
- From Nureva Console cloud navigate to Settings
- Adjust the Speaker settings as needed
- Recalibrate the system for the best HDL410 experience
On the Logitech RoomMate
- Ensure the Logitech RoomMate is using the latest firmware (version 1.7.202 or newer)
- Connect the USB cable from the HDL410 cable to any USB-A port on the Logitech RoomMate
- Navigate to the RoomMate system settings > Display and Audio > Audio section:
- Set the default speaker volume
- Ensure the default speakers and microphones are set to Nureva audio
- Test the speakers and microphones using the equipment test tool at the bottom
- Exit the system settings and return to the conferencing application (e.g. Zoom Rooms, Microsoft Teams Rooms, etc.)
- If applicable, set “Nureva audio” as the default speaker and microphone device inside the conferencing application
- The HDL410 system and RoomMate are ready to be used
 Delete
NOTE: The technical information provided in this article, including specifications and recommendations, is provided for customer convenience. The accuracy of this information is not guaranteed and is subject to change without notice. Please check the user manuals and related documentation from each product manufacturer to ensure that your setup meets the proper recommendations.