The HDL200, HDL300 and Dual HDL300 systems are compatible and formally certified with the Barco ClickShare CX series. |
 |
To get started, choose your Nureva audio conferencing system and Barco ClickShare system from the combinations below.
HDL200 system
Barco ClickShare CX-20
Begin with setting up your HDL200 by following the steps in the getting started guide:
On the Barco ClickShare CX-20 unit
- Connect the USB cable from your HDL200 system to the front USB-C port of the CX-20 unit
- Connect an HDMI cable to the in-room display
To use the system
- Insert the ClickShare Button into a USB port on your laptop as part of the BYOM
- Start the wireless audio/video session by clicking the ClickShare Button
- Use the UC&C client of your choice to start a meeting and share your content
NOTE: If you experience lower-than-expected audio output levels on the HDL200, even when the volume setting on your laptop is at its maximum, this is a known issue and will be fixed in an upcoming firmware update for the Barco ClickShare.
Connection diagram

Barco ClickShare CX-30 Gen1
Begin with setting up your HDL200 by following the steps in the getting started guide:
On the Barco ClickShare CX-30 Gen1 unit
- Connect the USB cable from your HDL200 system to the front USB-C port of the CX-30 unit
- You will need a USB-A to USB-C adapter
- Connect an HDMI cable to the in-room display
To use the system
- Insert the ClickShare Button into a USB port on your laptop as part of the BYOM
- Start the wireless audio/video session by clicking the ClickShare Button
- Use the UC&C client of your choice to start a meeting and share your content
NOTE: If you experience lower-than-expected audio output levels on the HDL200, even when the volume setting on your laptop is at its maximum, this is a known issue and will be fixed in an upcoming firmware update for the Barco ClickShare.
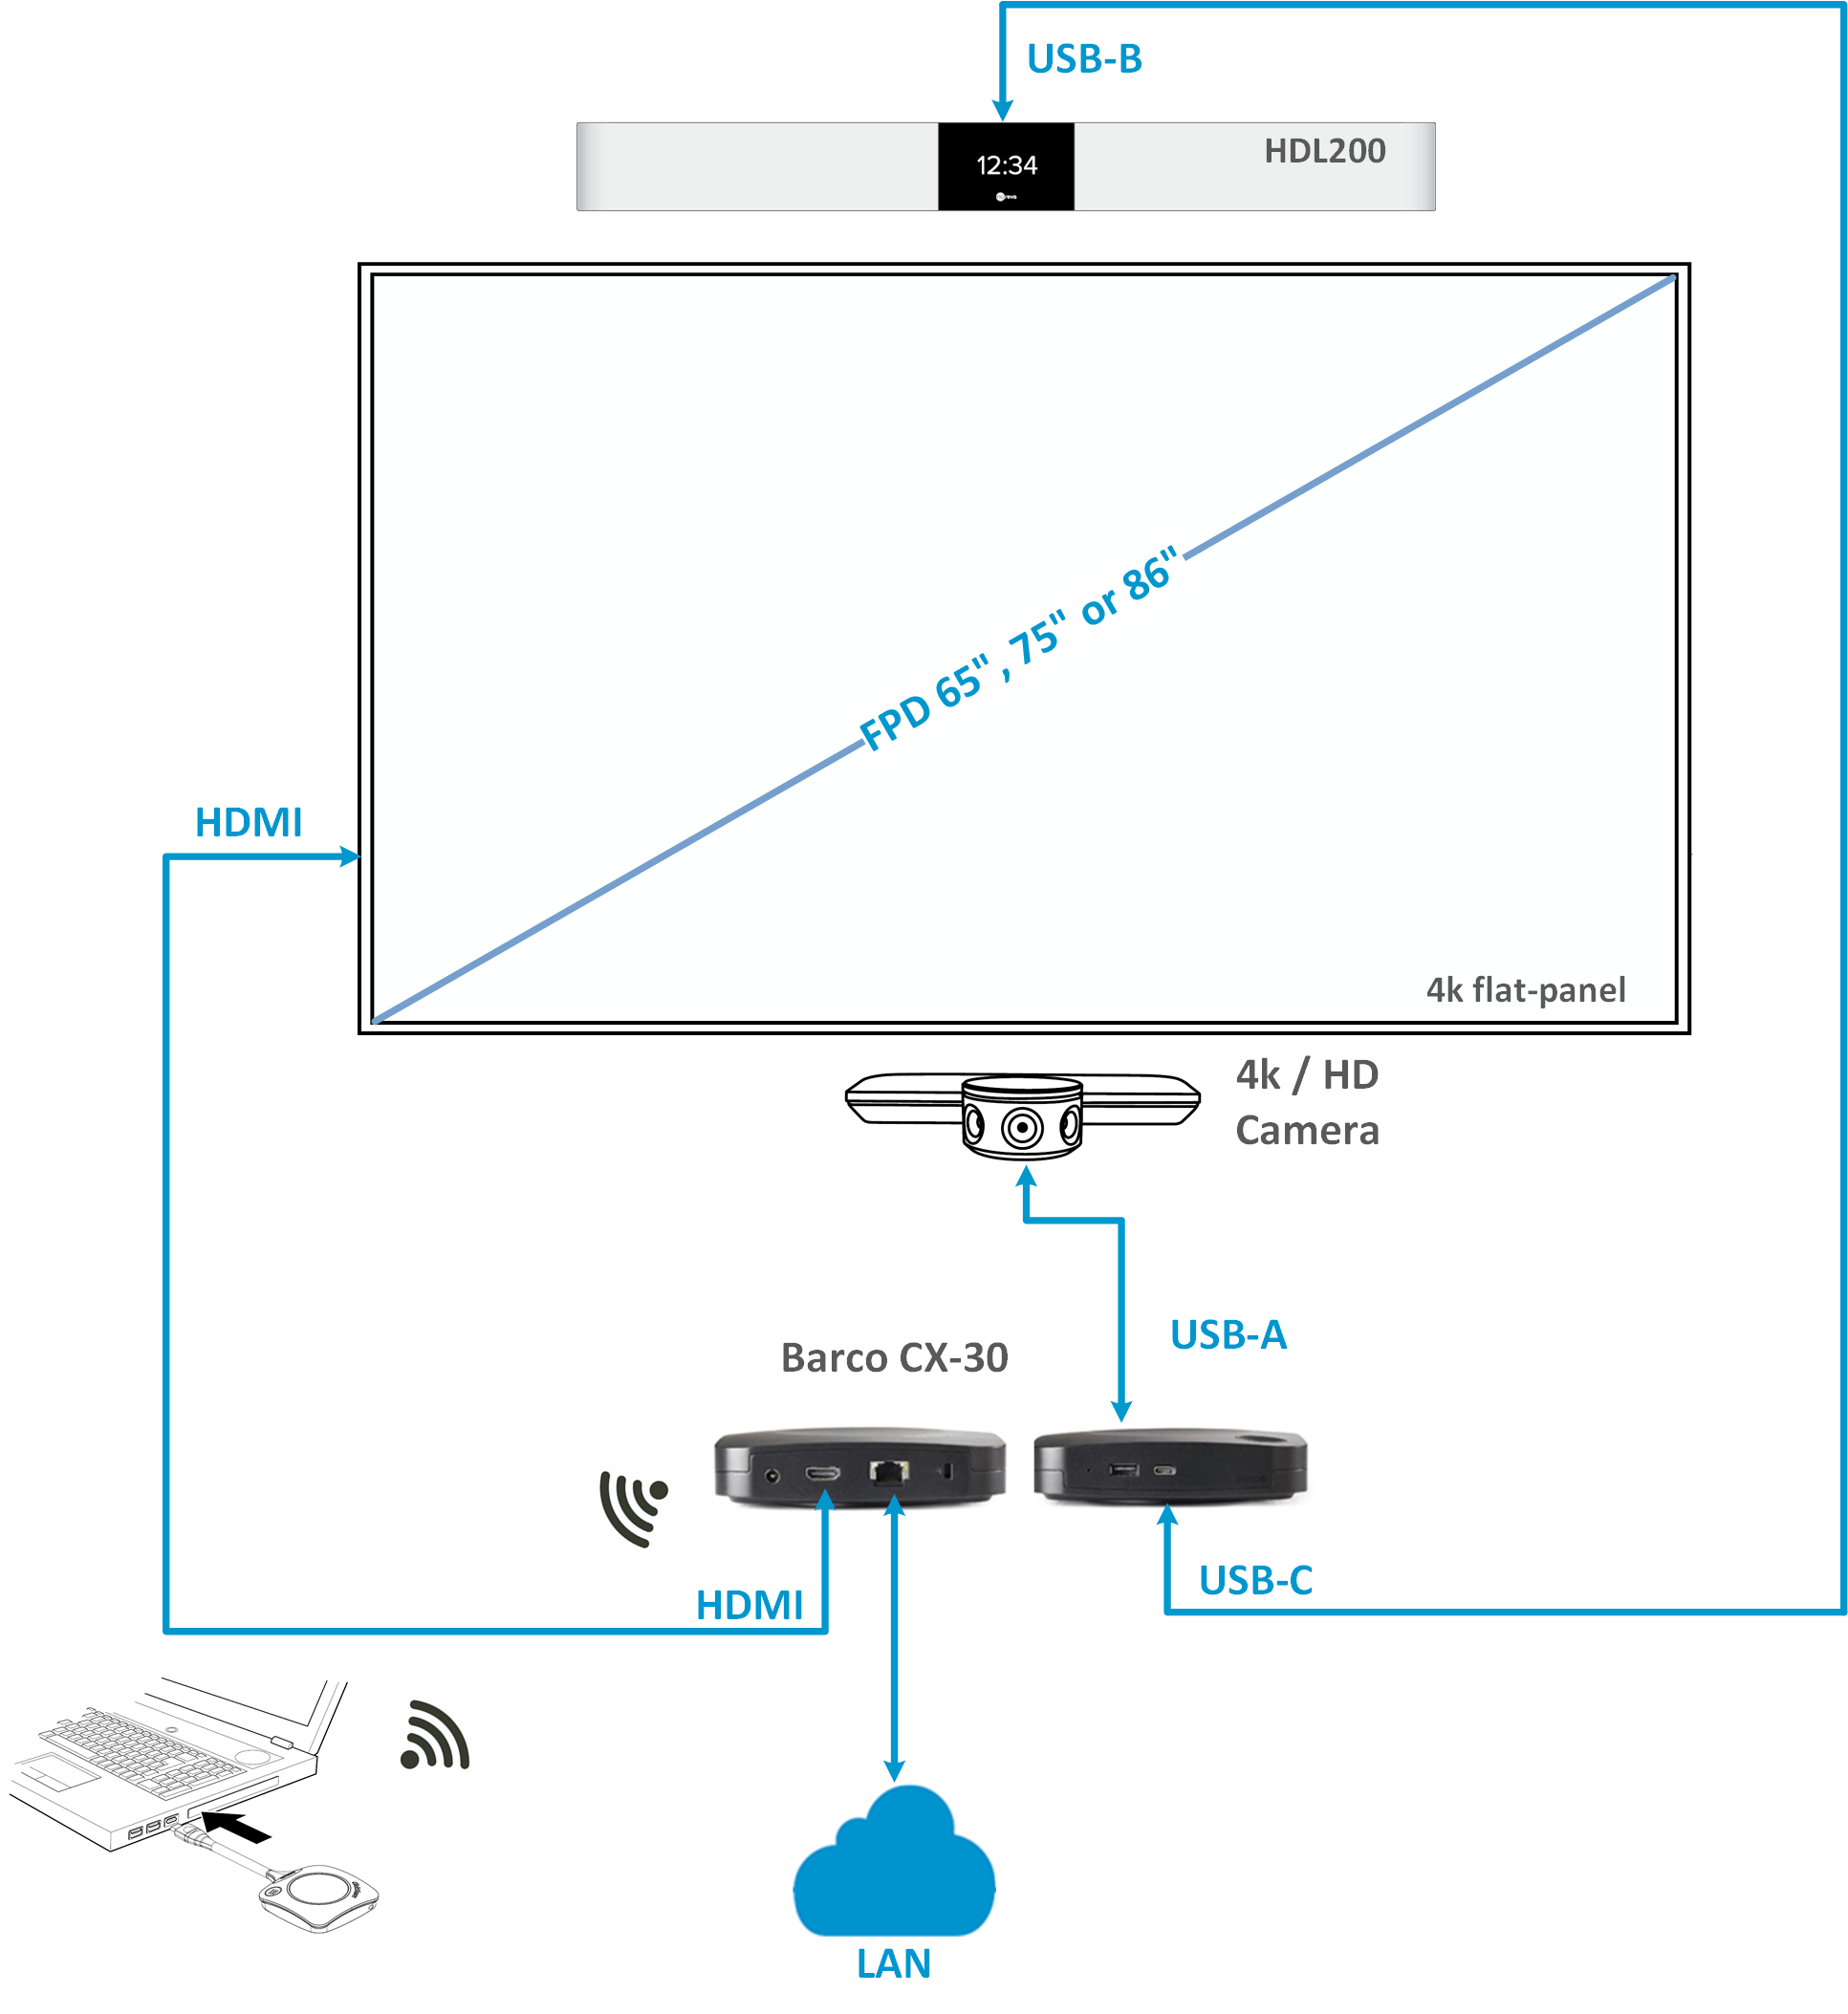
Connection diagram

Barco ClickShare CX-30 Gen2
Begin with setting up your HDL200 by following the steps in the getting started guide:
On the Barco ClickShare CX-30 Gen2 unit
- Connect the USB cable from your HDL200 system to the front USB-C port of the CX-30 Gen2 unit
- The front USB-A port also be used
- You will need a USB-A to USB-C adapter
- Connect an HDMI cable to the in-room display
To use the system
- Insert the ClickShare Button into a USB port on your laptop as part of the BYOM
- Start the wireless audio/video session by clicking the ClickShare Button
- Use the UC&C client of your choice to start a meeting and share your content
NOTE: If you experience lower-than-expected audio output levels on the HDL200, even when the volume setting on your laptop is at its maximum, this is a known issue and will be fixed in an upcoming firmware update for the Barco ClickShare.
Connection diagram
Barco ClickShare CX-50 Gen1
Begin with setting up your HDL200 by following the steps in the getting started guide:
On the Barco ClickShare CX-50 Gen1 unit
- Connect the USB cable from the HDL200 system's USB-B port to the rear USB-C port of the CX-50 Gen1 unit
- Connect a USB-A cable to the in-room camera
- Connect an HDMI cable to the in-room display
To use the system
- Insert the ClickShare Button into a USB port on your laptop as part of the BYOM
- Start the wireless audio/video session by clicking the ClickShare Button
- Use the UC&C client of your choice to start a meeting and share your content
NOTE: If you experience lower-than-expected audio output levels on the HDL200, even when the volume setting on your laptop is at its maximum, this is a known issue and will be fixed in an upcoming firmware update for the Barco ClickShare.
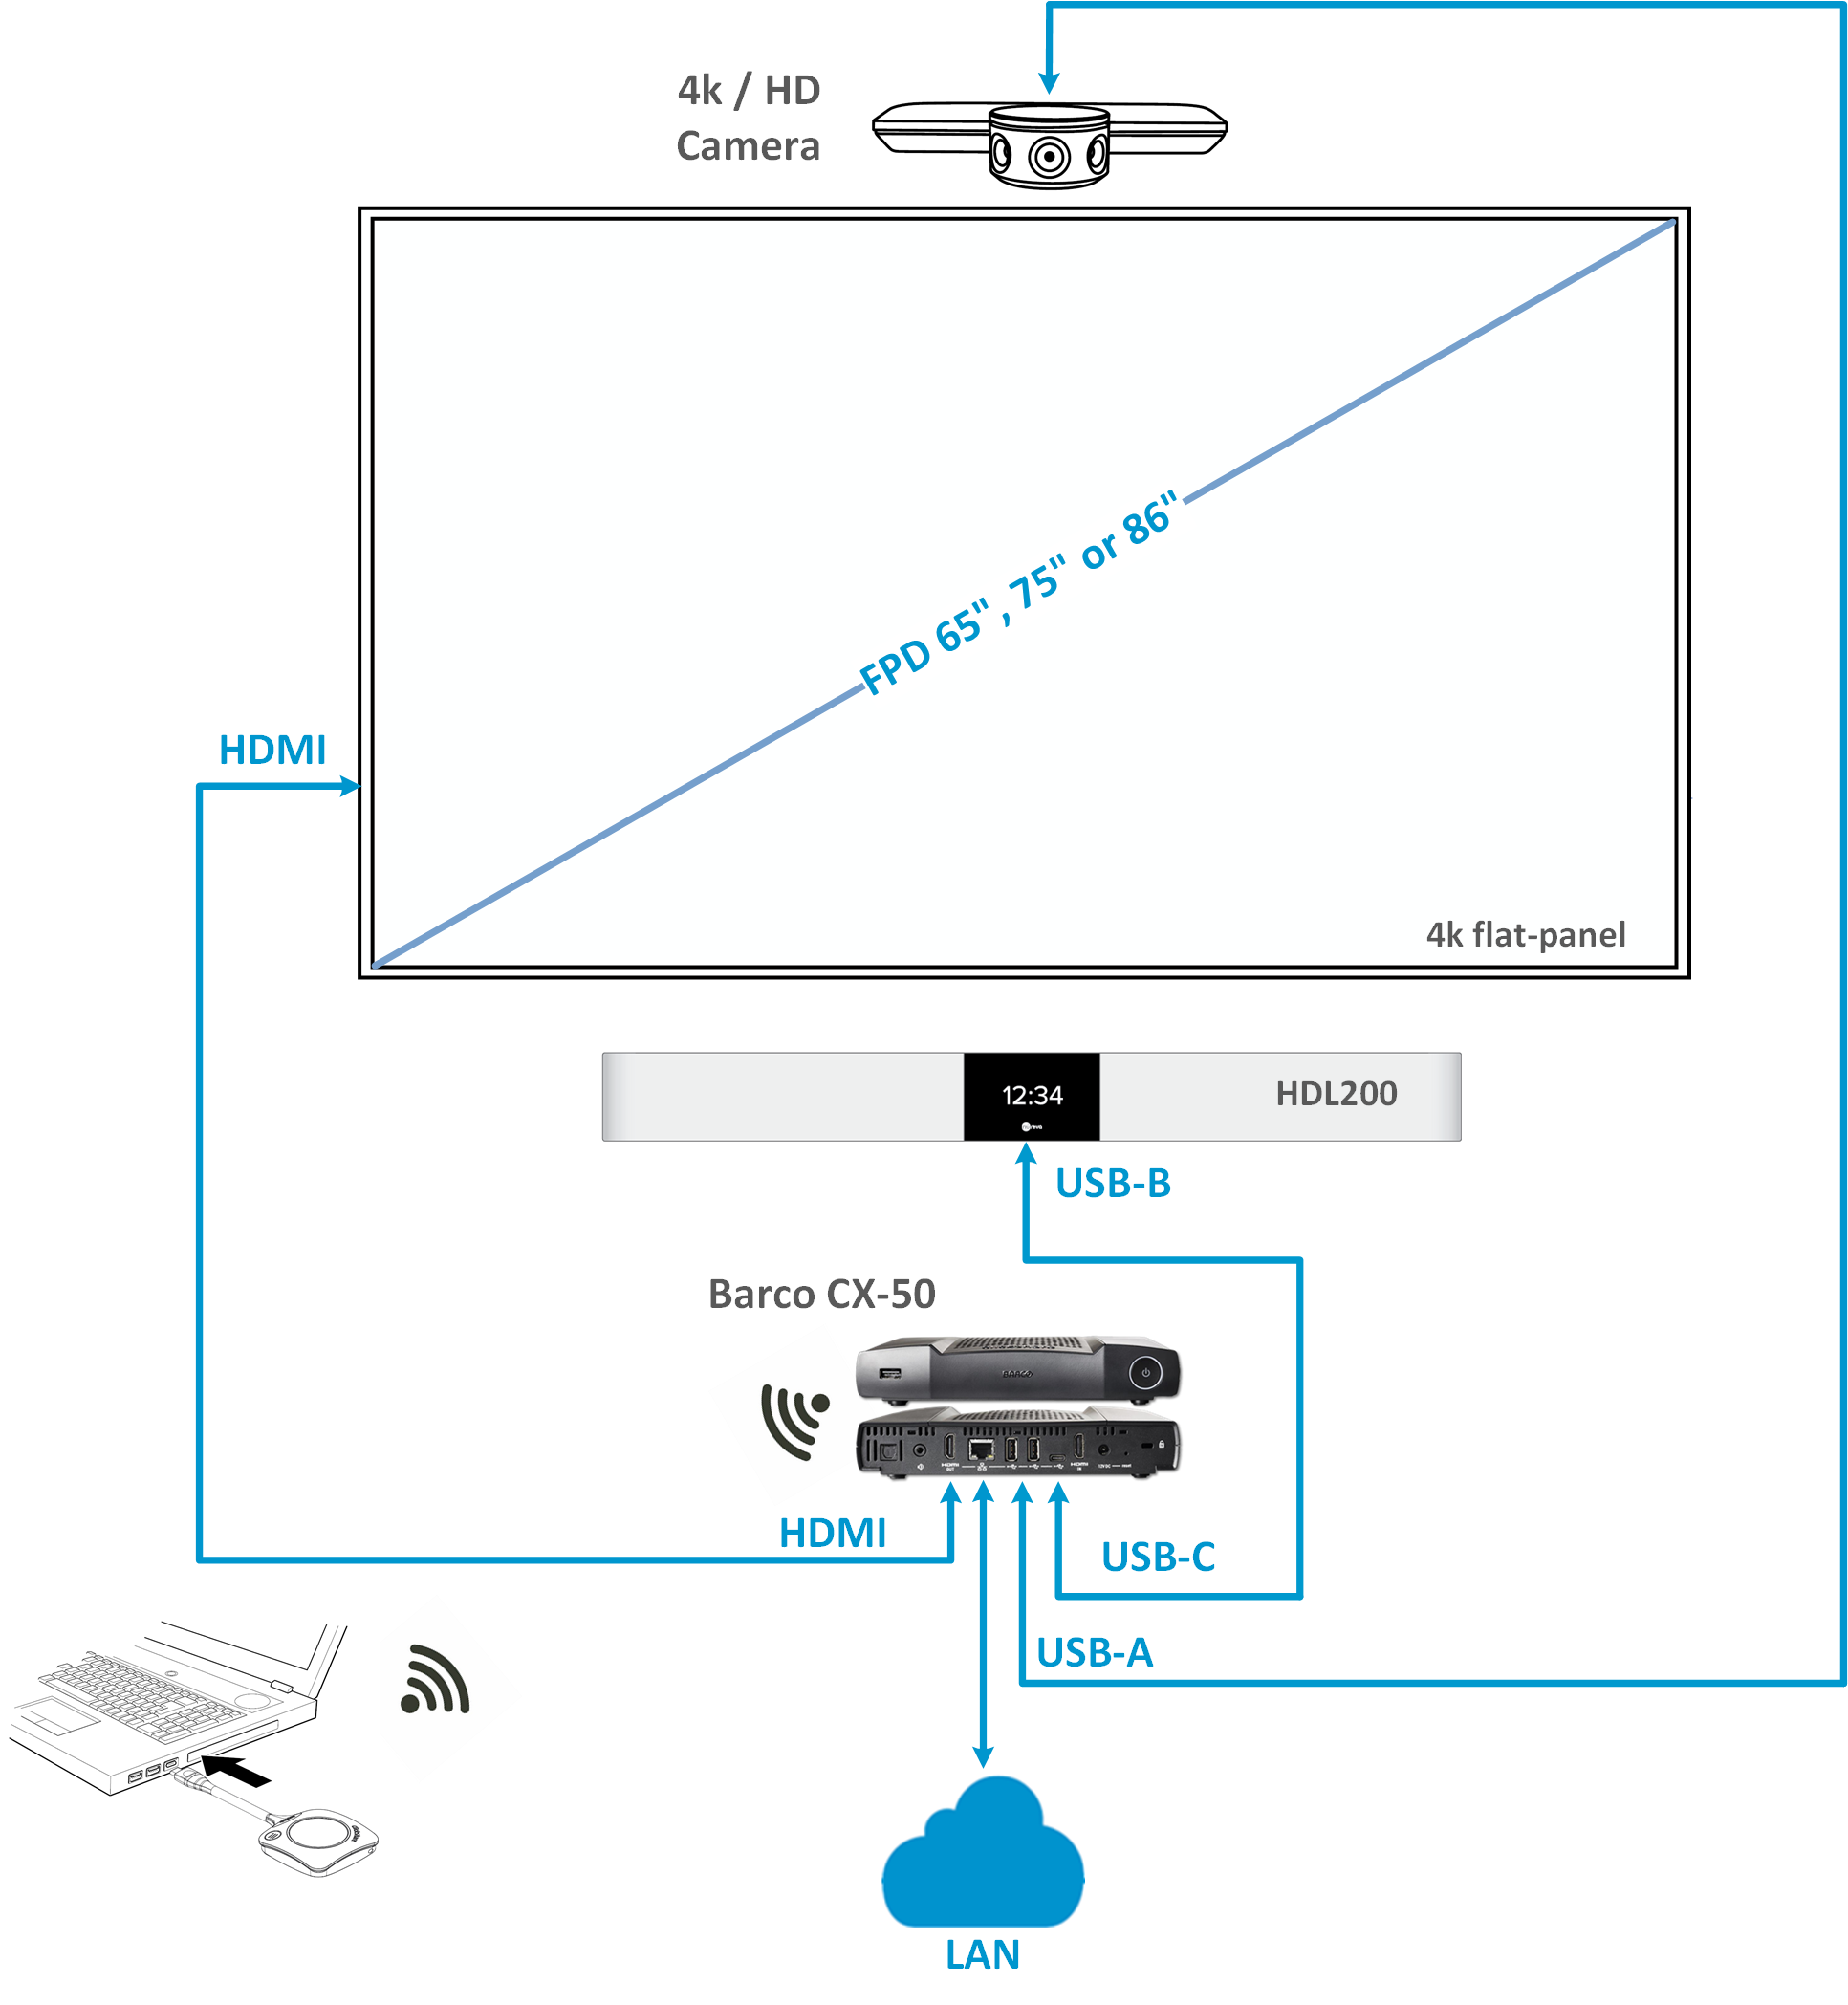
Connection diagram

Barco ClickShare CX-50 Gen2
Begin with setting up your HDL200 by following the steps in the getting started guide:
On the Barco ClickShare CX-50 Gen2 unit
- Connect the USB cable from your HDL200 system to a USB-C port on the rear of the CX-50 Gen2 unit
- Learn about USB-C compatibility with Nureva audio devices
- Connect a USB cable to the in-room camera
- Connect an HDMI cable to the in-room display
To use the system
- Insert the ClickShare Button into a USB port on your laptop as part of the BYOM
- Start the wireless audio/video session by clicking the ClickShare Button
- Use the UC&C client of your choice to start a meeting and share your content
Connection diagram
HDL300 and Dual HDL300 systems
Barco ClickShare CX-20
Begin with setting up your HDL300 or Dual HDL300 system by following the steps in the getting started guide:
On the Barco ClickShare CX-20 unit
- Connect the USB cable from your HDL300 or Dual HDL300's connect module to the front USB-A port of the CX-20 unit
- Connect an HDMI cable to the in-room display
To use the system
- Insert the ClickShare Button into a USB port on your laptop as part of the BYOM
- Start the wireless audio/video session by clicking the ClickShare Button
- Use the UC&C client of your choice to start a meeting and share your content
NOTE: When in a call, you can control the Audio volume or Mute from your laptop - there is no need to use the remote control.
Connection diagram

Barco ClickShare CX-30 Gen1
Begin with setting up your HDL300 or Dual HDL300 system by following the steps in the getting started guide:
On the Barco ClickShare CX-30 Gen1 unit
- Connect the USB cable from your HDL300 or Dual HDL300's connect module to the front USB-C port of the CX-30 Gen1 unit
- You will need a USB-A to USB-C adapter
- Connect an HDMI cable to the in-room display
To use the system
- Insert the ClickShare Button into a USB port on your laptop as part of the BYOM
- Start the wireless audio/video session by clicking the ClickShare Button
- Use the UC&C client of your choice to start a meeting and share your content
Connection diagram

Barco ClickShare CX-30 Gen2
Begin with setting up your HDL300 or Dual HDL300 system by following the steps in the getting started guide:
On the Barco ClickShare CX-30 Gen2 unit
- Connect the USB cable from your HDL300 or Dual HDL300's connect module to the front USB-A port of the CX-30 Gen2 unit
- The front USB-C port can also be used, but you will need a USB-A to USB-C adapter
- Connect an HDMI cable to the in-room display
To use the system
- Insert the ClickShare Button into a USB port on your laptop as part of the BYOM
- Start the wireless audio/video session by clicking the ClickShare Button
- Use the UC&C client of your choice to start a meeting and share your content
NOTE: When in a call, you can control the Audio volume or Mute from your laptop - there is no need to use the remote control.
Connection diagram
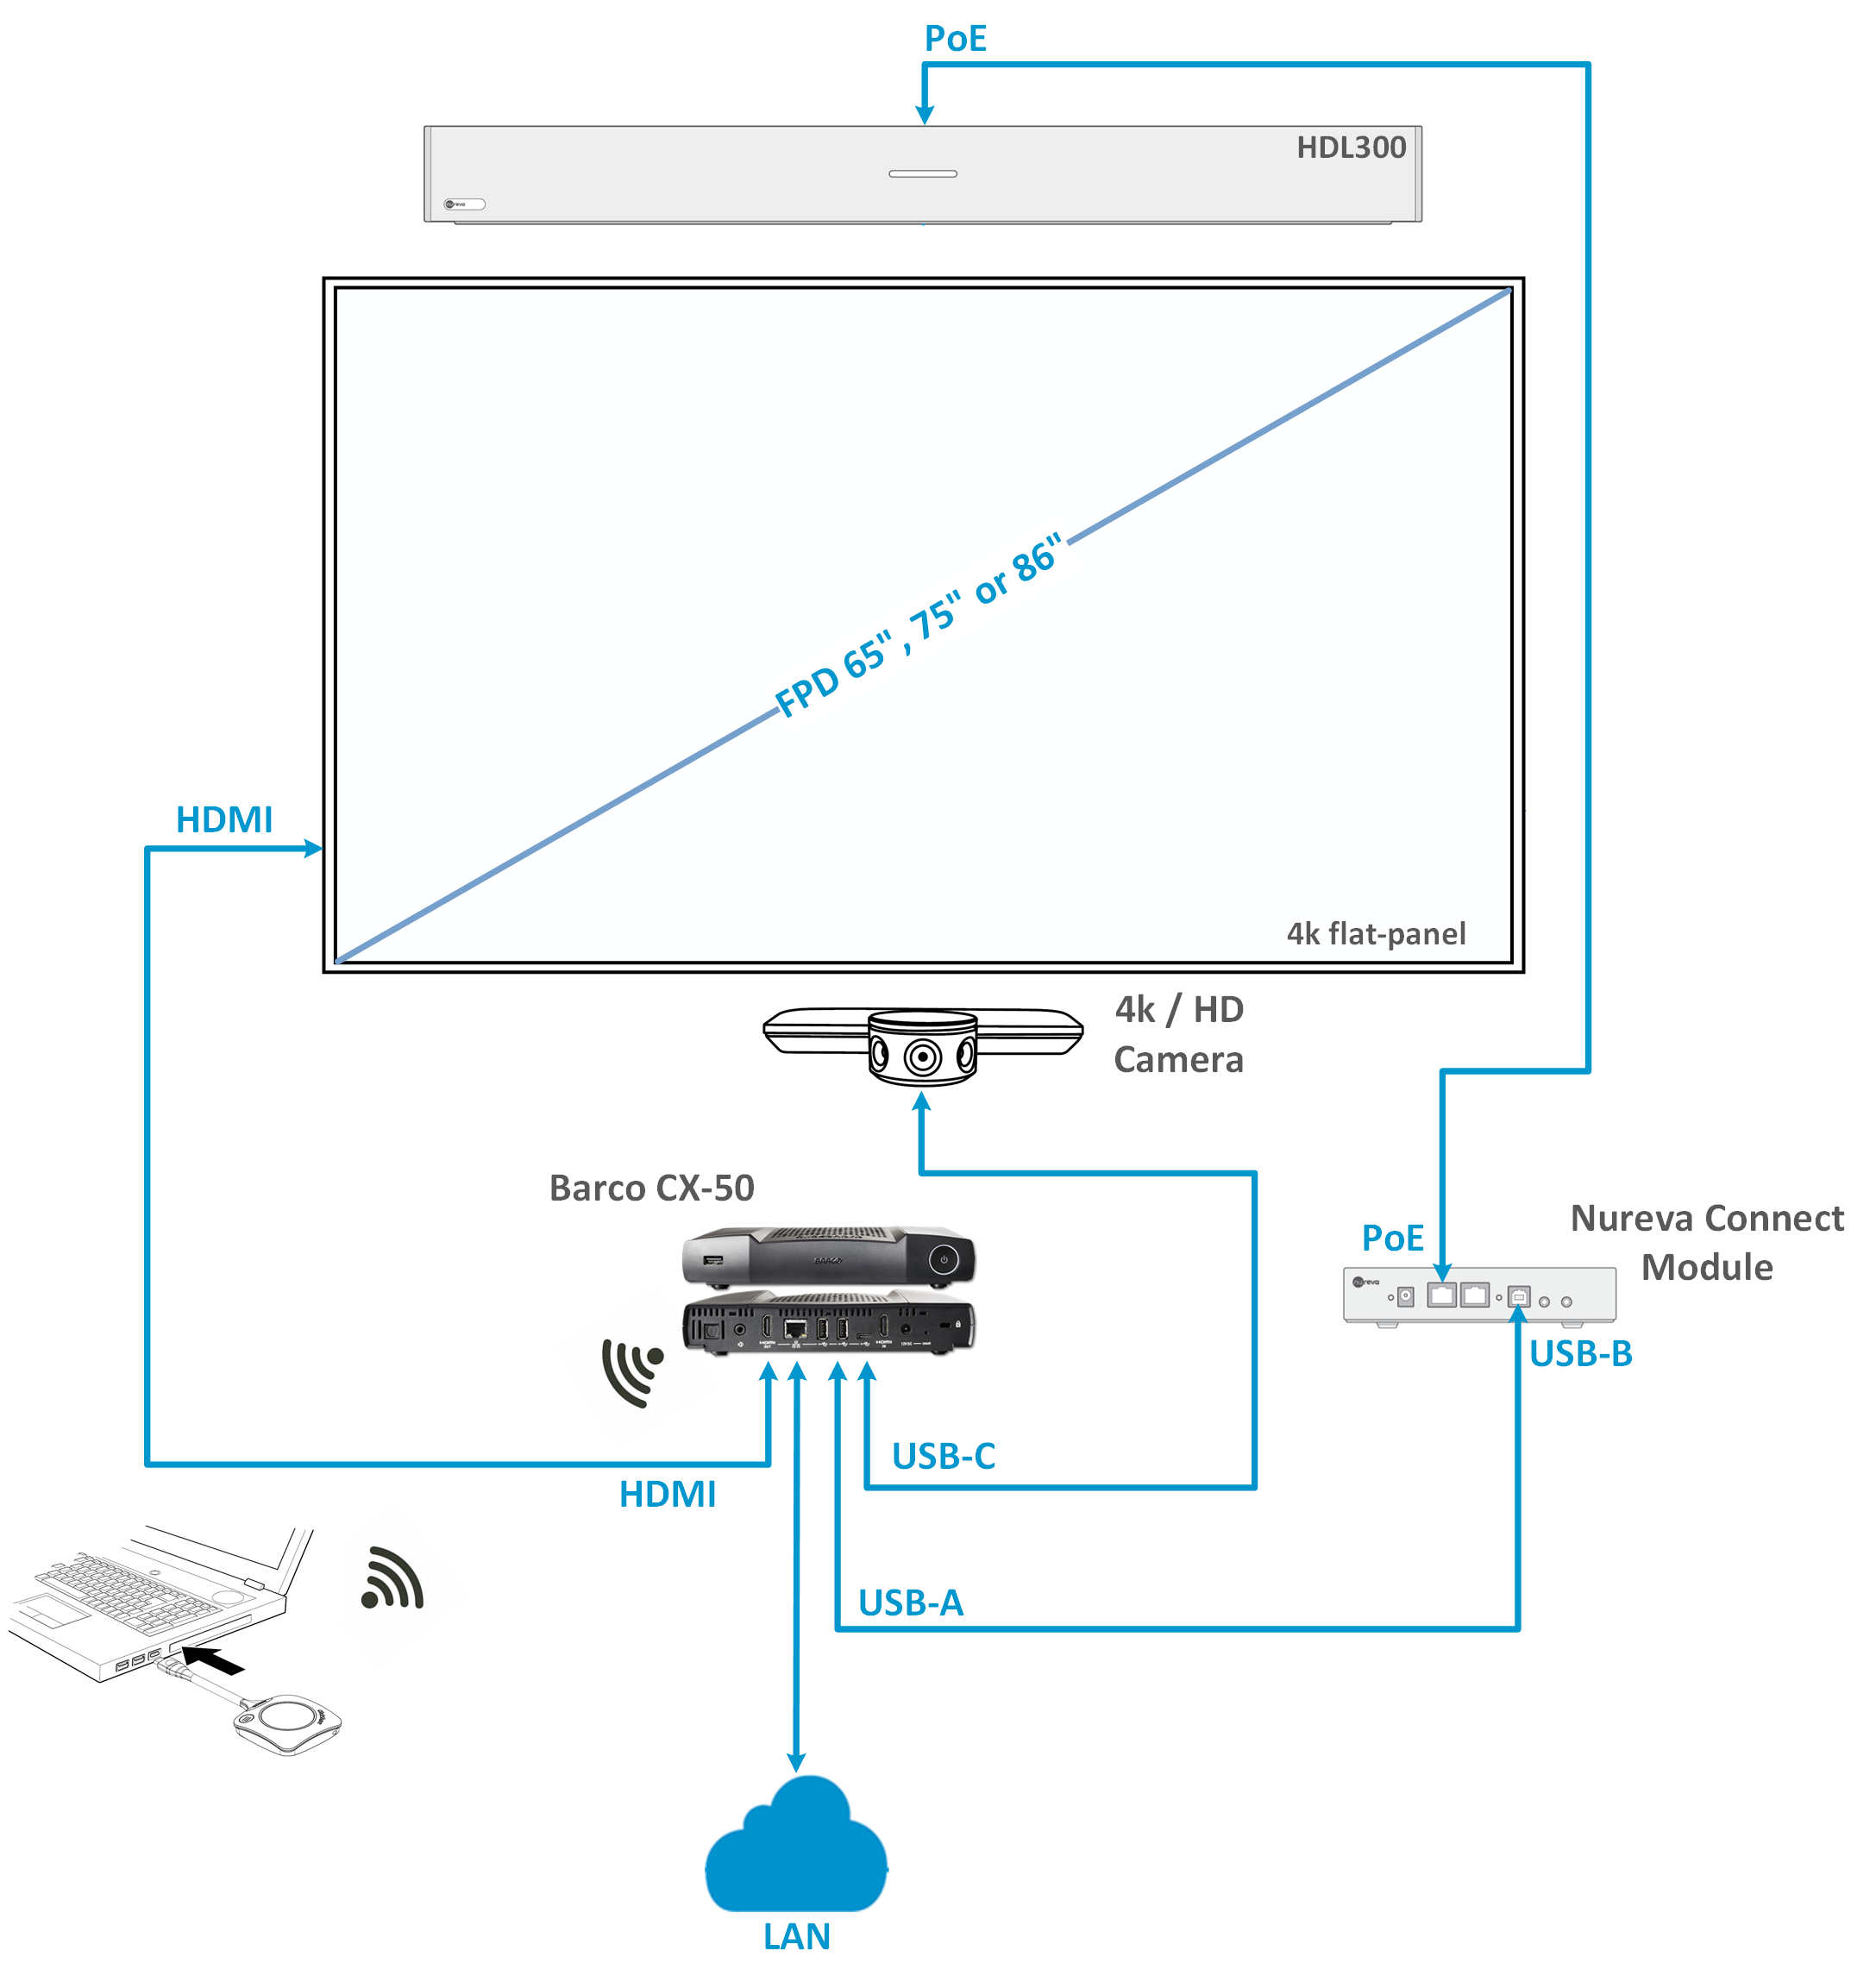
Barco ClickShare CX-50 Gen1
Begin with setting up your HDL300 or Dual HDL300 system by following the steps in the getting started guide:
On the Barco ClickShare CX-50 unit
- Connect the USB cable from the HDL300 or Dual HDL300 system's connect module USB-B port to any of the USB-A ports on the CX-50 Gen1 unit
- Connect a USB-A cable to the in-room camera
- Connect an HDMI cable to the in-room display
To use the system
- Insert the ClickShare Button into a USB port on your laptop as part of the BYOM
- Start the wireless audio/video session by clicking the ClickShare Button
- Use the UC&C client of your choice to start a meeting and share your content
NOTE: When in a call, you can control the Audio volume or Mute from your laptop - there is no need to use the remote control.
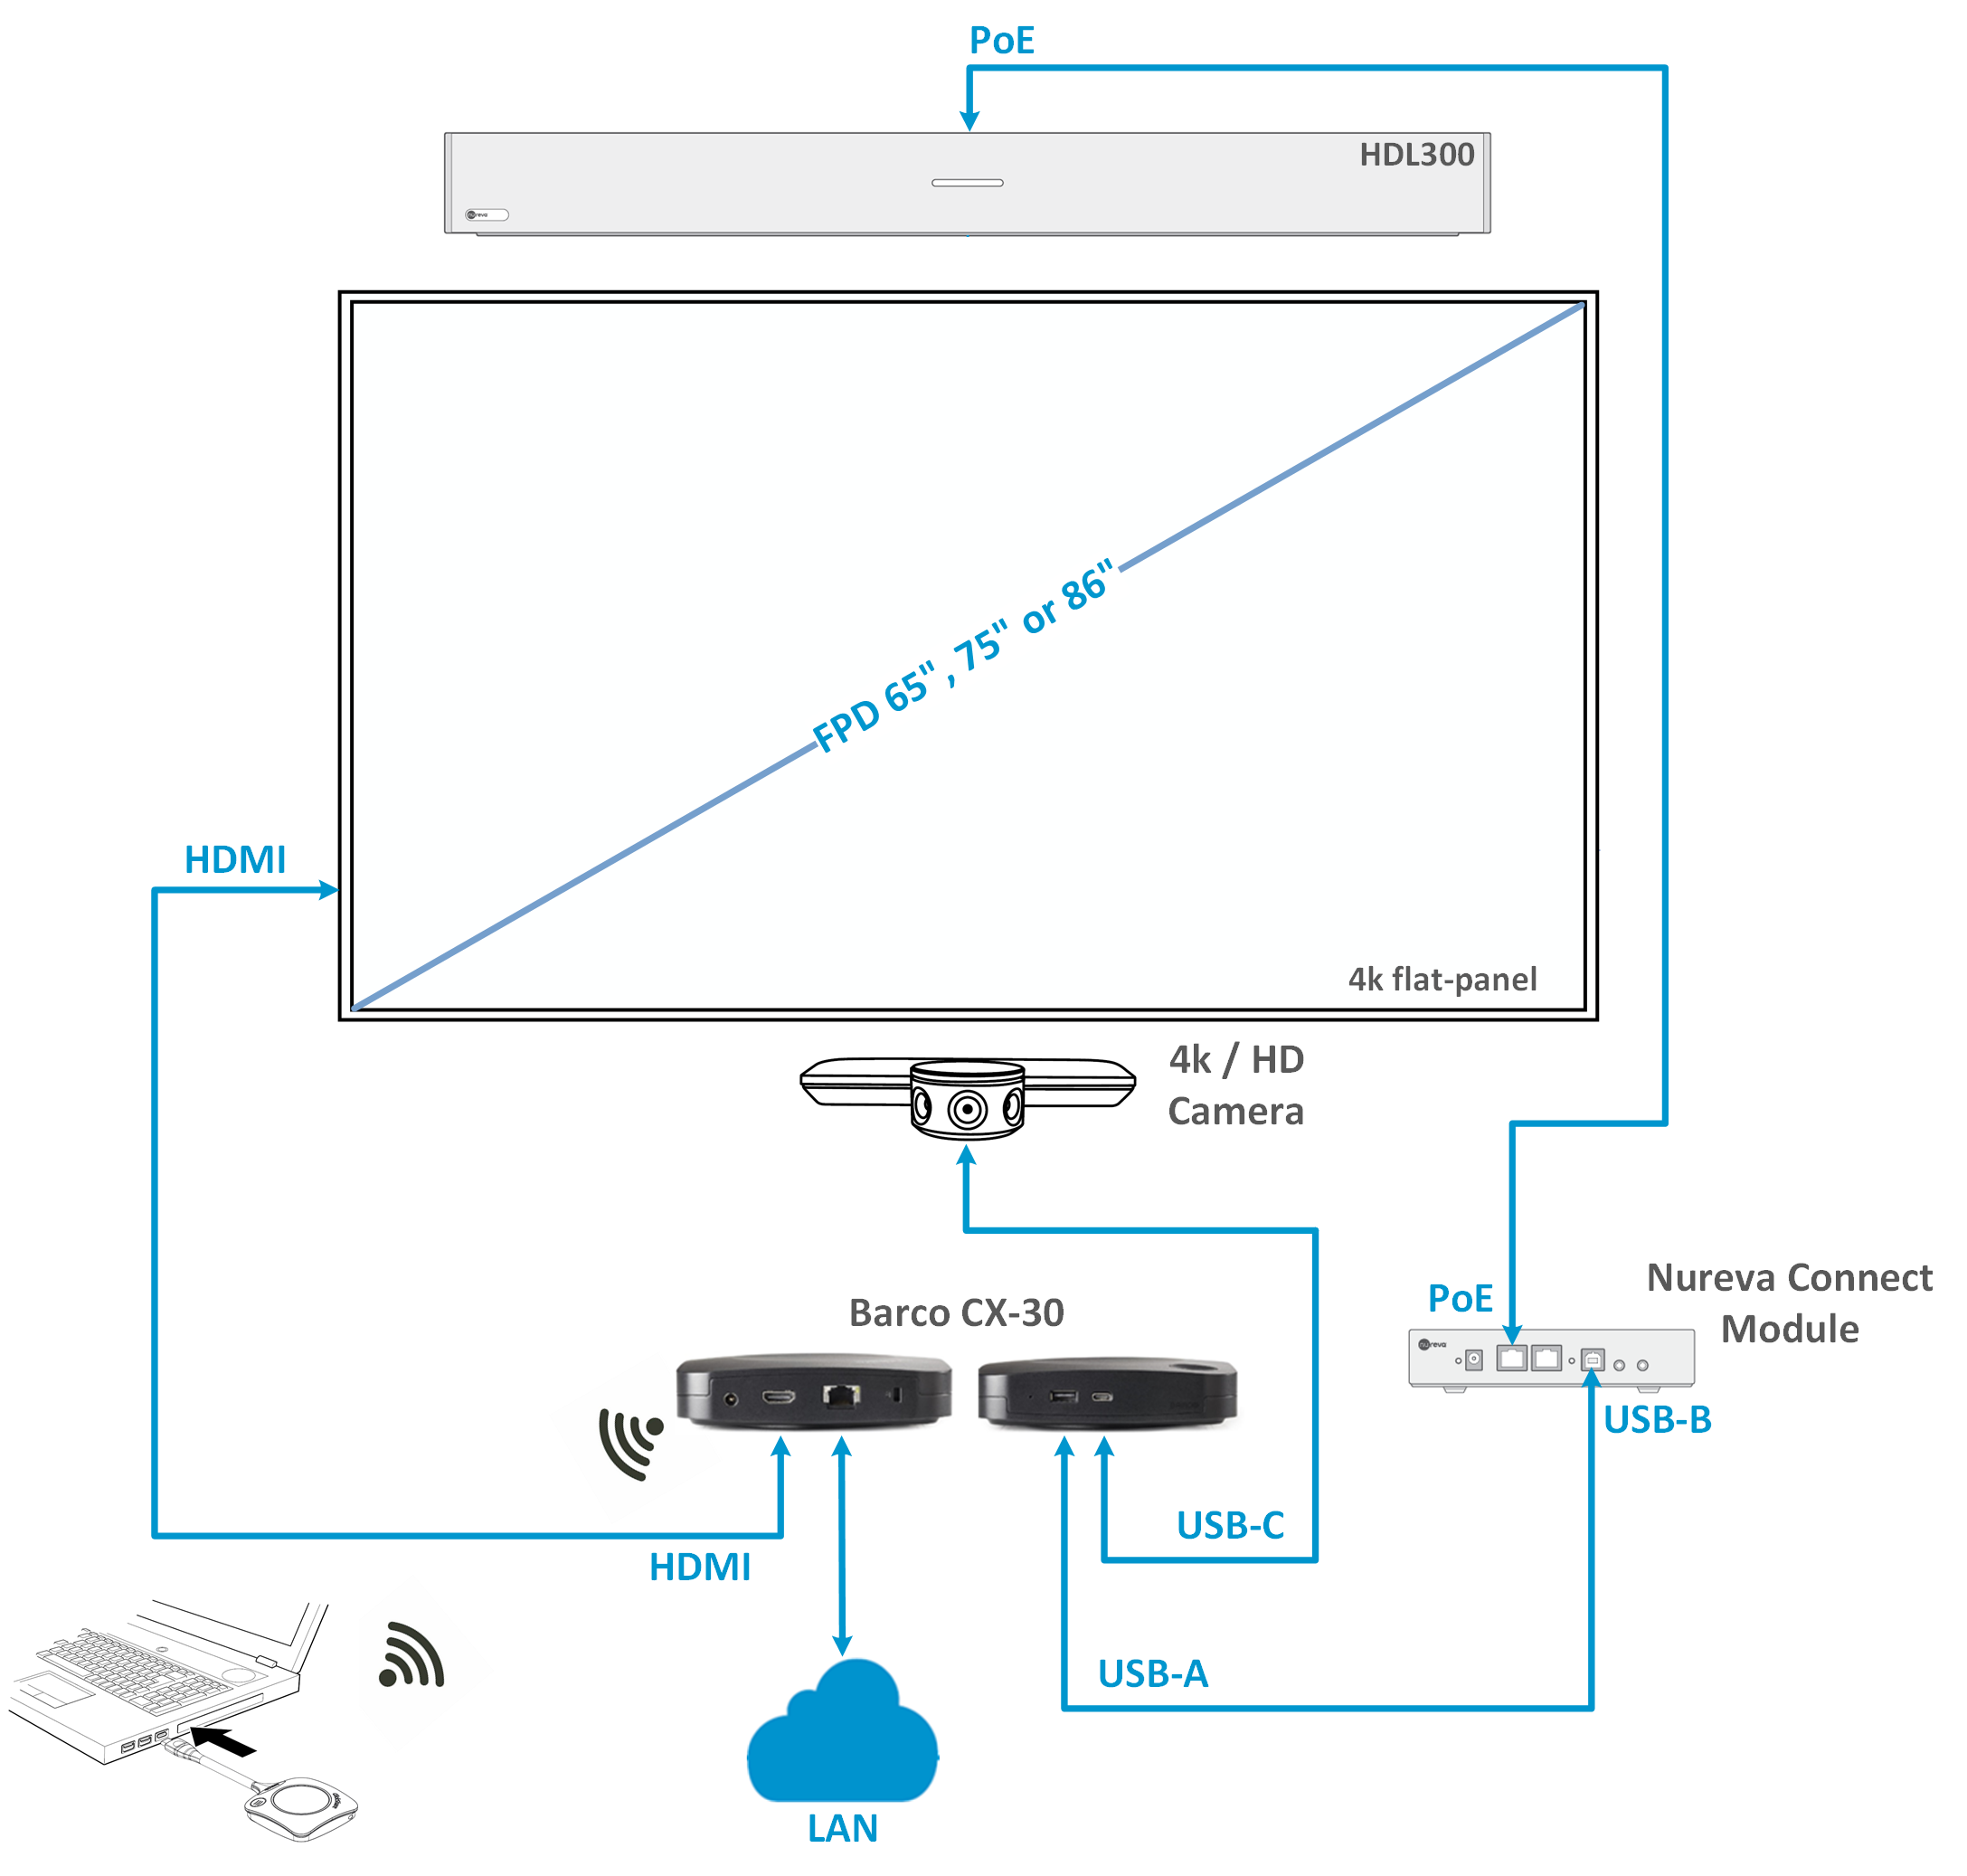
Connection diagram

Barco ClickShare CX-50 Gen2
Begin with setting up your HDL300 or Dual HDL300 system by following the steps in the getting started guide:
On the Barco ClickShare CX-50 Gen2 unit
- Connect the USB cable from your HDL300 or Dual HDL300 system's connect module to a USB-A port on the rear of the CX-50 Gen2 unit
- Connect a USB cable to the in-room camera
- Connect an HDMI cable to the in-room display
To use the system
- Insert the ClickShare Button into a USB port on your laptop as part of the BYOM
- Start the wireless audio/video session by clicking the ClickShare Button
- Use the UC&C client of your choice to start a meeting and share your content
NOTE: When in a call, you can control the Audio volume or Mute from your laptop - there is no need to use the remote control.
Connection diagram
NOTE: The technical information provided in this article, including specifications and recommendations, is provided for customer convenience. The accuracy of this information is not guaranteed and is subject to change without notice. Please check the user manuals and related documentation from each product manufacturer to ensure that your setup meets the proper recommendations.