Internet Protocol (IP) devices, also known as network-connected devices, can be remotely monitored by adding them to Nureva Console. Examples of IP devices that benefit from remote monitoring include cameras and video displays. Before adding an IP-connected A/V device, ensure that:
- The Nureva conferencing device in the room is enrolled in Nureva Console cloud
- The IP device is on the same local area network (LAN) as the Nureva device in the room
- The IP device has a static or reserved IP address
- You know the IP address and active TCP port number of the IP device
This functionality is only available for HDL310 and HDL410 devices.
The monitoring of IP devices through Nureva Console is limited to each device's availability. Devices will be presented as "online" or "unavailable". Nureva Console does not offer the ability to control the IP device and only confirms if the device should be checked to ensure that it is available for use.
NOTE: The screenshots used in this article reference a fictitious organization. This is for illustrative purposes only.
Adding and removing IP devices
IP cameras
Nureva Console supports the monitoring of many IP cameras. These third-party cameras are monitored alongside the Nureva conferencing system in the room.
- Sign-in to your Nureva Console cloud account
- Navigate to the room where the IP camera and Nureva conferencing device are located
- Press the ‘+’ button in the Devices list on the left

- Select Camera from the Select IP device type drop-down box

- Select the camera manufacturer from the drop-down list

- If the manufacturer is not listed, choose Other
- Type the manufacturer's name into the Manufacturer name box

- Type the model of your IP camera into the Model input box
NOTE: The Custom name box will automatically populate with the manufacturer name and camera model. This information from the Custom name box will be the camera name in the Devices list and on the Rooms dashboard. This field can be edited.

- Enter the camera's IP address
- Nureva Console will confirm that the IP address is connected to the same LAN as the Nureva audio device in the room
- Once the IP address has been validated, the Add device button will become enabled
- The Port entry box has a default value of 80
- Change this value if your IP camera’s active TCP port is different
- Press the Add device button to complete adding the camera
NOTE: By clicking 'Add device', you give Nureva Console permission to monitor the status of the IP camera remotely.

NOTE: Some third-party IP cameras may not be supported. An error notification will advise if the IP camera cannot be added.
Once the IP camera has been added, it will appear in the room’s Devices list, using the custom name you selected as the label. The IP camera information you entered will be displayed on the page.
Press the Edit button if changes must be made to the Model, Custom name, IP address or Port. This button will be enabled as long as the Nureva audio device in the room is online.

IP displays
Nureva Console supports the monitoring of many IP displays. These third-party displays are monitored alongside the Nureva conferencing system in the room.
- Sign-in to your Nureva Console cloud account
- Navigate to the room where the IP display and Nureva conferencing device are located
- Press the ‘+’ button in the Devices list on the left

- Select Display from the Select IP device type drop-down box

- The Select manufacturer dropdown box will become enabled
- Select the manufacturer of your IP display from the drop-down list

- If the manufacturer is not listed, select Other
- Type the manufacturer name into the new Manufacturer name input box

- Type the model of your IP display into the Model input box
NOTE: The Custom name box will automatically populate with the manufacturer name and camera model. This information from the Custom name box will be the display name in the Devices list and on the Rooms dashboard. This field can be edited.

- Enter the IP addressof the display
- Nureva Console will confirm that the IP address is on the same LAN as the Nureva audio device in the room
- Once the IP address has been validated, the Add device button will become enabled
- The Portentry box has a default value of 80
- Change this value if your IP display’s active TCP port is different
- Press the Add device button to bring the IP display into the Nureva Console device list
NOTE: By clicking 'Add device', you give Nureva Console permission to monitor the status of the IP camera remotely.

NOTE: Some third-party IP displays may not be supported. An error notification will advise if the IP display cannot be added.
Once the IP display has been added, it will appear in the room’s Devices list using the Custom name you selected as the label. The IP display information you entered will be displayed on the page.
Press the Edit button if changes must be made to the Model, Custom name, IP address or Port. This button will be enabled as long as the Nureva audio device in the room is online.

Other IP devices
Nureva Console supports monitoring IP-connected AV devices other than cameras and displays. These third-party devices are monitored alongside the Nureva conferencing system in the room.
- Sign-in to your Nureva Console cloud account
- Navigate to the room where the IP device and Nureva conferencing device are located
- Press the ‘+’ button in the Devices list on the left

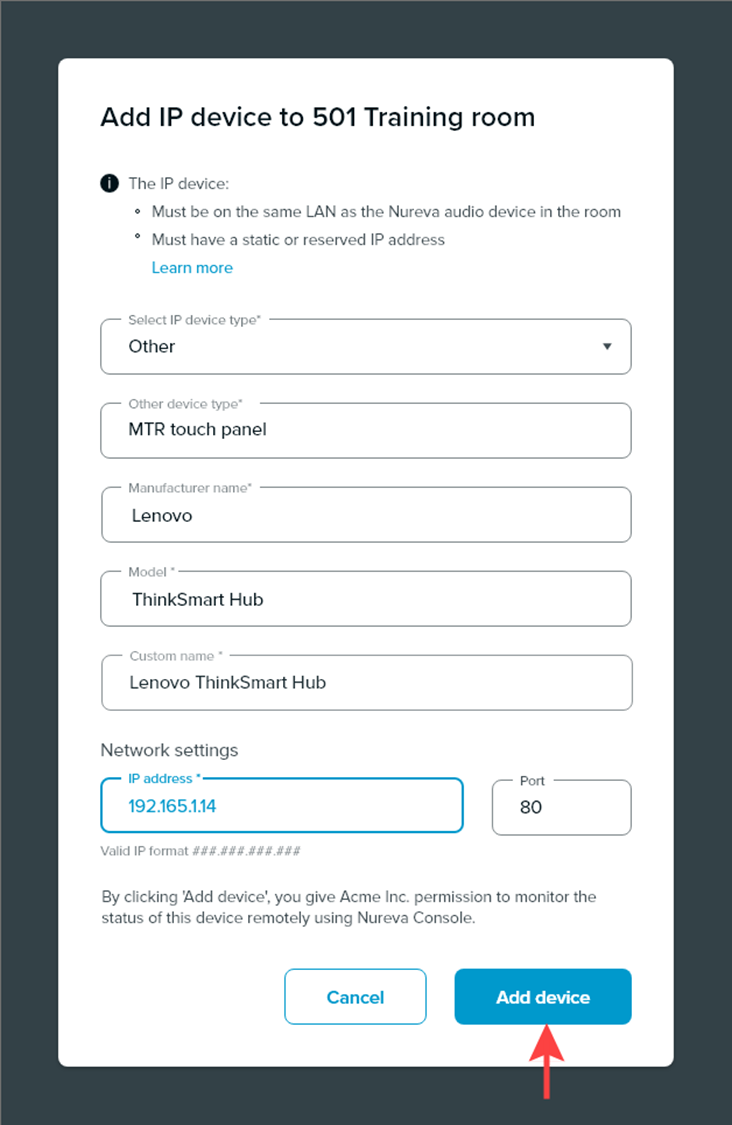
- When the Add IP device dialog opens, select Other from the Select IP device type drop-down box

- In the Other device type input box, enter a description of the device type
- Enter the manufacturer name into the Manufacturer name input box

- Type the model of your IP display into the Model input box
NOTE: The Custom name box will automatically populate with the manufacturer name and camera model. This information from the Custom name box will be the display name in the Devices list and on the Rooms dashboard. This field can be edited.

- Enter the IP addressof the display
- Nureva Console will confirm that the IP address is on the same LAN as the Nureva audio device in the room
- Once the IP address has been validated, the Add device button will become enabled
- The Portentry box has a default value of 80
- Change this value if your IP display’s active TCP port is different
- Press the Add device button to bring the IP display into the Nureva Console device list
NOTE: By clicking 'Add device', you give Nureva Console permission to monitor the status of the IP camera remotely.
NOTE: Some third-party IP devices may not be supported. An error notification will advise if the IP device cannot be added.
Once the IP device has been added, it will appear in the room’s Devices list, using the Custom name you selected as the label. The IP device information you entered will be displayed on the page.
Press the Edit button if changes need to be made to the Model, Custom name, IP address or Port. This button will be enabled as long as the Nureva audio device in the room is online.

Removing IP devices
To remove an IP camera from Nureva Console sign in to your Nureva Console cloud account and follow the steps below.- Navigate to Rooms

- Locate the room with the IP device to be removed from the list
- Open the three-dot menu next to the device from the Actions column

- Click on Remove from the menu

- The confirmation window will open
- Press the Remove button

- A message will indicate that the IP device has been removed
