Expand the articles below for information about connecting and configuring the HDL300 system with these Lifesize products.
Lifesize® Icon 600™
Yes, Nureva has determined that the Lifesize Icon 600 conference room solution works with the HDL300 and Dual HDL300 systems when configured as shown in this article.
To get started, first check that the HDL300 is up-to-date and set up correctly:
- Connect the PoE cable (provided) to the RJ45-1 port on the connect module to the rear port on the HDL300 system
- Plug in the 54VDC power supply and connect a laptop to the connect module using the USB-A to USB-B cable (provided)
- Download and run Nureva Console Client
- In Nureva Console Client, under
- Product updates => Check for firmware updates
-
Audio conferencing system
-
Controls
-
Auxiliary ports
- Aux out => Microphone out (Mic level)
- Sleep mode => Disable
-
Auxiliary ports
-
Controls
- Disconnect the connect module from your laptop and remove the USB cable.
Creating custom cables
Prepare two 3.5 mm jack cables with the three pins positive (+), negative (–) and ground (G) per Nureva auxiliary port recommendations. Label one Cable 1 and the other Cable 2.
See the article What kind of auxiliary jacks are compatible with the HDL300 system? for more information.
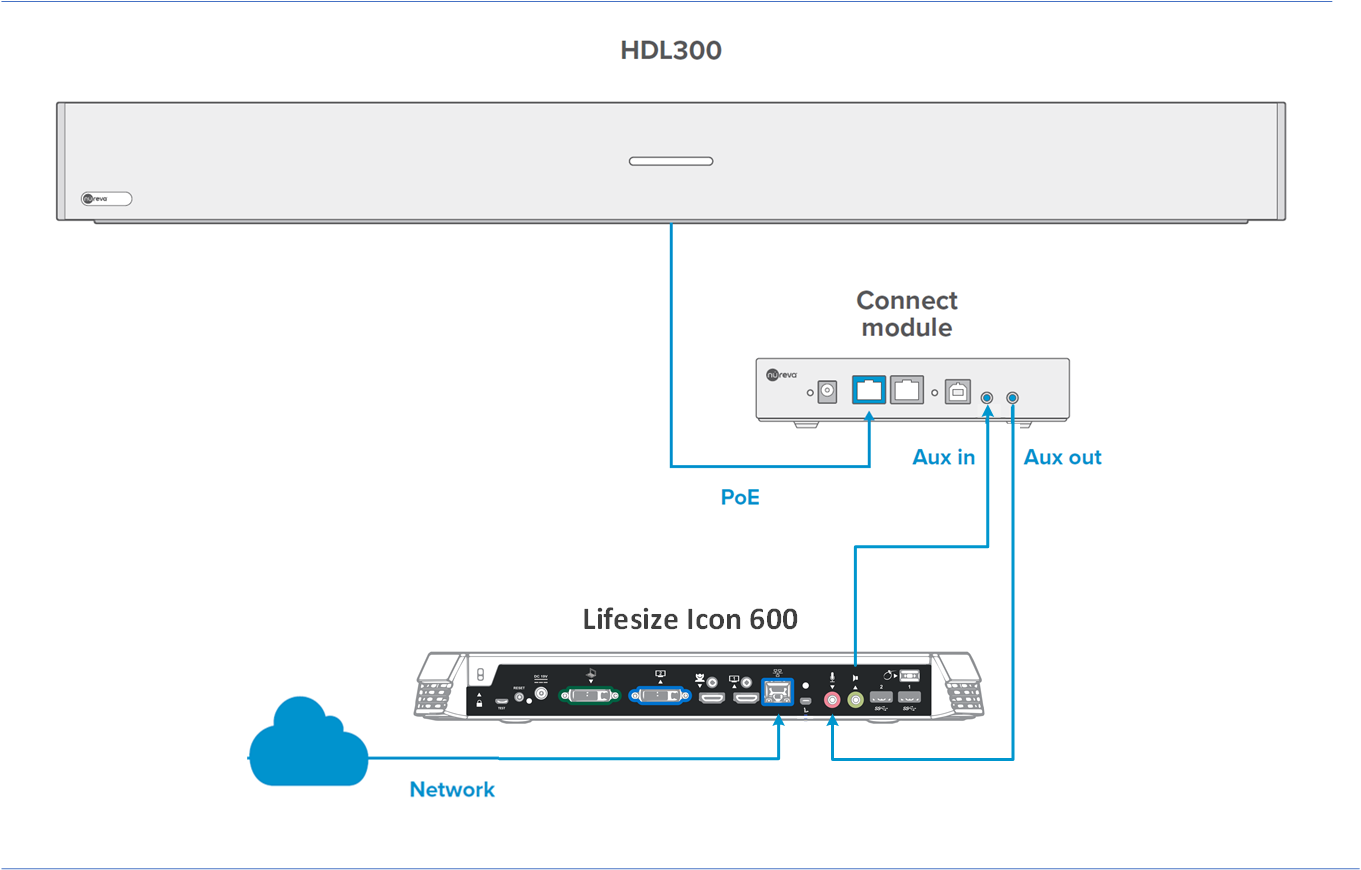
On the HDL300 connect module
- Plug Cable 1 into the Aux out port
- Plug Cable 2 into the Aux in port
- Connect the PoE cable (provided) to the RJ45-1 port on the connect module to the rear RJ45 port on the HDL300 system
- Plug in the 54VDC power supply
On the Lifesize Icon 600 CODEC
- Plug Cable 1 into Microphone in on the I/O panel
- Plug Cable 2 into the Speaker out on the I/O panel
- Connect the Lifesize Icon 600 video system to the network via the LAN port
-
Navigate to the IP address of your Icon 600 video system portal from the web browser
- Navigate Account Settings => Preferences => Audio
- Set Audio Device to Echo Cancelling Speakerphone (HDL300)
- Disable Acoustic Echo Canceller for Microphone in (if active)
- Save all changes and Exit
To start a video conferencing call, see the article Does the HDL300 system work with audio conferencing (UC&C) software? for more information on setting up and using the LifeSize UC&C client.
Connection Diagram
NOTE: The Nureva Aux In / Out connections are single-ended, unbalanced signals with default maximum output signals as given in the table below. Any equipment requiring voltages below these levels may result in clipping, distortion, and in extreme cases, damage to connected systems. Equipment requiring voltages above these levels will not be adequately driven by the HDL300 system’s output signal and may result in quiet / no audio on the channel. Before connecting to the Nureva Connect Module, ensure the third-party device voltage levels are adequate or adjusted properly by additional interfacing hardware.

NOTE: The technical information provided in this article, including specifications and recommendations, is provided for customer convenience. The accuracy of this information is not guaranteed and is subject to change without notice. Please check the user manuals and related documentation from each product manufacturer to ensure that your setup meets the proper recommendations.
Lifesize® Icon 700™
Yes, Nureva has determined that the Lifesize Icon 700 video conferencing solution will work with the HDL300 and Dual HDL300 when configured as shown in this article.
To get started, first check that the HDL300 is up-to-date and set up correctly:
- Connect the PoE cable (provided) to the RJ45-1 port on the connect module to the rear port on the HDL300 system
- Plug in the 54VDC power supply and connect a laptop to the connect module using the USB-A to USB-B cable (provided)
- Download and run Nureva Console Client
- In Nureva Console Client, under
- Product updates => Check for firmware updates
-
Audio conferencing system
-
Controls
-
Auxiliary ports
- Aux out => Microphone out (Mic level)
- Sleep mode => Disable
-
Auxiliary ports
-
Controls
- Disconnect the connect module from your laptop and remove the USB cable.
Creating custom cables
Prepare two 3.5mm jack cable with the three pins positive (+), negative (–) and ground (G) as per Nureva Auxiliary port recommendations. Label one ‘Cable 1’, and the other ‘Cable 2’.
See the article What kind of auxiliary jacks are compatible with the HDL300 system? for more information.
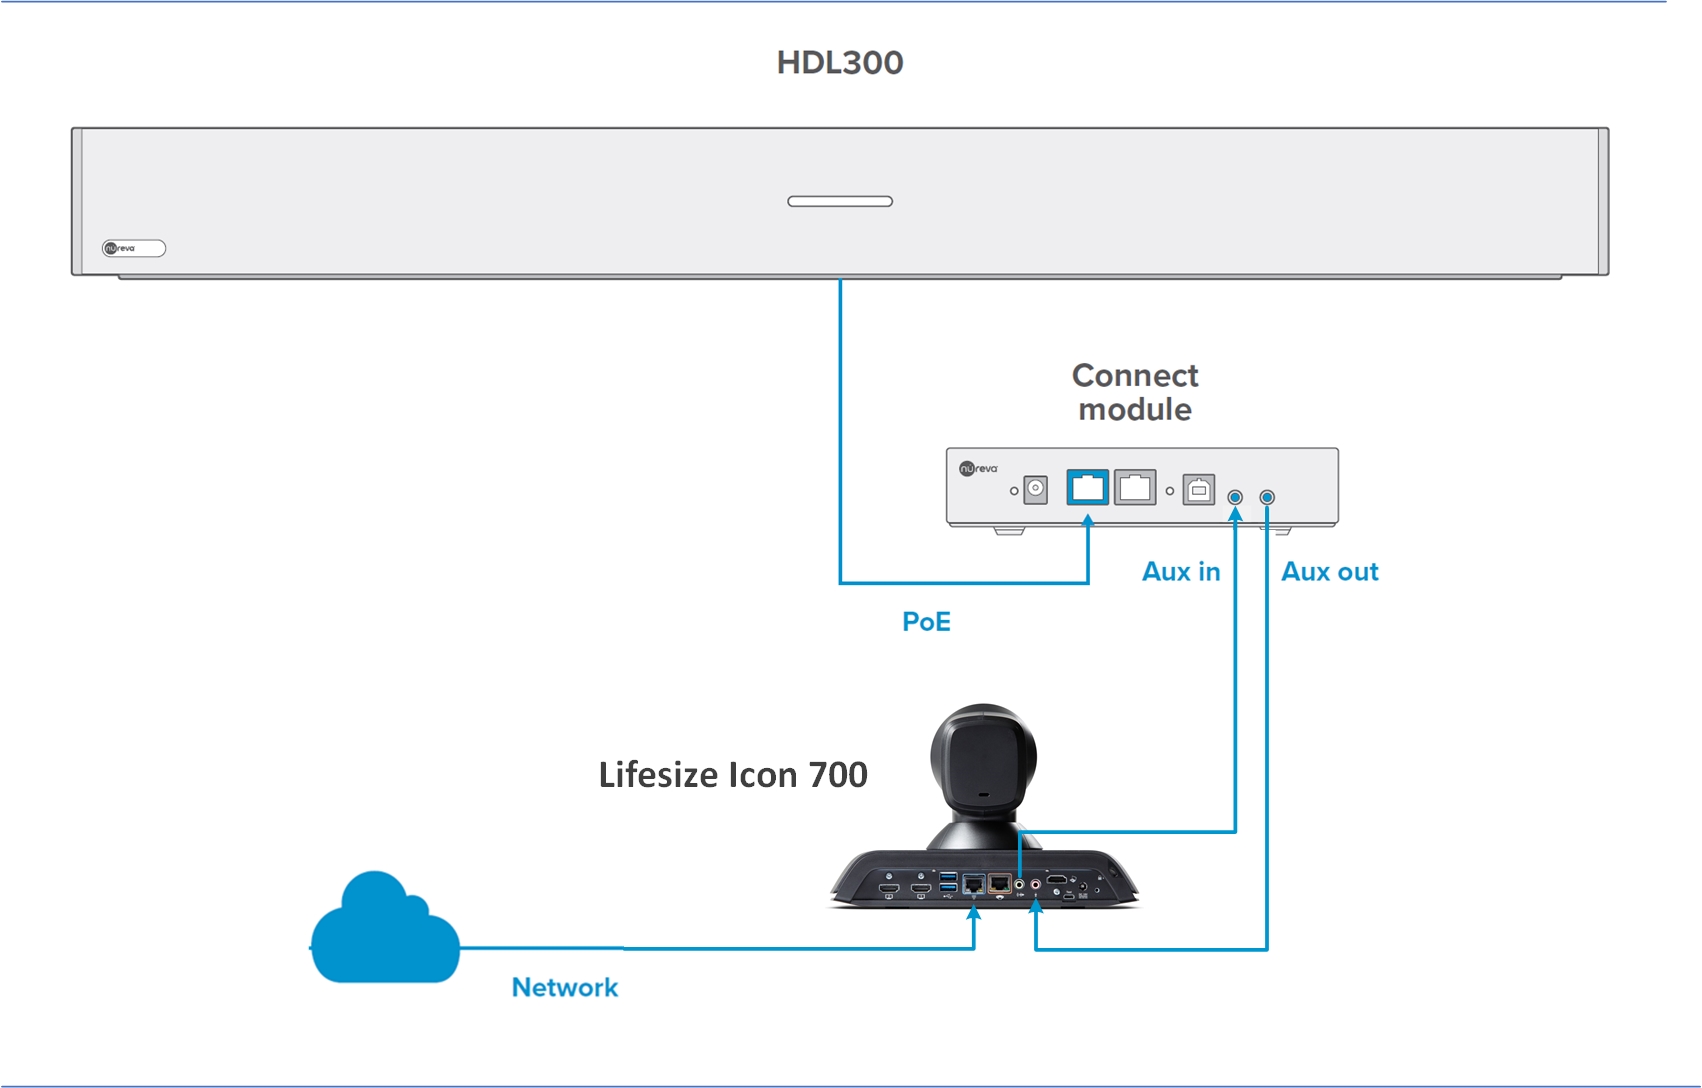
On the HDL300 connect module
- Plug Cable 1 into the Aux out port
- Plug Cable 2 into the Aux in port
- Connect the PoE cable (provided) to the RJ45-1 port on the connect module and the other end to the HDL300
- Plug in the 54VDC power supply
On the Lifesize 4k Icon 700 system
- Plug Cable 1 into the Microphone In on the I/O panel
- Plug Cable 2 into the Speaker Out on the I/O panel
- Connect the Lifesize Icon 700 video system to the network via the LAN port
- Navigate to the IP address of your Icon 700 video system portal from a web browser
- Navigate Account Settings => System Behaviour => Audio
- Set Audio output to TV Display or Speakers
- Set Default Audio device to Echo Cancelling Speakerphone (HDL300)
- Disable Automatic Echo Cancellation for Microphone (if active)
- Save all changes and Exit
NOTE: - Poor audio and video quality might result from insufficient bandwidth on your network. Follow the recommendations from Lifesize, who recommend that your network be capable of at least 1 Mb/s (incoming and outgoing) for a high definition video call.
NOTE: The Nureva Aux In / Out connections are single-ended, unbalanced signals with default maximum output signals as given in the table below. Any equipment requiring voltages below these levels may result in clipping, distortion, and in extreme cases, damage to connected systems. Equipment requiring voltages above these levels will not be adequately driven by the HDL300 system’s output signal and may result in quiet / no audio on the channel. Before connecting to the Nureva Connect Module, make sure the third-party device voltage levels are adequate or adjusted properly by additional interfacing hardware.
NOTE: The technical information provided in this article, including specifications and recommendations, is provided for customer convenience. The accuracy of this information is not guaranteed and is subject to change without notice. Please check the user manuals and related documentation from each product manufacturer to ensure that your setup meets the proper recommendations.
Lifesize® Icon 800™
Yes, Nureva has determined that the Lifesize Icon 800 conference room solution will work with the HDL300 and Dual HDL300 when configured as shown in this article.
To get started, first check that the HDL300 is up-to-date and set up correctly:
- Connect the PoE cable (provided) to the RJ45-1 port on the connect module to the rear port on the HDL300 system
- Plug in the 54VDC power supply and connect a laptop to the connect module using the USB-A to USB-B cable (provided)
- Download and run Nureva Console Client
- In Nureva Console Client, under
- Product updates => Check for firmware updates
-
Audio conferencing system
-
Controls
-
Auxiliary ports
- Aux out => Microphone out (Mic level)
- Sleep mode => Disable
-
Auxiliary ports
-
Controls
- Disconnect the connect module from your laptop and remove the USB cable.
Creating custom cables
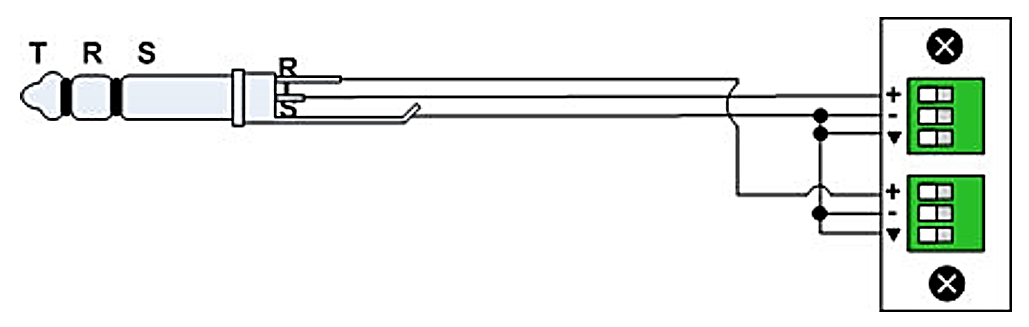
- Cable 1: Prepare a 3.5 mm jack to dual Phoenix 3-conductor terminator block with the three pins positive (+), negative (–) and ground (G) per Nureva auxiliary jack connection to the Phoenix ports (Balanced). Note both the negative conductor and grounds are tied together.
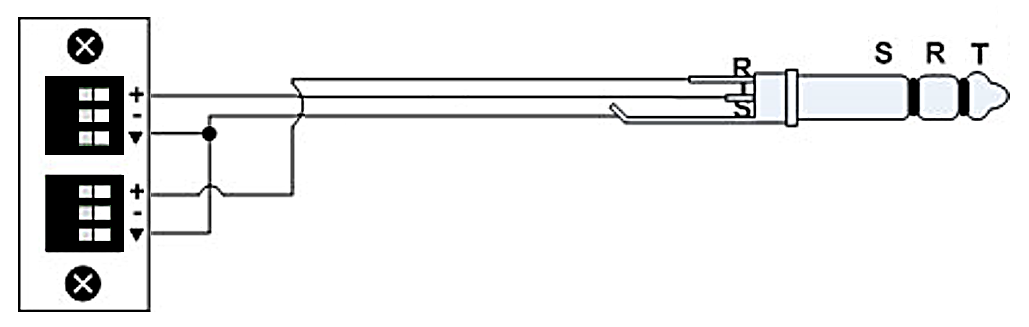
- Cable 2: Prepare a 3.5 mm jack to Phoenix 3-conductor terminator block with the three pins positive (+), negative (–) and ground (G) per Nureva auxiliary jack connection to the Phoenix ports (Balanced). Note the grounds are tied together and the negative conductors are unused.
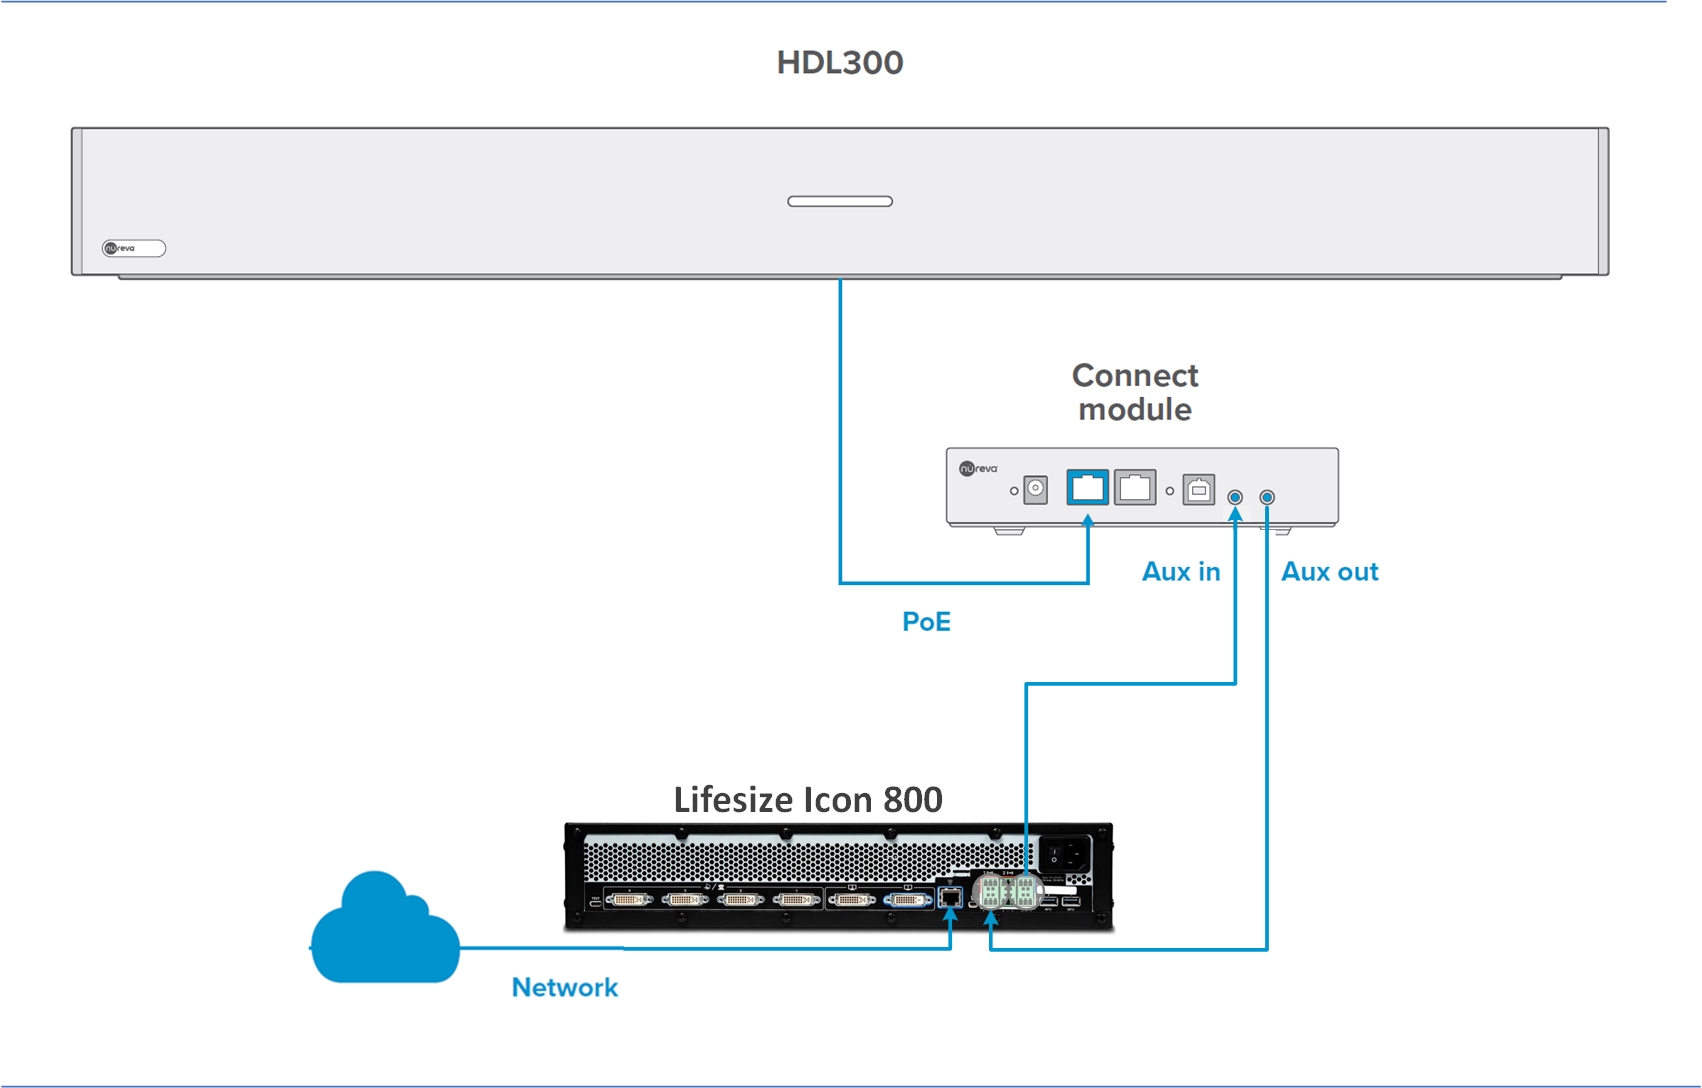
On the HDL300 connect module
- Plug Cable 1 into the Aux out port
- Plug Cable 2 into the Aux in port
On the Lifesize Icon 800 video conferencing system
- Plug Cable 1 into the Line In, L/R on the I/O panel
- Plug Cable 2 into the Line Out, L/R on the I/O panel
- Connect the Lifesize Icon 800 video system to the network via the LAN port
- Navigate to the IP address of your Icon 800 video system portal from a web browser:
- Select Account Settings
- Navigate to Preferences
- Set default Audio device to Echo Cancelling Speakerphone (HDL300)
- Disable Acoustic Echo Canceller (Microphone in)
- Save all changes and Exit
Connection diagram
To start a video conferencing call, see the article Does the HDL300 system work with audio conferencing (UC&C) software? for more information on setting up and using the Lifesize UC&C client.
NOTE: If you experience echo or audio whining/interference, you may need to convert the HDL300 Line Out unbalanced signal to a balanced signal for the Icon 800 Input. Nureva has tested and recommends the Rolls MB15b Promatch converter, which also requires a 3.5 mm/XLR mating connector.
NOTE: The Nureva Aux In / Out connections are single-ended, unbalanced signals with default maximum output signals as given in the table below. Any equipment requiring voltages below these levels may result in clipping, distortion, and in extreme cases, damage to connected systems. Equipment requiring voltages above these levels will not be adequately driven by the HDL300 system’s output signal and may result in quiet / no audio on the channel. Before connecting to the Nureva Connect Module, make sure the third-party device voltage levels are adequate or adjusted properly by additional interfacing hardware.
NOTE: The technical information provided in this article, including specifications and recommendations, is provided for customer convenience. The accuracy of this information is not guaranteed and is subject to change without notice. Please check the user manuals and related documentation from each product manufacturer to ensure that your setup meets the proper recommendations.