Yes, Nureva® has determined that the Crestron DMPS3-4k-150-C will work with the HDL300 and Dual HDL300 systems if configured as shown in this article.
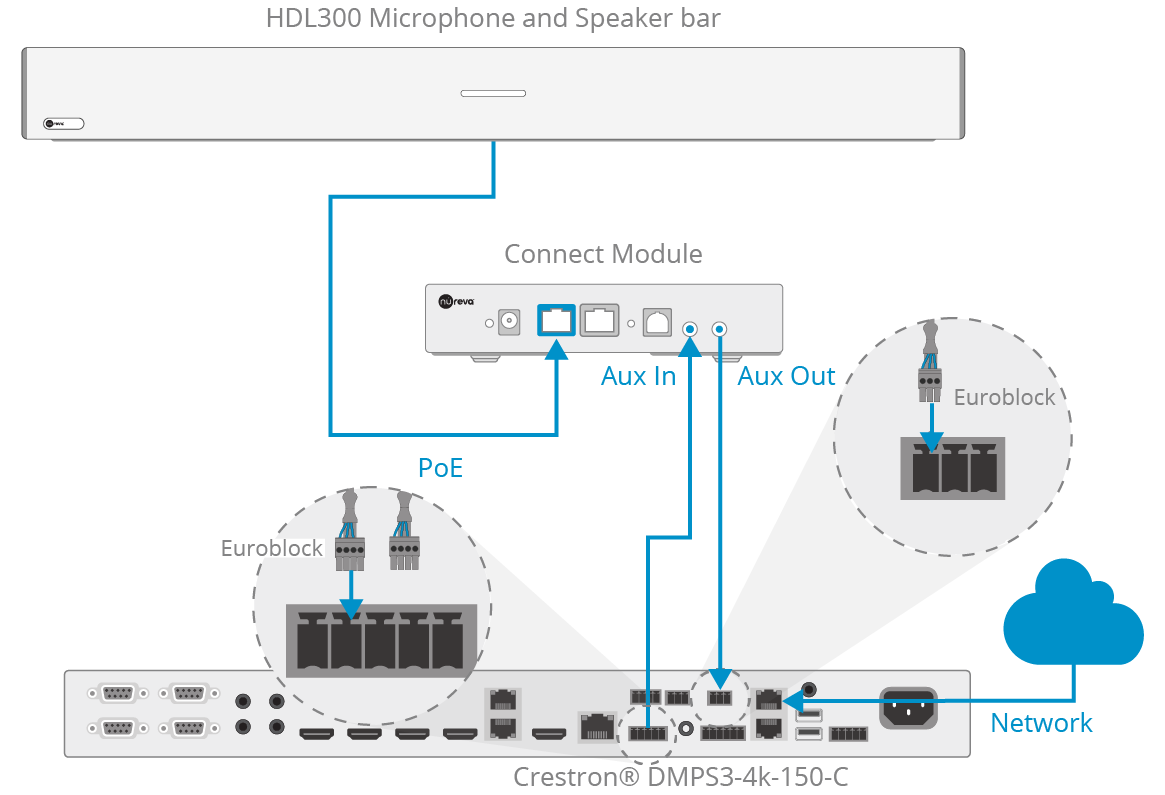
For this integration, two custom cables are needed to accommodate the standard 3.5mm jack connector on the HDL300 system's connect module with the standard Euroblock connectors on the Crestron I/O panel.
Creating custom cables
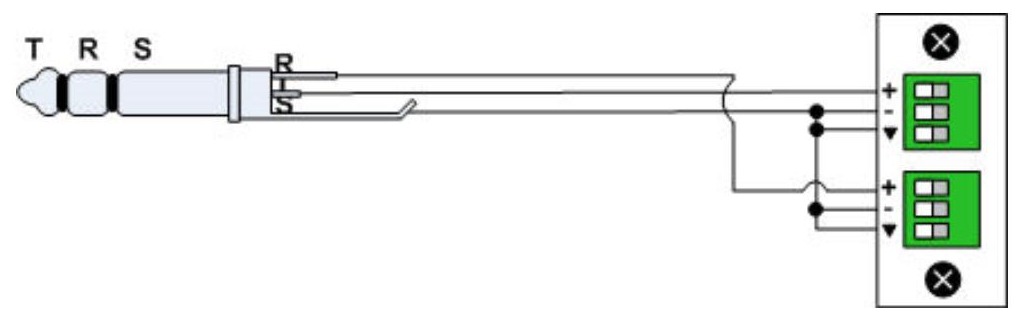
Cable 1: Prepare a 3.5mm jack cable with the three pins: positive (+), negative (–) and ground ( ) wired to the appropriate Euroblock 4-conductor terminal block per the Crestron DMPS3 User Manual for microphone inputs.
Cable 2: Prepare a 3.5mm jack cable with the three pins: positive (+), negative (–) and ground (), wired to accommodate the Crestron speaker Output left & right terminal connections by tying the two negative (–) and two ground () lines together:
On the connect module
- Plug Cable 1 into the Aux Out port
- Plug Cable 2 into the Aux-In port
- Connect the PoE cable (provided) to the RJ45-1 port on the connect module to the rear RJ45 port on the HDL300 system
- Plugin the 54VDC power supply
In Nureva Console client
- Open Nureva Console client
- From the left-hand menu, select System Information
- If a firmware update is available, click on Update
- From the left-hand menu, choose Device settings
-
Auxiliary ports
- Change to Line level
- Ensure Sleep mode is set to OFF
-
Auxiliary ports
On the Crestron presentation system
- Plug Cable 1 Euroblock connector into Mic In on the rear DMPS3 I/O panel
- Plug Cable 2 Euroblock dual terminal connectors into Audio Out L & R
- Connect the Crestron video scalar to the network via the LAN port
- Run the Crestron control software, and ensure the "Audio input Mic type" is set to "Line"
NOTE: The aux in/out connections are single-ended, unbalanced signals with default maximum output signals as given in the table below. Using any equipment requiring voltages below these levels may result in clipping, distortion, and in extreme cases, damage to connected systems. Equipment requiring voltages above these levels will not be adequately driven by the HDL300 system’s output signal and may result in quiet/no audio on the channel.
Before connecting to the connect module ports, make sure the CODEC-provided voltage levels are adequate or adjusted properly by additional interfacing hardware.

NOTE: The technical information provided in this article, including specifications and recommendations, is provided for customer convenience. The accuracy of this information is not guaranteed and is subject to change without notice. Please check the user manuals and related documentation from each product manufacturer to ensure that your setup meets the proper recommendations.