In the package
With your HDL200 system, you will receive:
- A microphone and speaker bar
- remote control with batteries
- A power cable and power adaptor
- a wall mount bracket
- a USB 2.0 cable

You will need
Before you begin, ensure that you have all the necessary tools and supplies on hand. The following items will be needed for a successful installation:
- screws and anchors which can support 44 lb. (20 kg) or more, and are designed for the wall material you are mounting to
- a pencil
- a tape-measure
- a level
- a drill with bits matching the screws and anchors

Mounting recommendations
When mounting above or below a flat panel display and directly onto a wall, use these recommendations:
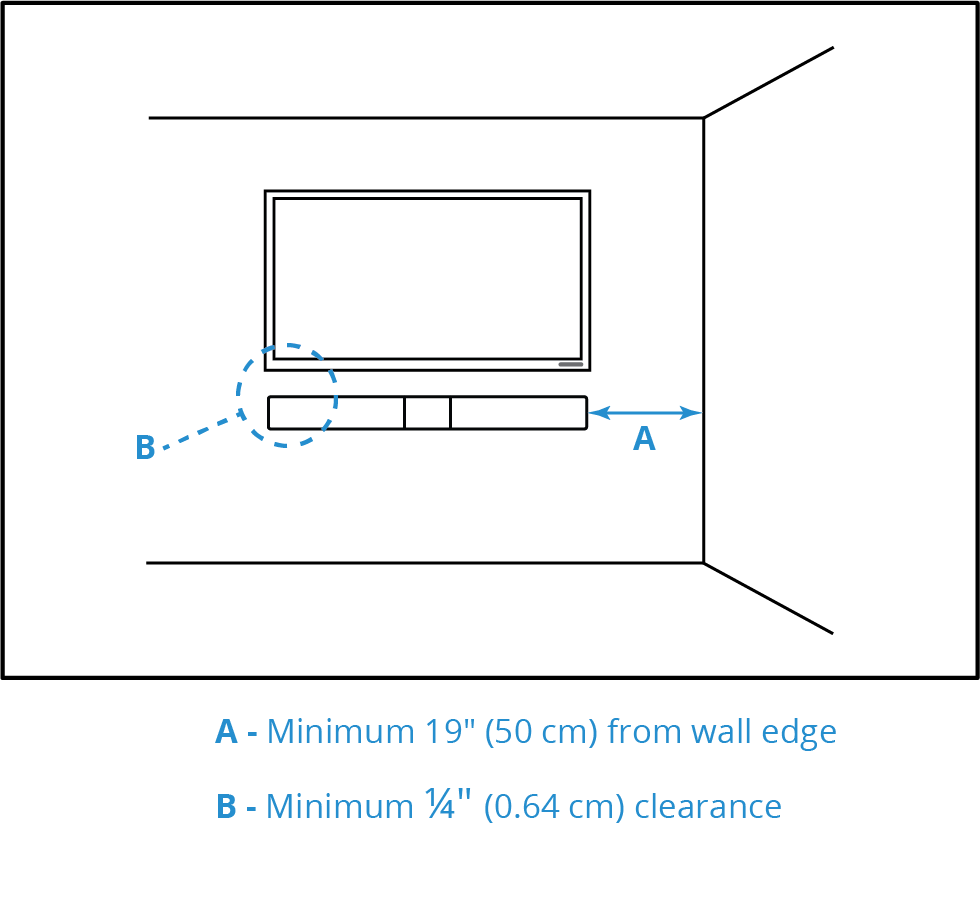
- The sides of the HDL200 should be a minimum of 19 inches (48 cm) from any objects or wall edges
- The top of the HDL200 should be a minimum of 9 inches (23 cm) from the ceiling
- Ensure that there is a minimum of 1/4 inch (5 mm) between the display and the HDL200


Other mounting considerations are:
- Avoid mounting near potential sources of intermittent noise, such as heating and air conditioning vents
- Avoid installing in recessed areas
- Avoid mounting opposite surfaces that reflect sound
- Avoid direct contact between the HDL200 system and other objects
- Do not install on flat surfaces without using Nureva® approved accessories
- Ensure adequate space between all vents and other objects to promote airflow and cooling
It is important to ensure that there is a direct voice path between the people speaking and the HDL200 system. The path should be clear of furniture and other objects. Installing too close to a wall edge or object may impede the sound quality from the HDL200 system's speakers.
Placing the mounting bracket
After you have decided where the HDL200 will be installed, make sure that the bracket is right side up and level before you mark where the pilot holes will be. Choose the hole location on the bracket that is best suited for your installation.


Routing cables
Once you have marked and drilled the pilot holes, install the anchors, and install the bracket using the screws. If routing the cables through the wall, there is a cut out on the bracket to pass the cables through.

Connecting cables to the HDL200 system
Before placing the HDL200 onto the mounting bracket, connect the USB cable to the USB port and the power supply to the power port. Routing the cables through the cable tie and closing it tightly will minimize cable strain. The optional cable covers can be installed by placing one half underneath the cables, placing the other half over the cables, and snapping them together.

Placing on to the mounting bracket
Locate the slots on the back of the HDL200 unit. The tabs on the mounting bracket slide into these slots. When you place the HDL200 onto the tabs, use the markings on the HDL200 and the corresponding markings on the bracket to line up with the tabs.

Connecting to the computer
The next step is to connect the HDL200 system to the in-room computer. Connect the USB cable to the USB port on the computer. Plug the power cable into the power supply, then into the wall socket or power bar.
Always use a power cable and power supply that is provided by Nureva®. For information about using USB extenders with the HDL200 system, please see the article Can I use a USB extender with the HDL200.

The HDL200 system will auto-calibrate when the system is powered up for the first time. This lasts about 10 seconds. It is very important that the room is quiet and there is no talking during the calibration process.
Nureva Console
The final step is to install and run Nureva Console client. Nureva Console client is required to:
- Update firmware to ensure HDL200 system optimal audio performance
- Manage the HDL200 settings from the in-room computer
- Enroll your HDL200 system into Nureva Console cloud to manage it remotely
