Expand the articles below for connection information for your Nureva audio conferencing system.
HDL200 system
Connecting the HDL200- Using the provided USB cable, connect to the USB-B port on the HDL200
- Run the cable to the in-room computer, connecting to a USB-A port
- Connect the provided power supply to the HDL200 and plug it into an available outlet or power bar

- Once powered the HDL200 will automatically calibrate
- Please remain quiet in the room until calibration is complete
- Please remain quiet in the room until calibration is complete
- When calibration has completed, the screen may indicate that a firmware update is required
Download and install Nureva Console client
- Download Nureva Console client
- Launch Nureva Console client installer
- Follow the steps to complete the installation
Launch Nureva Console client
- Launch Nureva Console client
- The HDL200 system will be automatically detected
- Follow the setup steps to set the HDL200 as the default audio device
NOTE: Learn more about optimizing the HDL200 system's settings here
- Enroll the HDL200 into Nureva Console using the step by step enrollment instructions, available here
What is Nureva Console?
Nureva Console is a cloud-based platform that allows for remote management of Nureva audio devices.
Why enroll devices in Nureva Console?- Monitor your enrolled devices through the Device Dashboard
- Manage your devices remotely
- Perform remote firmware updates
HDL300 system
Connecting the HDL300
- Using the provided USB cable, connect to the USB-B port on the connect module
- Run the cable to the in-room computer, connecting to the USB-A port
- Connect the provided PoE cable to the RJ45-1 port on the connect module
- Run the PoE cable to the RJ45 port on the back of the microphone and speaker bar
- Connect the provided power supply to the connect module and plug into an available outlet or power bar

Once powered, the HDL300 will automatically calibrate
- Please remain quiet in the room until calibration is complete
Download and install Nureva Console client
- Download and install Nureva Console client
- Launch Nureva Console client installer
- Follow the steps to complete the installation
Launch Nureva Console client
- Launch Nureva Console client
- The HDL300 system will be automatically detected
- Follow the setup to ensure that the HDL300 system is set as your default audio device
NOTE: Learn more about optimizing the HDL300 system's settings here
- Enroll the HDL300 system into Nureva Console using the step by step enrollment instructions, available here
What is Nureva Console?
Nureva Console is a cloud-based platform that allows for remote management of Nureva audio devices.
Why enroll devices in Nureva Console?- Monitor your enrolled devices through the Device Dashboard
- Manage your devices remotely
- Perform remote firmware updates
DUAL HDL300 system
Connecting the DUAL HDL300- Using the provided USB cable, connect to the USB-B port on the connect module
- Run the cable to the in-room computer, connecting to the USB-A port
- Connect the provided PoE cables to each RJ45 port on the connect module
- Run the PoE cables to the RJ45 ports on the back of each microphone and speaker bar
- Connect the provided power supply to the connect module and plug into an available outlet or power bar

- Once powered, the HDL300 will automatically calibrate
- Please remain quiet in the room until calibration is complete
Download and install Nureva Console client
- Download Nureva Console client
- Launch Nureva Console client installer
- Follow the steps to complete the installation
Launch Nureva Console client
- Launch Nureva Console client
- The HDL300 system will be automatically detected
- Follow the setup to ensure that the HDL300 system is set as your default audio device
NOTE: Learn more about optimizing the HDL300 system's settings here
- Enroll the HDL300 system into Nureva Console using the step by step enrollment instructions, available here
What is Nureva Console?
Nureva Console is a cloud-based platform that allows for remote management of Nureva audio devices.
Why enroll devices in Nureva Console?- Monitor enrolled devices through the Device Dashboard
- Remote management of enrolled devices
- Perform remote firmware updates
CV30 Classroom camera
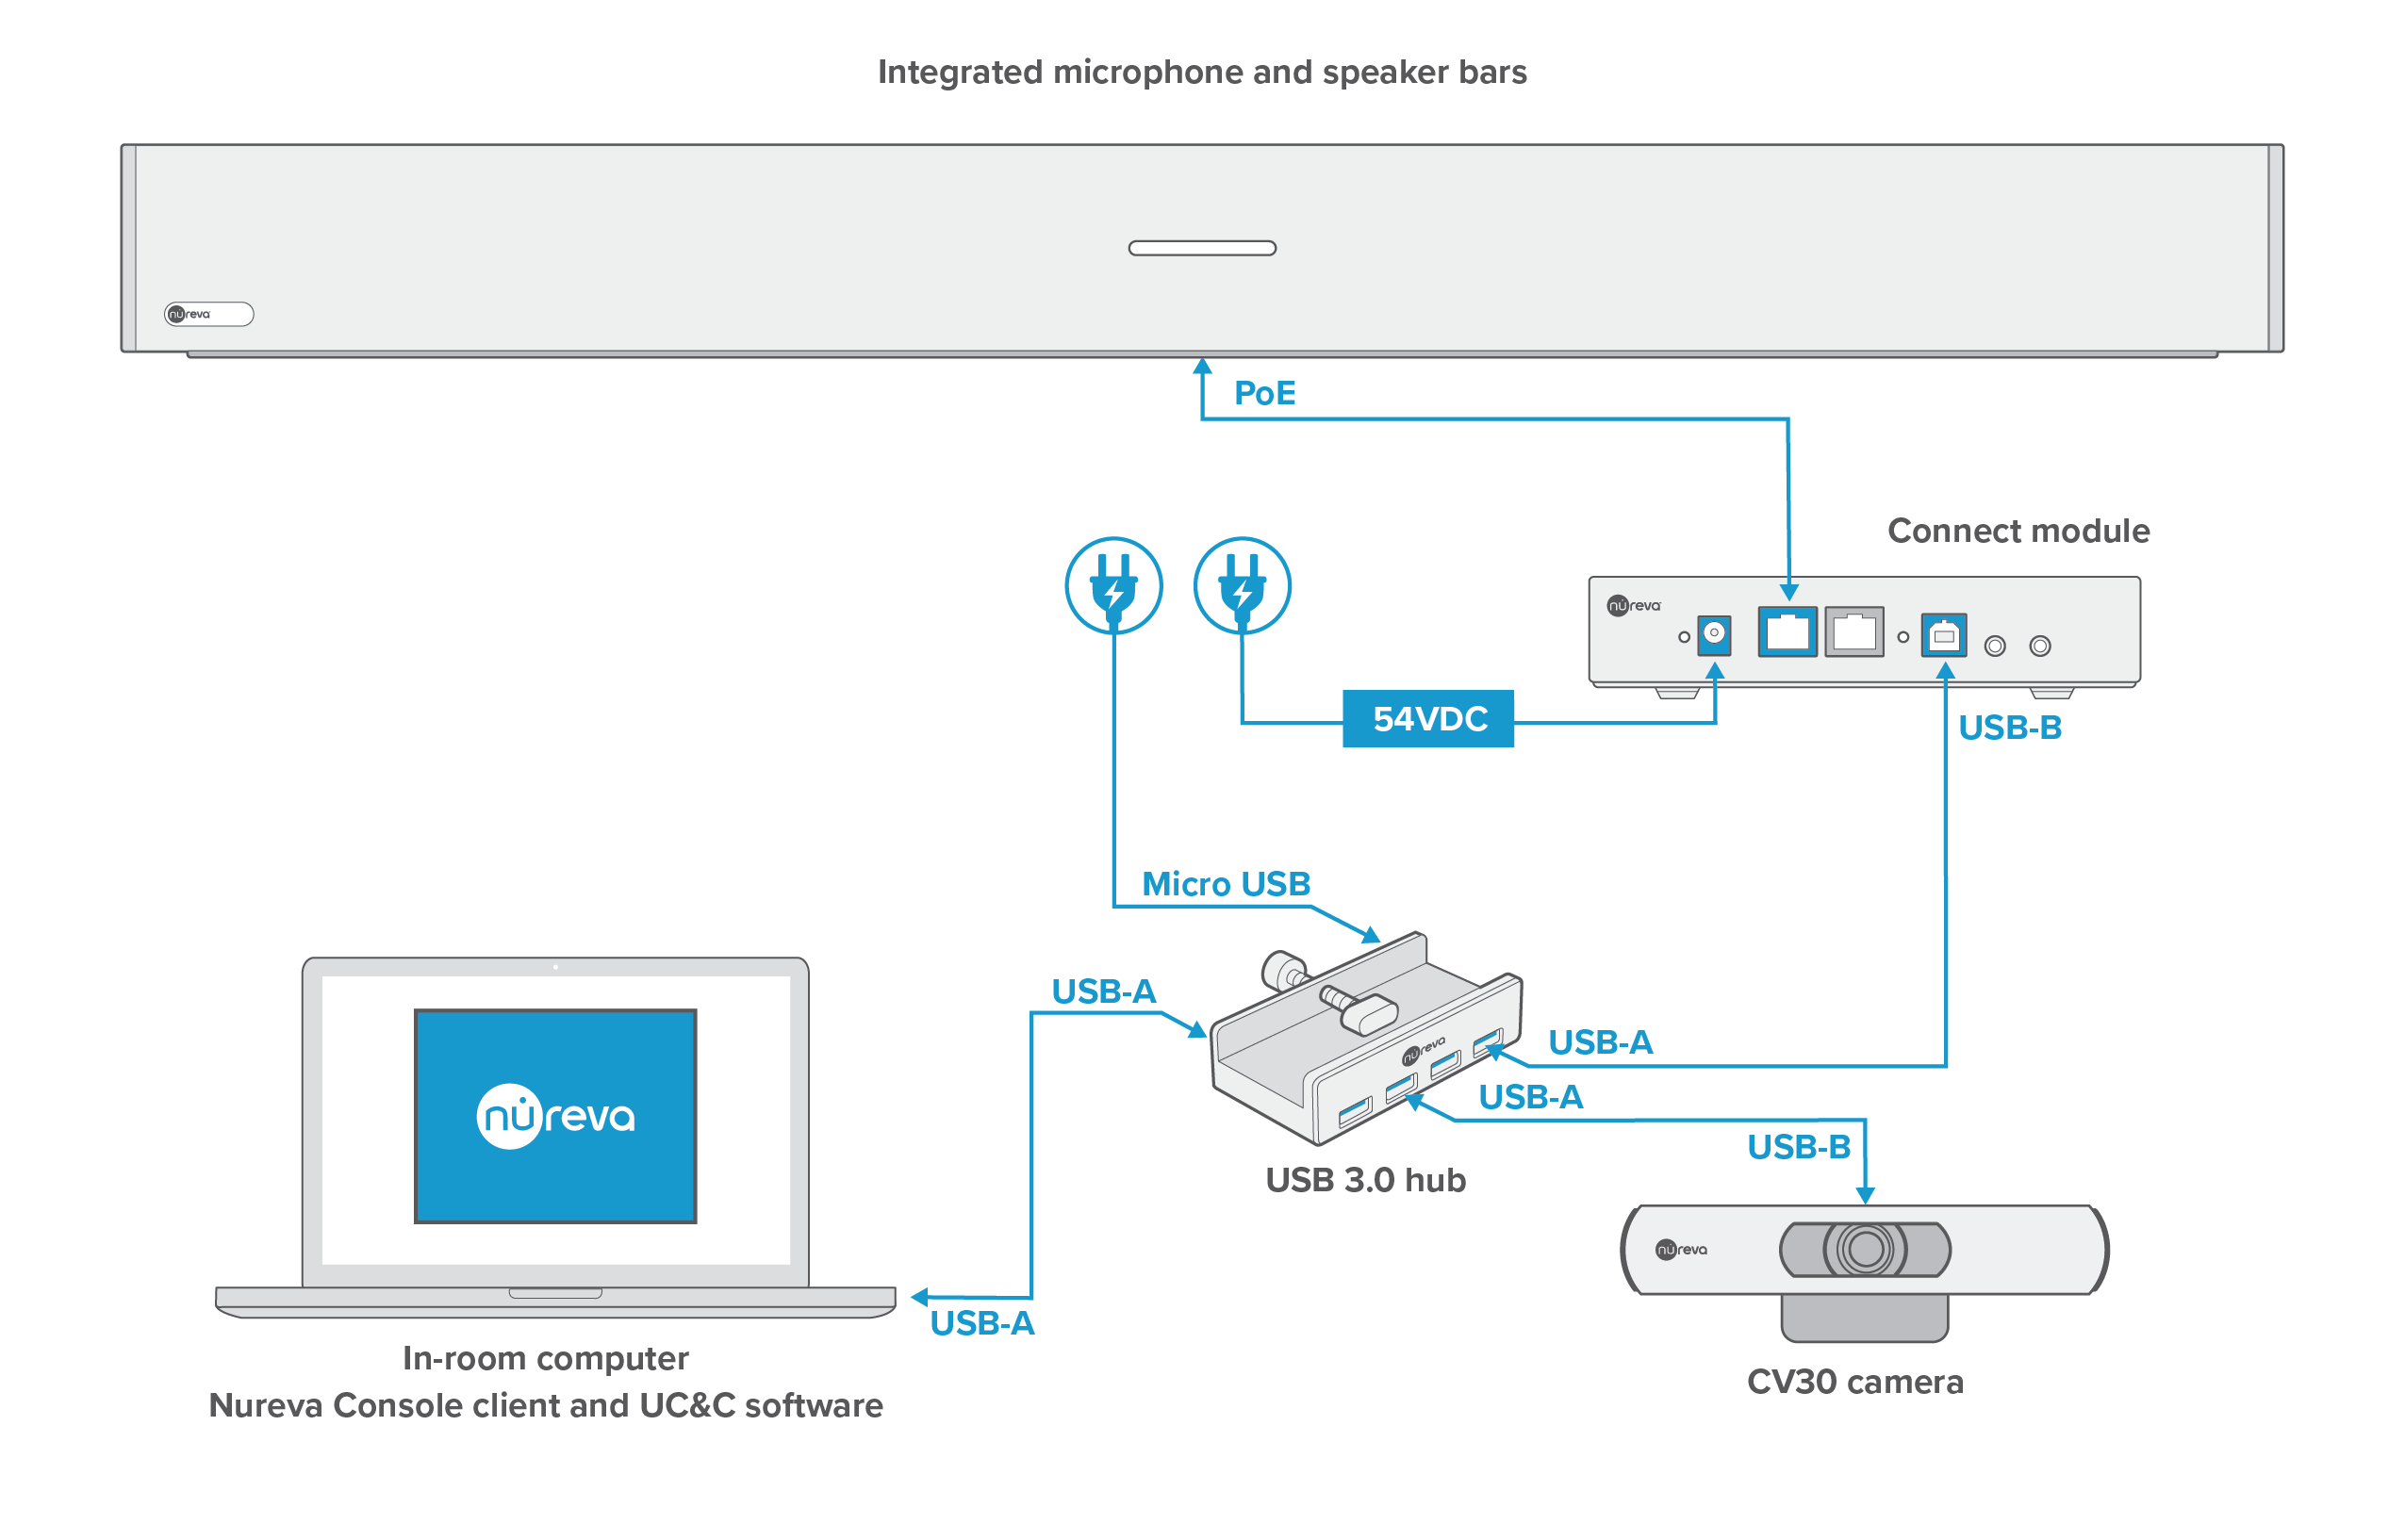
Connect a CV30 and single HDL300
- Connect the provided PoE cable to the back of the microphone and speaker bar then connect the other end to the RJ45-1 port on the connect module.
- Using the provided USB cable, connect to the USB-B port on the connect module and connect the USB-A port on the front of the USB 3.0 hub.
- Connect the USB-B cable to the back of the CV30 camera and connect the USB-A side on the front of the USB 3.0 hub.
- Connect the micro USB power supply to the USB 3.0 hub and plug it into an available outlet or power bar.
- Connect the HDL300 provided power supply to the connect module and plug it into an available outlet or power bar.
- Then connect the USB cable from the back of the USB 3.0 hub to the in-room computer.
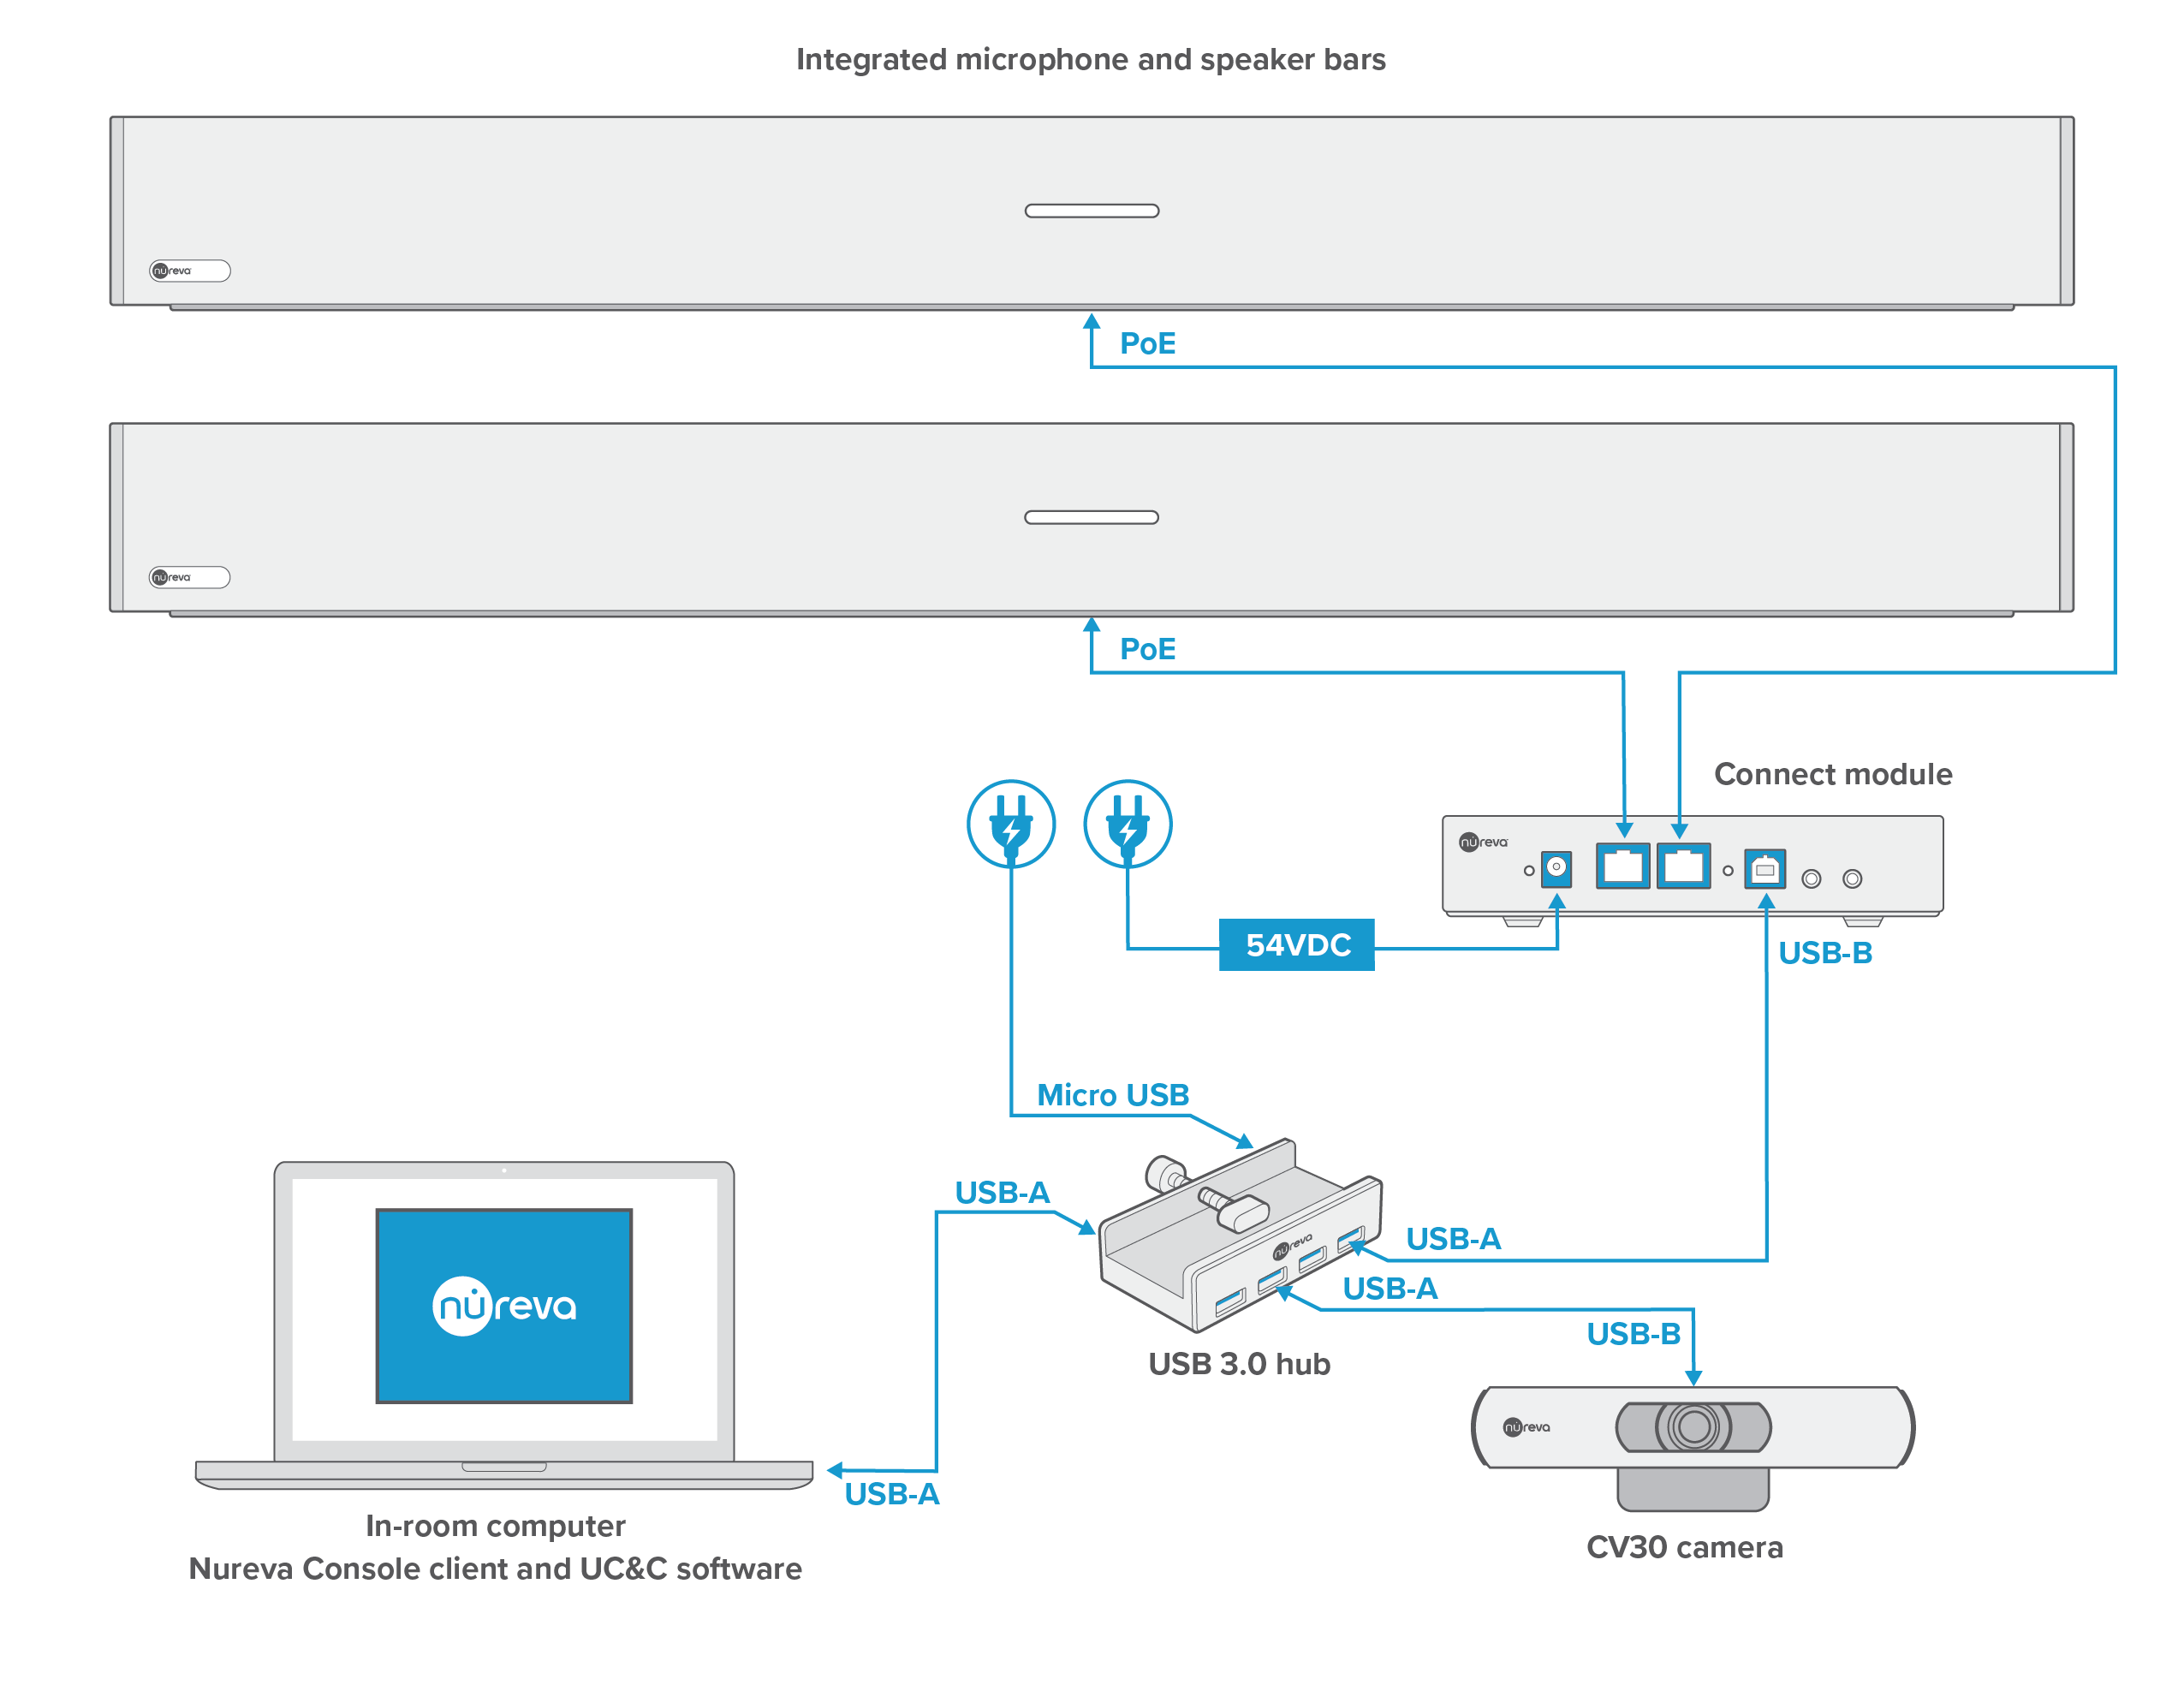
Connect a CV30 and Dual HDL300
- Connect the provided PoE cables to the back of each of the microphone and speaker bars then connect the other ends to the RJ45-1 and RJ45-2 ports on the connect module
- Using the provided USB cable, connect to the USB-B port on the connect module and connect the USB-A port on the front of the USB 3.0 hub
- Connect the USB-B cable to the back of the CV30 camera and connect the USB-A side on the front of the USB 3.0 hub
- Connect the micro USB power supply to the USB 3.0 hub and plug it into an available outlet or power bar
- Connect the HDL300 provided power supply to the connect module and plug it into an available outlet or power bar
- Then connect the USB cable from the back of the USB 3.0 hub to the in-room computer
Once connected to power
- The HDL300 or Dual HDL300 system will automatically calibrate
- Please remain quiet in the room until calibration is complete
- When calibration has been completed continue to step 3 and launch Nureva Console client to perform the firmware update for both the HDL300 and the CV30.
Troubleshoot connection
Restart the computer
- Restart the computer
- Attempt to check for updates again
If restarting the computer did not help
- Uninstall Nureva Console client
- Download the latest version of Nureva Console client
- Install the latest version
- Launch the application
Nureva Console requires a steady connection to the internet. In some cases, specific URLs or program folders may need to be approved by an IT administrator. Please see the article Configuring your network for Nureva Console for additional information regarding URL approvals.
Additional Troubleshooting
- Device not detected by Nureva Console client
- Windows 10 not reporting device detection properly to Nureva Console client