Yes, Nureva has determined that the Poly RealPresence Group 500 will work with the HDL300 and Dual HDL300 when configured as shown in this article. For this integration, two custom cables are needed.
Creating custom cables
Cable 1: Prepare a 3-conductor 3.5 mm jack cable with the three pins, positive (+), negative (–) and ground ( ), as described in the Nureva auxiliary port recommendations.
Cable 2: Prepare a second 3-conductor 3.5 mm jack cable with the three pins, positive (+), negative (–) and ground ( ), as described in the Nureva auxiliary port recommendations.
On your PC
- Connect a USB-A to USB-B cable from a laptop to the connect module
- Download and run Nureva Console client
- Register the HDL300 system following the on-screen instructions
- In Nureva Console client, under
- Device settings
-
Auxiliary ports
- Change to Mic level
- Ensure Sleep Mode is set to Off
- Disconnect the connect module from your laptop and remove the USB cable.
On the connect module
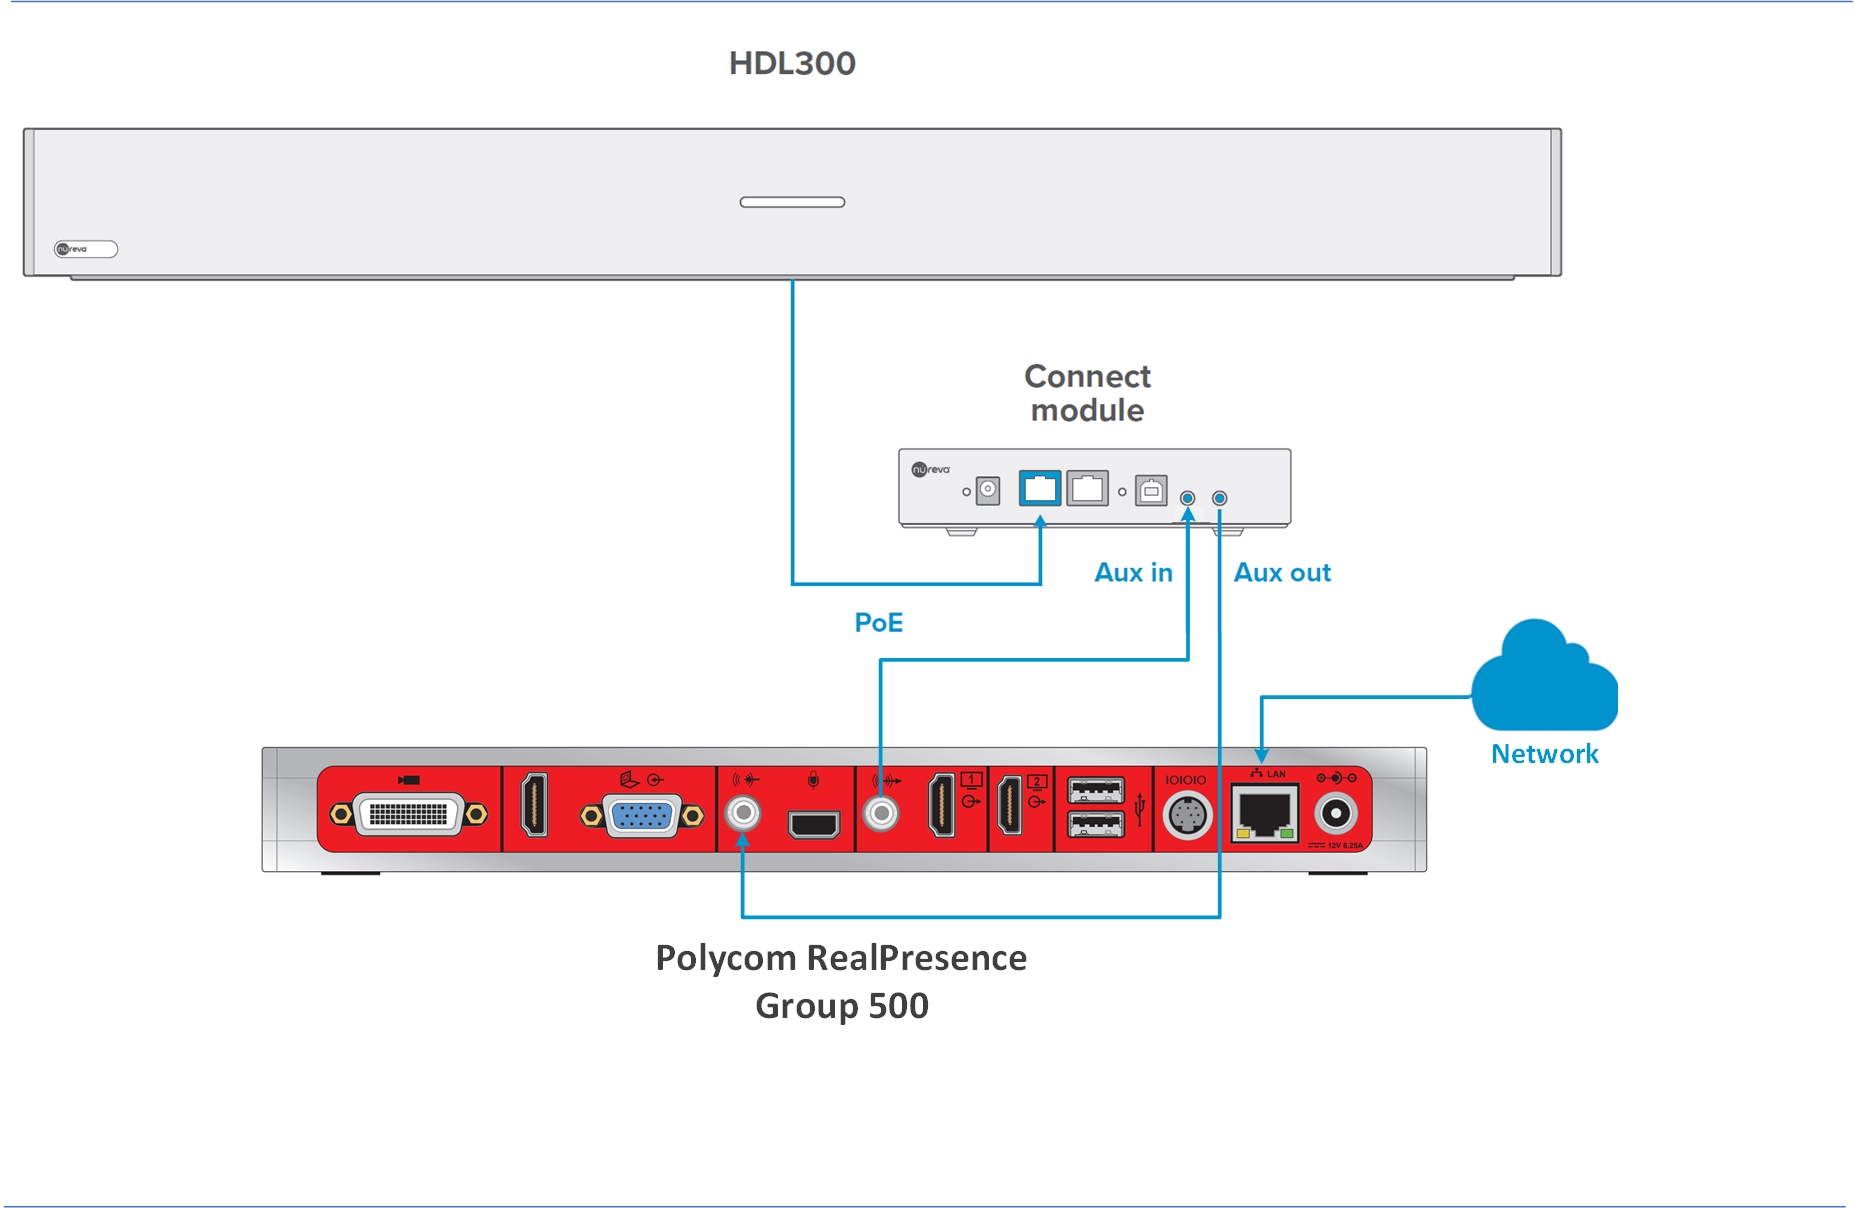
- Plug Cable 1 into the Aux out port
- Plug Cable 2 into the Aux in port
- Connect the PoE cable (provided) to the RJ45-1 port on the connect module to the rear RJ45 port on the HDL300 system
- Plug in the 54VDC power supply
On the Poly RealPresence device
- Plug Cable 1 into the audio Input 3.5 mm stereo line level
- Plug Cable 2 into the audio Output 3.5 mm stereo line level
- Connect the Polycom Group 500 to the network using the LAN port
- Connect the power supply as described in the Polycom user manual
Follow the steps below to configure a Poly Realpresence Group 500 system with the HDL300 system using a direct connection to the Audio input 1 port:
- Open the Polycom web interface
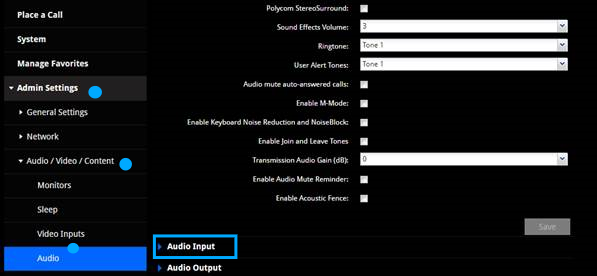
- Go to Admin Settings → Audio/Video/Content → Audio → Audio Input

- Enable "Use 3.5 mm Input for Microphone"
- Disable "Echo Canceler." The HDL300 system provides like-out echo-cancellation.
- Adjust the input level using the gain slider. Test the adjustments in a test call.
Additionally, make sure the following Polycom features are disabled:
Automatic gain control |
Instant adaptation echo cancellation |
Automatic noise suppression |
Audio error concealment |
Keyboard noise reduction |
Polycom Siren™ Lost Packet Recovery |
Polycom NoiseBlock™ technology |
Polycom Stereo Surround™ technology |
Polycom Acoustic Fence™ |
Activelip synchronization |
Live music mode |
Instant adaptation echo cancellation |
Connection Diagram
 |
NOTE: The aux in/out connections are single-ended, unbalanced signals with default maximum output signals as given in the table below. Any equipment requiring voltages below these levels may result in clipping, distortion, and in extreme cases, damage to connected systems. Equipment requiring voltages above these levels will not be adequately driven by the HDL300 system’s output signal and may result in quiet/no audio on the channel. Before connecting to the connect module, make sure the third-party device voltage levels are adequate or adjusted properly by additional interfacing hardware.

NOTE: The technical information provided in this article, including specifications and recommendations, is provided for customer convenience. The accuracy of this information is not guaranteed and is subject to change without notice. Please check the user manuals and related documentation from each product manufacturer to ensure that your setup meets the proper recommendations.