
Administrative access is required on the computer connected to the HDL200 system.
Step 1: Download Nureva Console client
 |
||
| Ver. 3.1.260940 Size: 143 MB | ||
%4072x-8.png) |
||
Ver. 3.1.260940 Size: 216 MB
|
Install on the computer connected to the HDL200
- Launch Nureva Console client installer
- Follow the steps to complete the installation
Nureva Console client enables:
- Remote management of Nureva devices in
- Device firmware updates
- Local device management
NOTE: If you have increased security on your network, you may need to approve the URLs from this list.
DeleteStep 2: Install and connect hardware
Install the HDL200
- HDL200 installation guide
- HDL200 installation video - wall mount
- HDL200 installation video - display mount
- Using the provided USB cable, connect to the USB-B port on the HDL200
- Run the cable to the in-room computer, connecting to a USB-A port
- Connect the provided power supply to the HDL200 and plug it into an available outlet or power bar
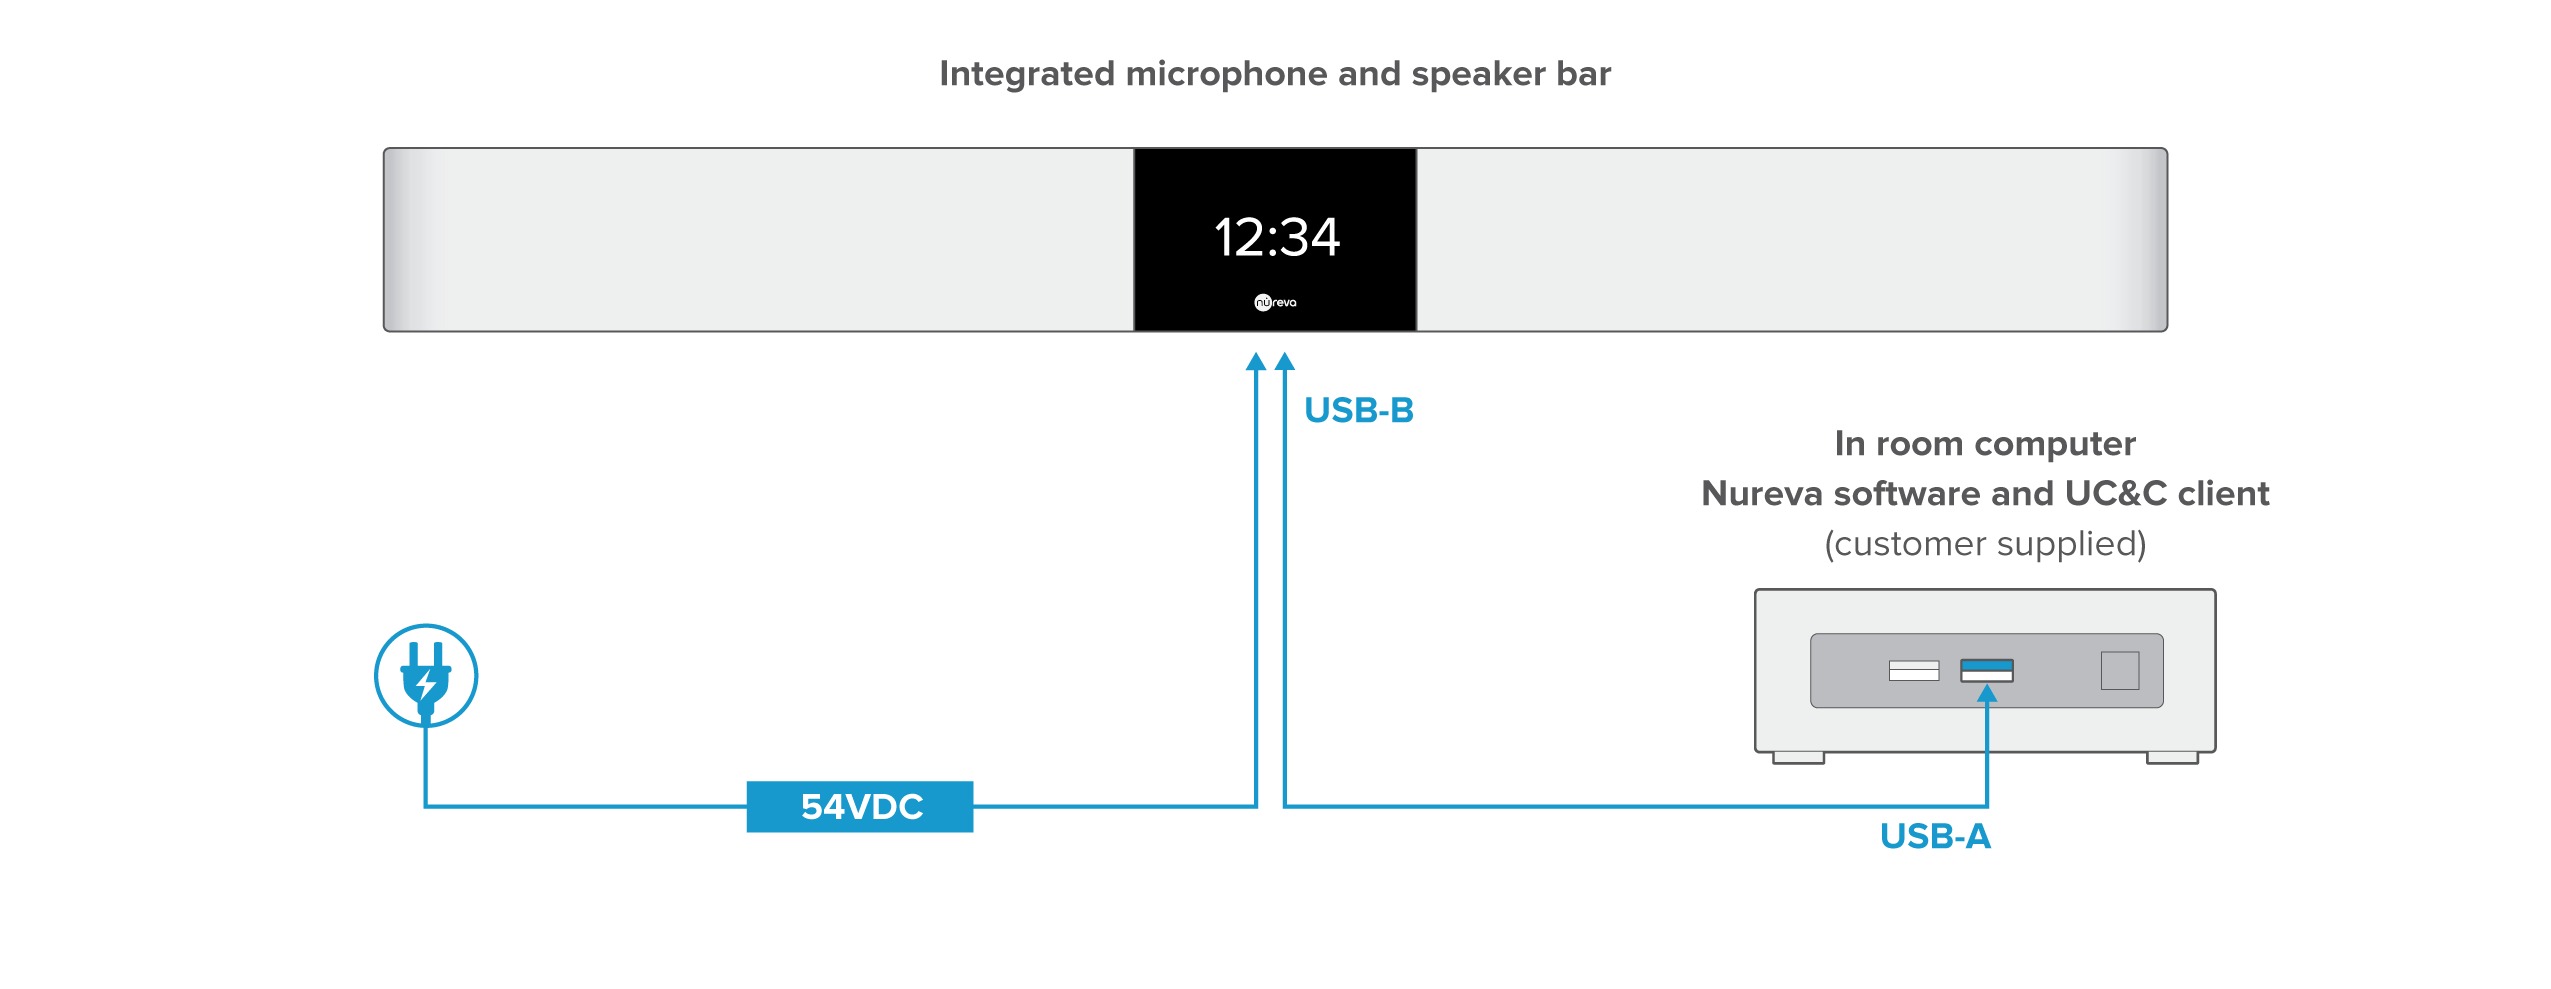 Once connected and powered
- Once powered up, the HDL200 will automatically calibrate
- Please remain quiet in the room until calibration is complete
- When calibration has been completed continue to step 3 and launch Nureva Console client to perform the firmware update.
Step 3: Enable remote management
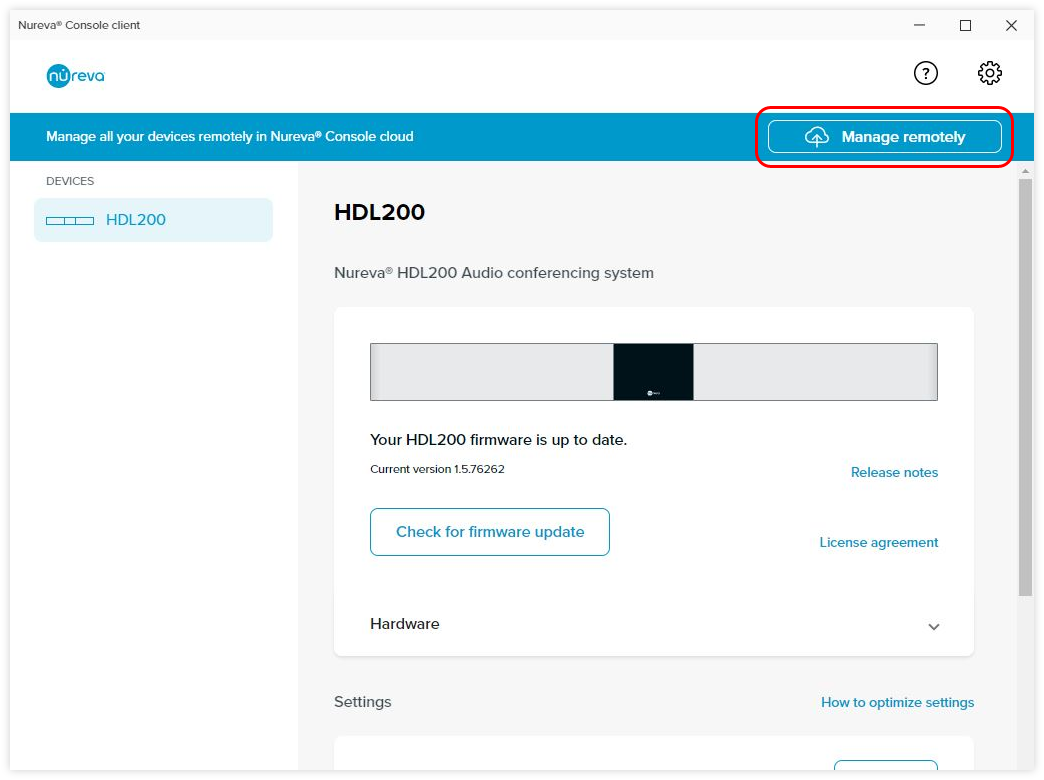
- Launch Nureva Console client
- The HDL200 system will be automatically detected by Nureva Console client
- If the system is not detected, check the USB connection to the computer as well as the power connection
- To begin, click the Manage remotely button in the blue banner
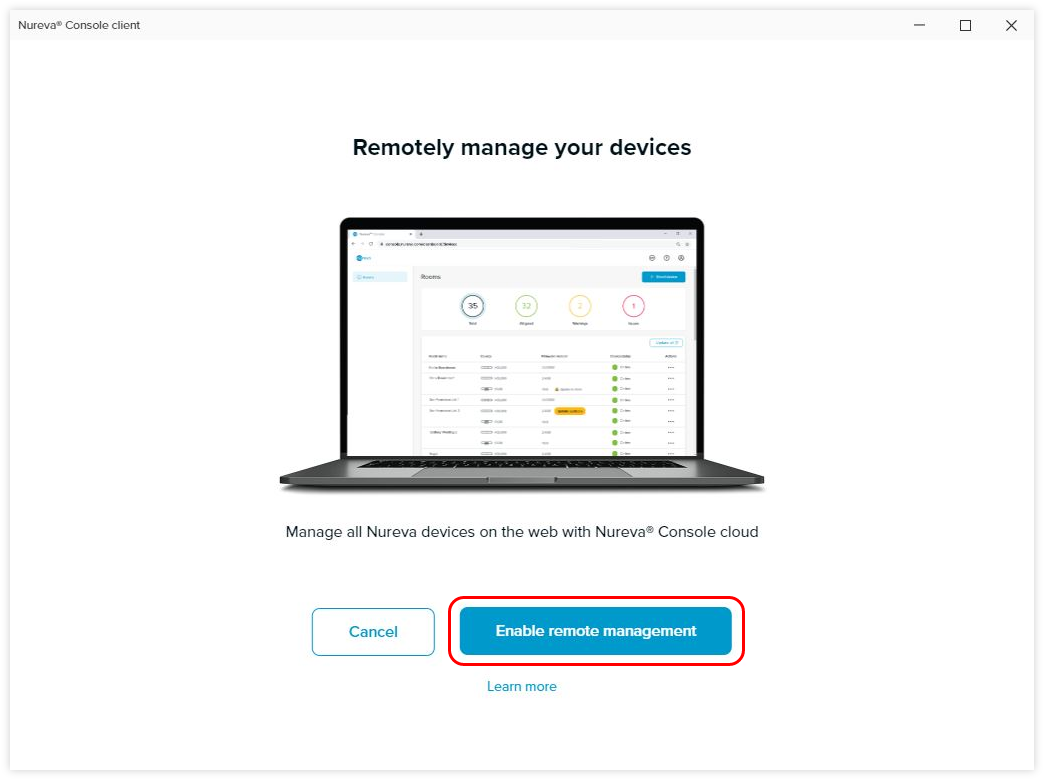
- Click the Enable remote management button at the bottom of the window
- Click the Create account link
- Advance to the Nureva Console account creation page
- Complete account creation
- If you have an account, sign in and enroll your device
Please DO NOT close Nureva Console client as it is needed to complete enrollment.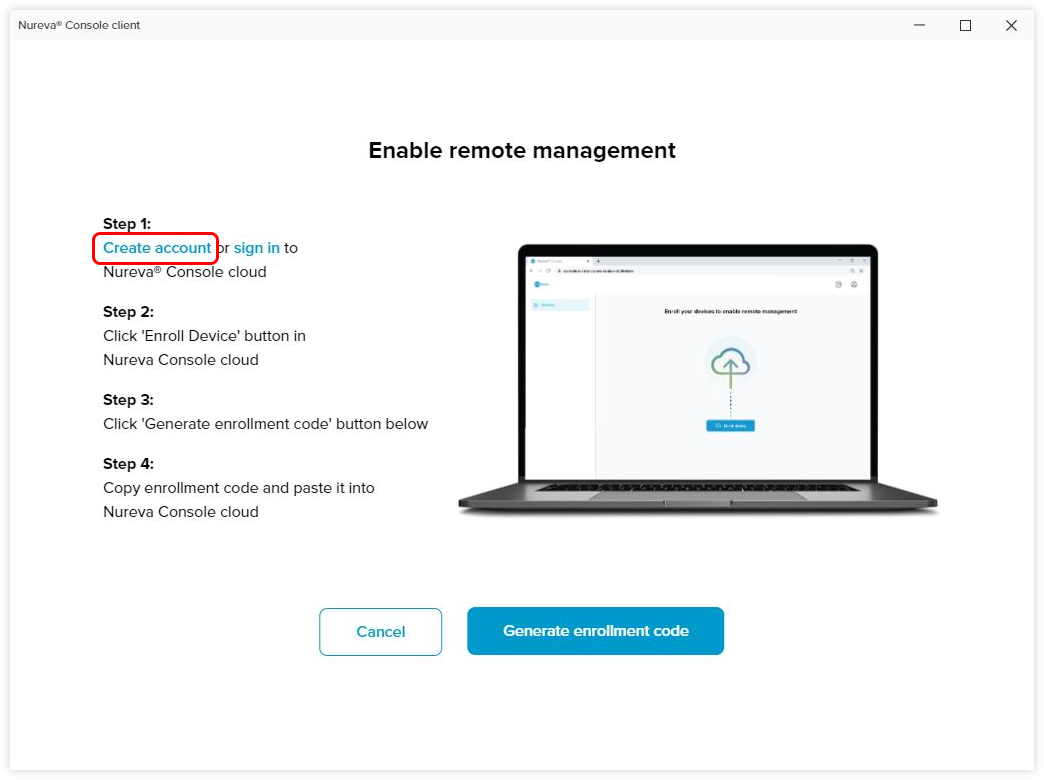
- Complete all of the fields and set-up steps
- Enter your email address, first name and last name
- Create a password
- Agree to the Nureva Software License and General Terms
- Opt-in or out of product and service emails
- Click on Create account
- Check your email for the verification email
- Verify the email address by clicking the Verify link in the email
- If the email is not in your inbox, please look in the junk or spam filter
- You will be directed to the sign in page, where you can now sign in
- The first time that you sign in an organization will need to be created
- Enter your Organization's name and click Create
Click here for additional information on how to create an account.
NOTE: If you have increased security on your network, you may need to approve the URLs from this list.
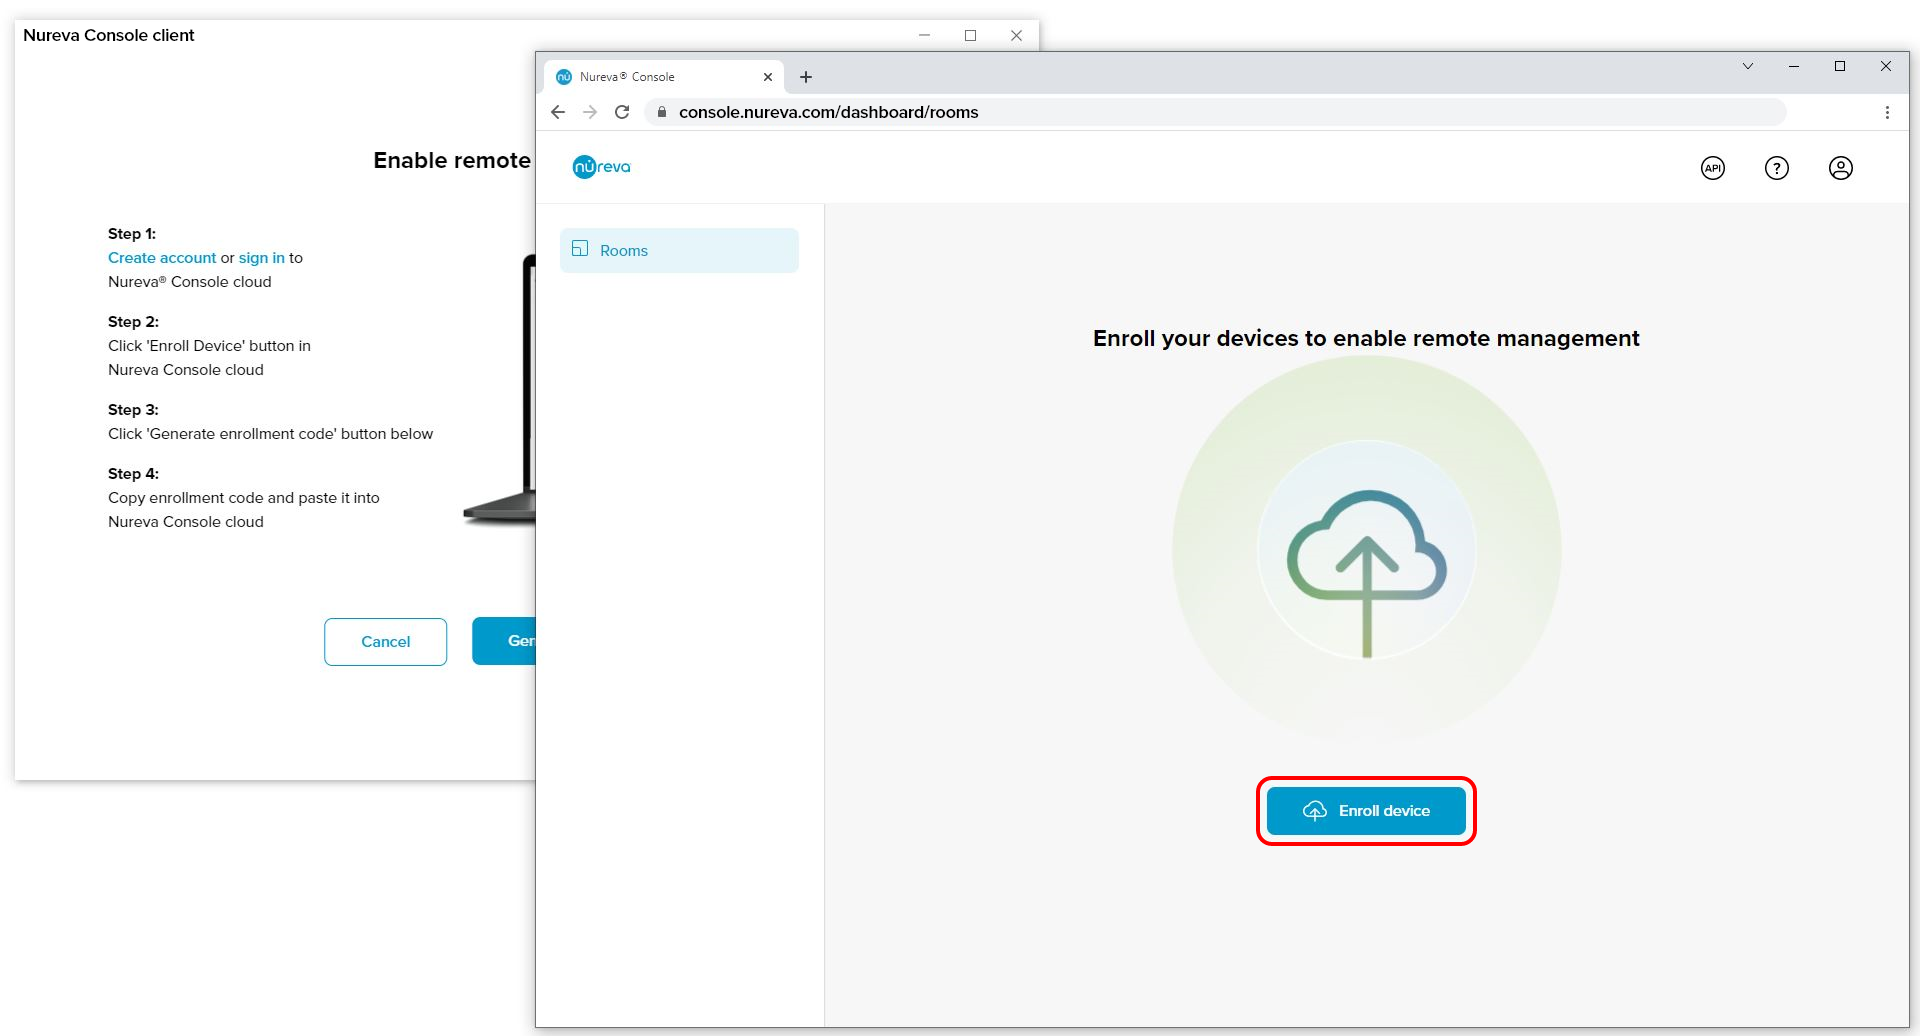
Step 2: Begin enrollment
When Nureva Console cloud launches for the first time, no devices will be enrolled. To make the connection between the physical hardware and the ability to manage it online, an enrollment code is required.
- Click on Enroll device to begin device enrollment
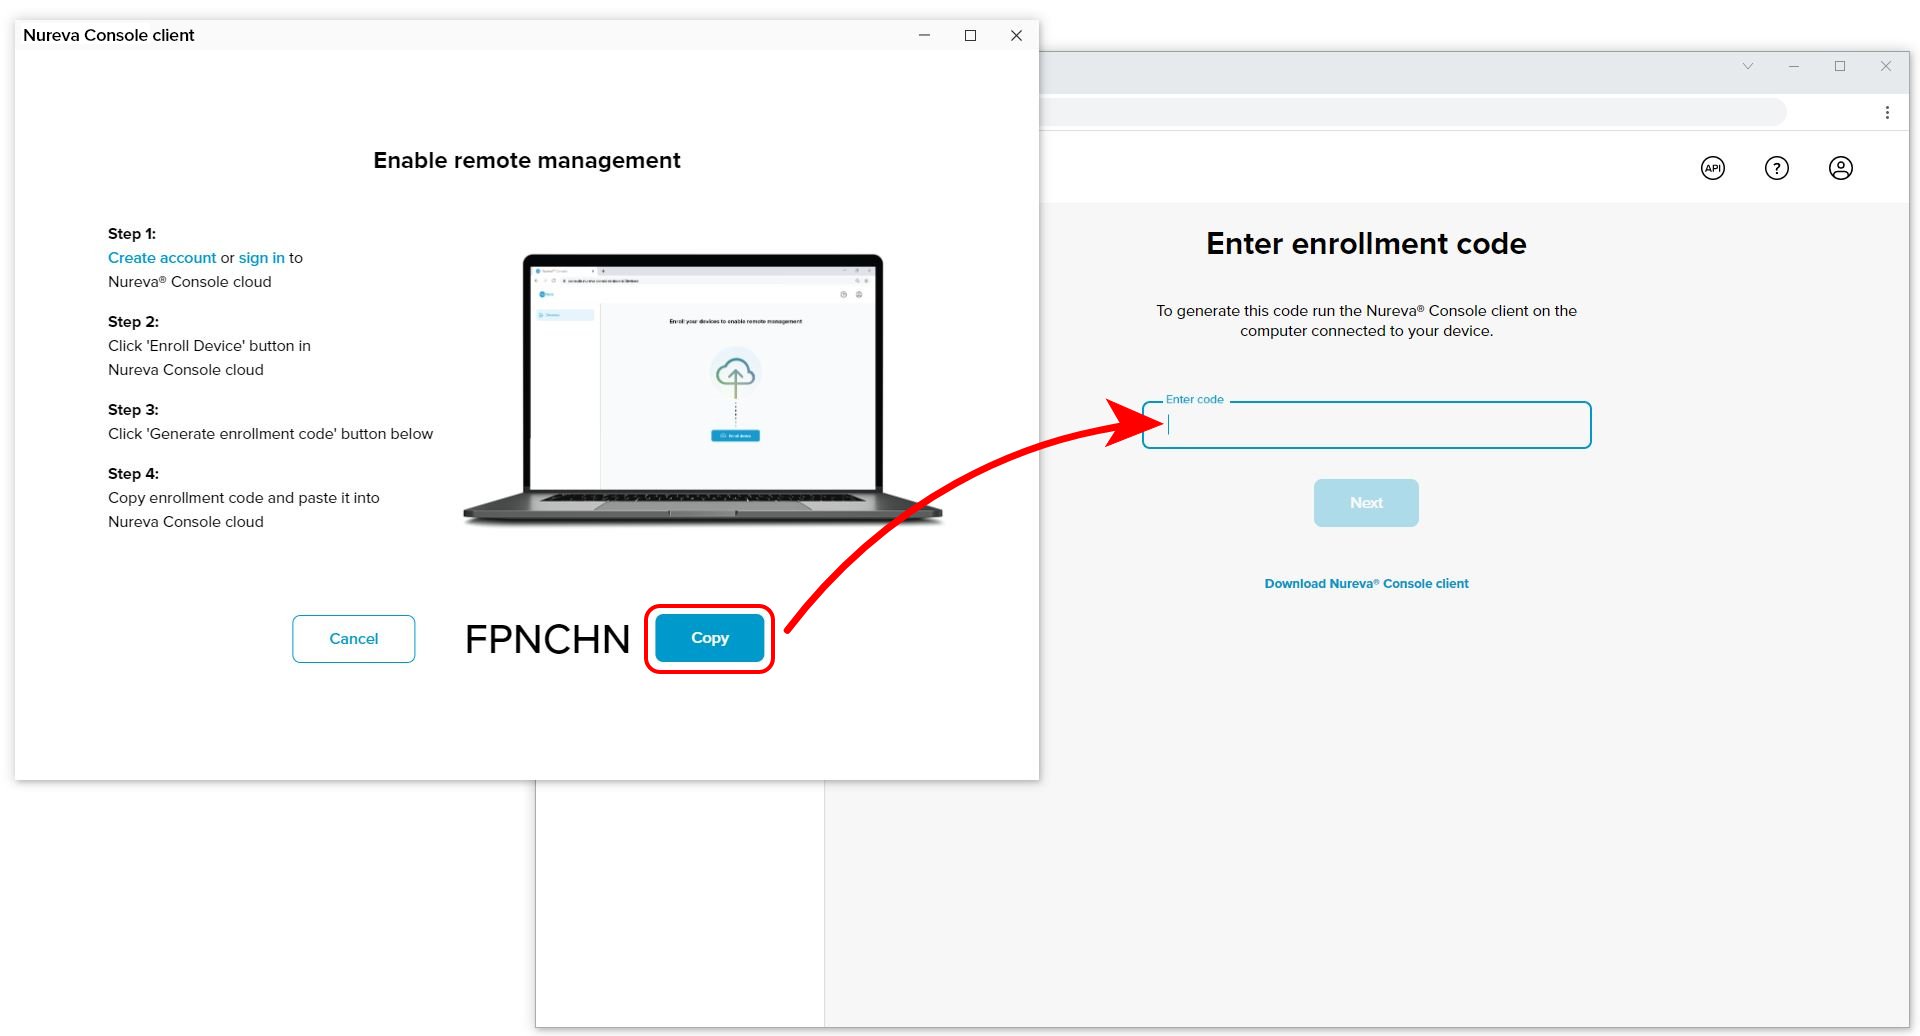
Step 3: Generate enrollment code
- Click the Generate enrollment code button in Nureva Console client
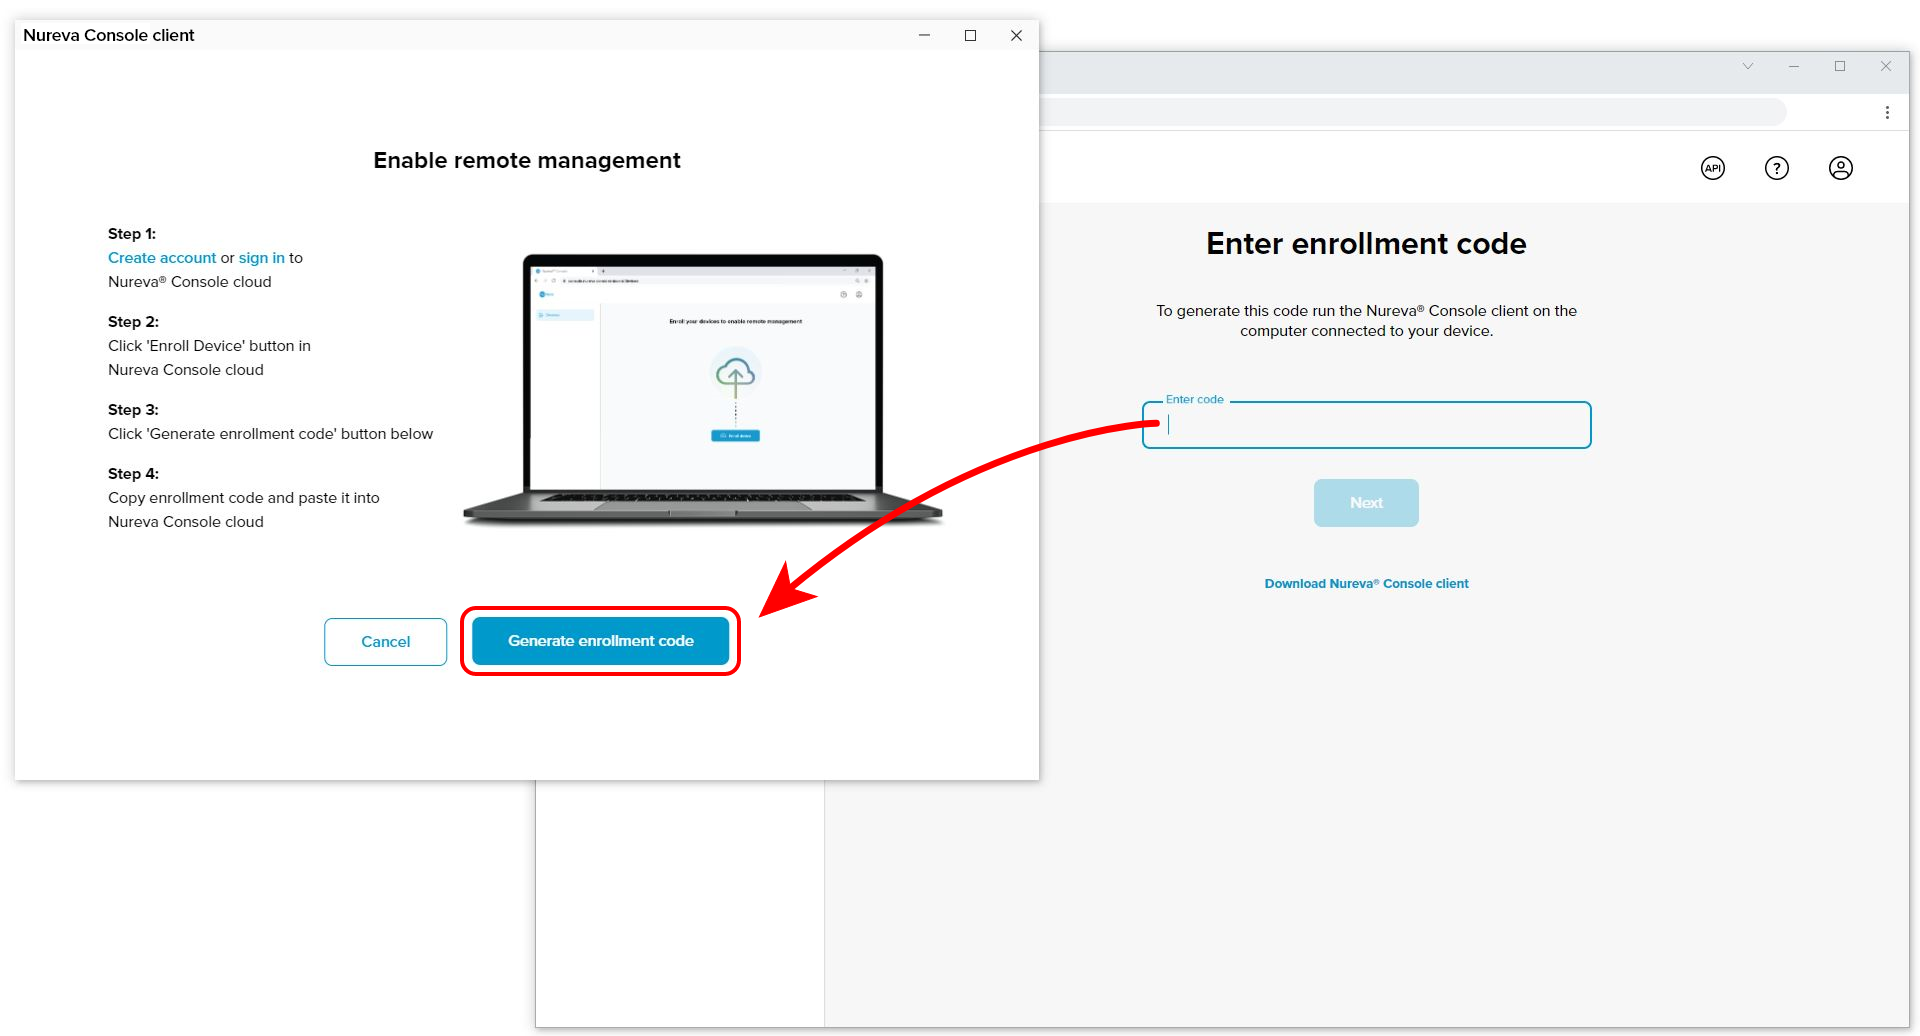
- Click the Enroll device button in the client
- Return to the browser window
- Paste the enrollment code into the Enter code box in Nureva Console cloud
- Click Next
- Select Allow from the pop-up in your browser to continue with device enrollment

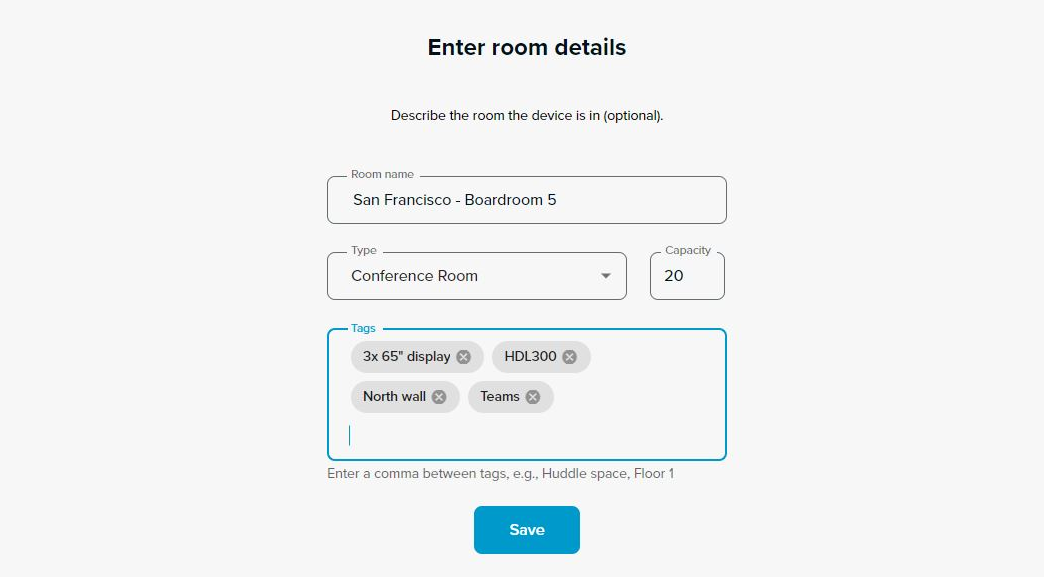
Step 5: Room details (optional)
- Enter some room details such as the room name, type, capacity and tags
- Click Save
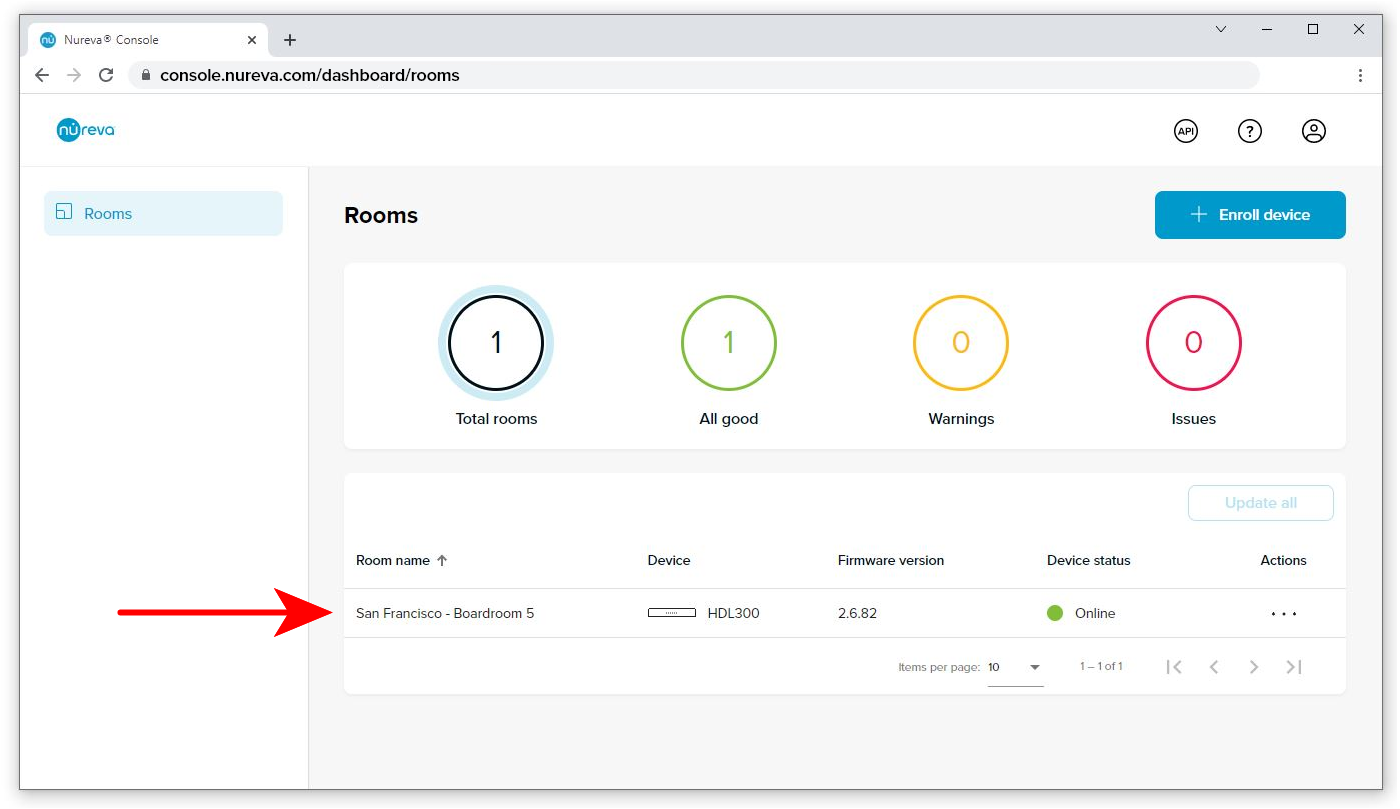
The HDL200 system should now appear in the device list, as shown below.
Step 4: Update firmware
⚠ The HDL200 system will not be available for calls during the firmware update. Please do not turn off the computer, unplug, or disconnect the device.Nureva Console indicates the firmware version of each enrolled device. If Update available is shown in the firmware version column of the dashboard, the firmware is not up to date.
- Click on the three dots in the Actions menu and select Update firmware
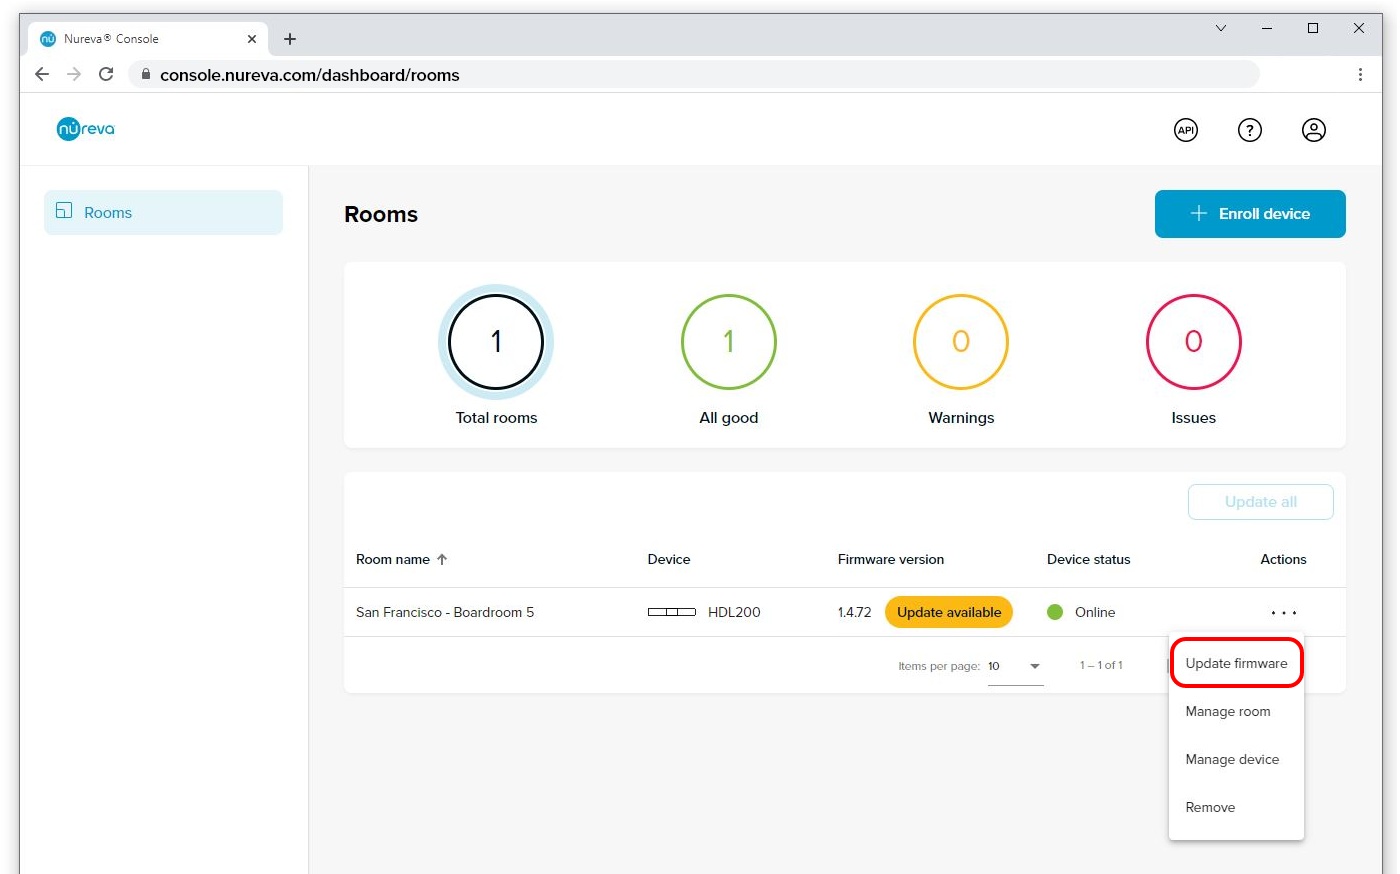
A confirmation dialog will appear to acknowledge that the device will not be available for calls during the update process.
- Click Update to continue
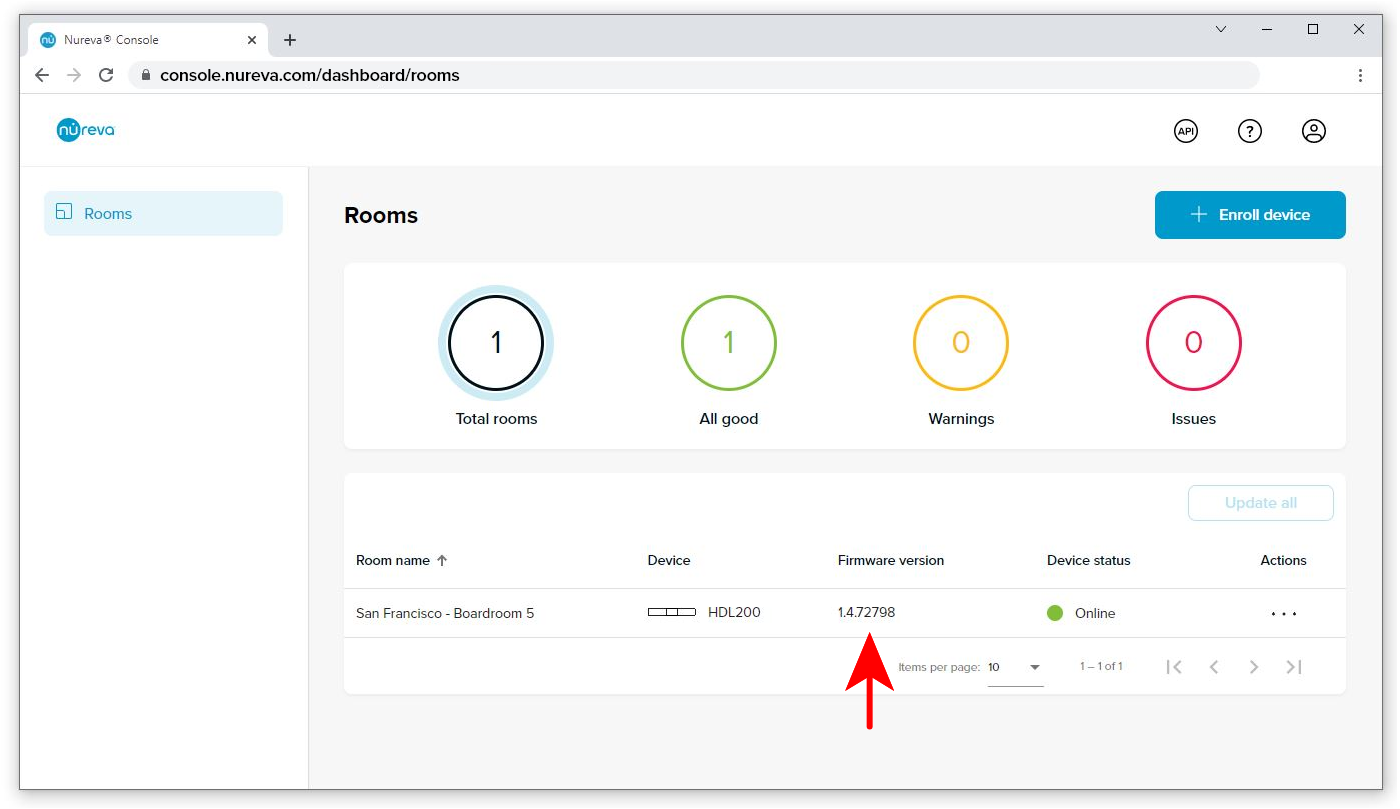
The download and update process will commence. When completed the new firmware version will be visible.
The HDL200 setup is now complete. To ensure audio quality it is recommended to perform a test call.
For more information on optimizing device settings please go here.
Warnings and other considerations
Hardware installation
Installing the HDL200 microphone and speaker bar in the positions listed below may cause overheating.- Do not install on tables, credenzas, countertops, or other surfaces without using Nureva approved accessories
- Blocking of the vents on the HDL200 system will impede airflow and will lead to overheating
- Ensure adequate space between all vents and other objects to promote airflow and cooling
- Do not operate the HDL200 system while laying on the back surface (with speakers directed upwards) as this impedes airflow
Nureva Console and client
Enrollment and use of Nureva Console is optional. Nureva Console client is required for local (in-room) management of hardware devices.