The CV30 camera provides an on-screen display menu (OSD) to adjust the camera settings. Please note that only advanced webcam users should adjust these settings. For most situations, the default settings will provide the optimum image quality.
Navigating the on-screen display
 |
||
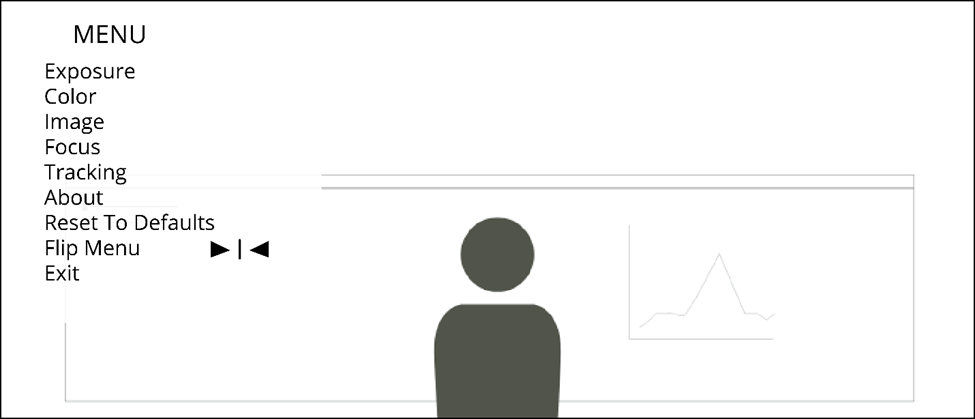
| The on-screen display will overlay on top of the video preview |
- Select Back from a menu to return to the main OSD menu
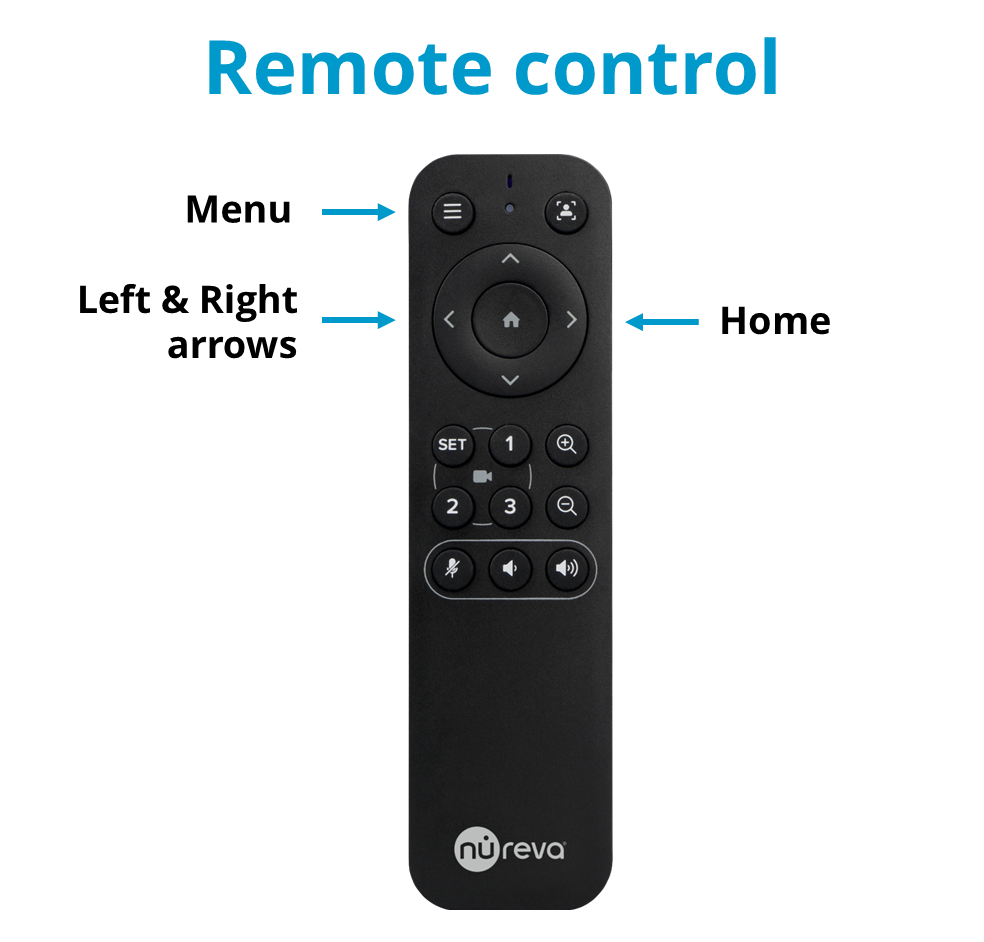
- Once in the OSD menu, use the Up, Down, Left and Right arrows to navigate the menu and adjust the settings
 |
Delete
Exposure
The Exposure settings determine how light or dark the CV30 camera's image will appear when the camera is in use. The CV30 provides seven exposure settings. It is recommended to keep the default settings to ensure the best image quality.
Mode
The available options are Auto, Manual, Shutter Priority and Bright. Each option offers adjustments to settings such as the shutter speed, gain, dynamic range compression (DRC), backlight and antiflicker.
Compensation
The Compensation setting can be turned on (default) or turned off. When this feature is turned on the CV30 camera will automatically brighten (increase exposure) or darken (decrease exposure) to offer the best image quality.
Compensation (Comp) Level
Compensation Level provides fine-tuning of the Compensation setting. The level settings range from -7 to + 7, with +1 as the default. Each step to the " + " increases the compensation and each step to the " - " decreases the compensation.
Gain Limit
The Gain Limit setting allows for the adjustment of the maximum amount of gain that the camera applies when in the Auto and Bright modes. The range for the gain limit is from 0 to 15. The default setting is 6.
Backlight
The backlight setting can be used to balance out a bright background when the CV30 camera is in the Auto and Bright modes. The backlight setting can be enabled by turning the setting to "on" and can be disabled by turning it to "off".
Dynamic range compression (DRC) Strength
Dynamic range is the difference between the darkest light level and the brightest light level in the FOV. The DRC strength setting for the CV30 camera ranges from 0 to 8. Each step higher provides a higher enhancement to the darker areas in the FOV. The default setting is 2. Setting DRC to 0 will provide no enhancement to the light levels in the FOV.
Anti-flicker
If there is a light source in the FOV that appears to flicker, the anti-flicker setting may help. This generally happens to flat panel displays, computer monitors and some types of light bulbs. The CV30 camera offers 50Hz and 60Hz options when used in Auto and Bright modes. If this setting is set to "off" the CV30 camera will not minimize flickering light sources.
DeleteColor
The Color settings for the CV30 camera determine how the saturation and intensity of the colors displayed in the FOV and to remote participants. The CV30 camera offers five choices to help fine-tune the color. Each of the choices allows for further tuning of the Red Gain, Blue Gain, Saturation and Hue. Adjustments to the white balance settings are saved by the camera. We recommend leaving the fine-tuning values of each setting at the default values for optimal results.
White balance
When using the CV30 camera there might be situations when white and other colors may not look as expected. Adjusting the white balance setting may improve this. The settings offered are Auto, Indoor, Outdoor, One Push, Manual and VAR (Variable).
- Auto - Automatically sets the white balance each time the camera is used. We recommend using this setting in most situations.
- Indoor - Chooses a white balance for using the camera with light from fluorescent, incandescent or LED lights.
- Outdoor - Chooses a white balance for using the camera with natural light.
- One Push - Quickly have the camera calculate your room's white balance and adjust the settings accordingly.
- Manual - Adjust the Red Gain, Blue Gain, Saturation and Hue manually to your own white balance preferences.
- VAR - If you already know the Color Temperature, Red Gain, Blue Gain, Saturation and Hue settings you want to use, select VAR and enter the desired settings.
Image
The CV30 camera's Image menu options include Luminance, Contrast, Sharpness, Flip-H, Gamma, Style and LDC. It is recommended to keep the default settings to ensure the best image quality.
Luminance
Adjusts the luminance value of the colors in the image. This setting has a range from 0 (off) to 14 (maximum). With each higher increment to the luminance setting the lighter the colors will appear in the image. The default setting is 7.
Contrast
The Contrast setting makes adjustments between the light and dark aspects of the image in the FOV. The higher the contrast setting the more difference there is between light and dark. The default setting is 7.
Sharpness
Adjustments to the Sharpness change how clear the details are in the FOV image. The higher the setting the sharper the details in the image will appear. The default setting is 2.
Flip-H
When viewing the FOV in a UC&C client or camera application the default view is a mirrored image and the reverse of what remote participants will see. When Flip-H is turned "on" the view in the application is not mirrored for local users and is mirrored for remote participants. Flip-H is set to "off" as default.
Gamma
Adjusting the gamma setting will change the overall brightness of the image. The CV30 camera offers Default, 0.45, 0.50, 0.56, 0.63 and EXT (Extension) choices.
Style
The style presets allow for preset adjustments to the luminance, contrast, and sharpness. The CV30 camera offers Default, Normal (Norm), Clarity, Bright, PC, Clarity (LED) and Face presets.
LDC
Lens distortion correction (LDC) allows for slight changes to correct distortions in the FOV. This setting is turned off by default.
DeleteFocus
The CV30 camera features auto-focus which is always active. The Focus settings allow for the adjustment of Auto-focus (AF) Sensitivity as well as the Focus Area. It is recommended to keep the default settings to ensure the best image quality.
Autofocus
The CV30 camera does not allow for auto-focus to be turned off in the OSD. However, some conferencing applications may offer the option to turn this feature off.
AF Sensitivity
The AF Sensitivity can be set to Low, Medium and High. When Medium or High are selected the CV30 camera will be more active with adjustments to the focus. Low is the default setting.
Focus Area
The CV30 camera provides four options for the area that auto-focus is responding to. Middle Area is the default setting.
- All - Auto-focus responds to the entire FOV
- Bottom Half - Auto-focus responds to the bottom half of the FOV
- Middle Area - Auto-focus responds to the middle of the FOV
- Upper Half - Auto-focus responds to the top half of the FOV
Tracking
The Tracking menu allows for changes to tracking settings.
Automated
The CV30 camera features automated tracking that uses the 4K image sensor, 84O field of view (FOV) and electronic pan, tilt, zoom (ePTZ) capability to maintain the view of people in a preset area of the FOV.
Zoom Level
The CV30 camera offers three zoom levels for automated tracking. Users have the choice between Low, Medium (default) and High settings.
Area
The CV30 camera has three tracking area settings which can be selected through the Tracking menu. Choosing from Full, Top 2/3 or Top 1/2 settings will help determine how the camera looks for the person to track.
Mode
The CV30 camera has three tracking modes which can be selected through the Tracking menu. The number of people that you want to track will determine the mode to choose. The modes that are offered are Auto, Manual and Group 2.
DeleteAdditional menu options
About
Viewing the About menu will display the language, model, serial number, firmware version and auto-focus version for your CV30 camera. The language can be cycled from English to Spanish, French or German by using the Right or Left arrow on the remote control.
Reset To Defaults
Selecting this menu option will return the CV30 camera settings to their defaults.
Flip Menu
When using the CV30 camera with some camera apps or UC&C platforms the on-screen display (OSD) will be shown in a mirror image. The Flip Menu option allows the OSD to be reversed and provides the user with a convenient way to view the OSD options if displayed as a mirror image.
Delete