Windows 10
Learn how to optimize the HDL300 system's settings for your organization's unique space.
Before you start:
- Nureva Console is used to manage the HDL300 system's features and settings
- Additional setup information is available at Getting started with your HDL300 system
- All device settings can be adjusted back to the system defaults at any time
- It is recommended to adjust device settings while on a test call
Set HDL300 as your default audio device
Follow these steps to set up the HDL300 system as the default audio device.
Open Nureva Console client
- Select Device Settings
- Select Open Sound settings
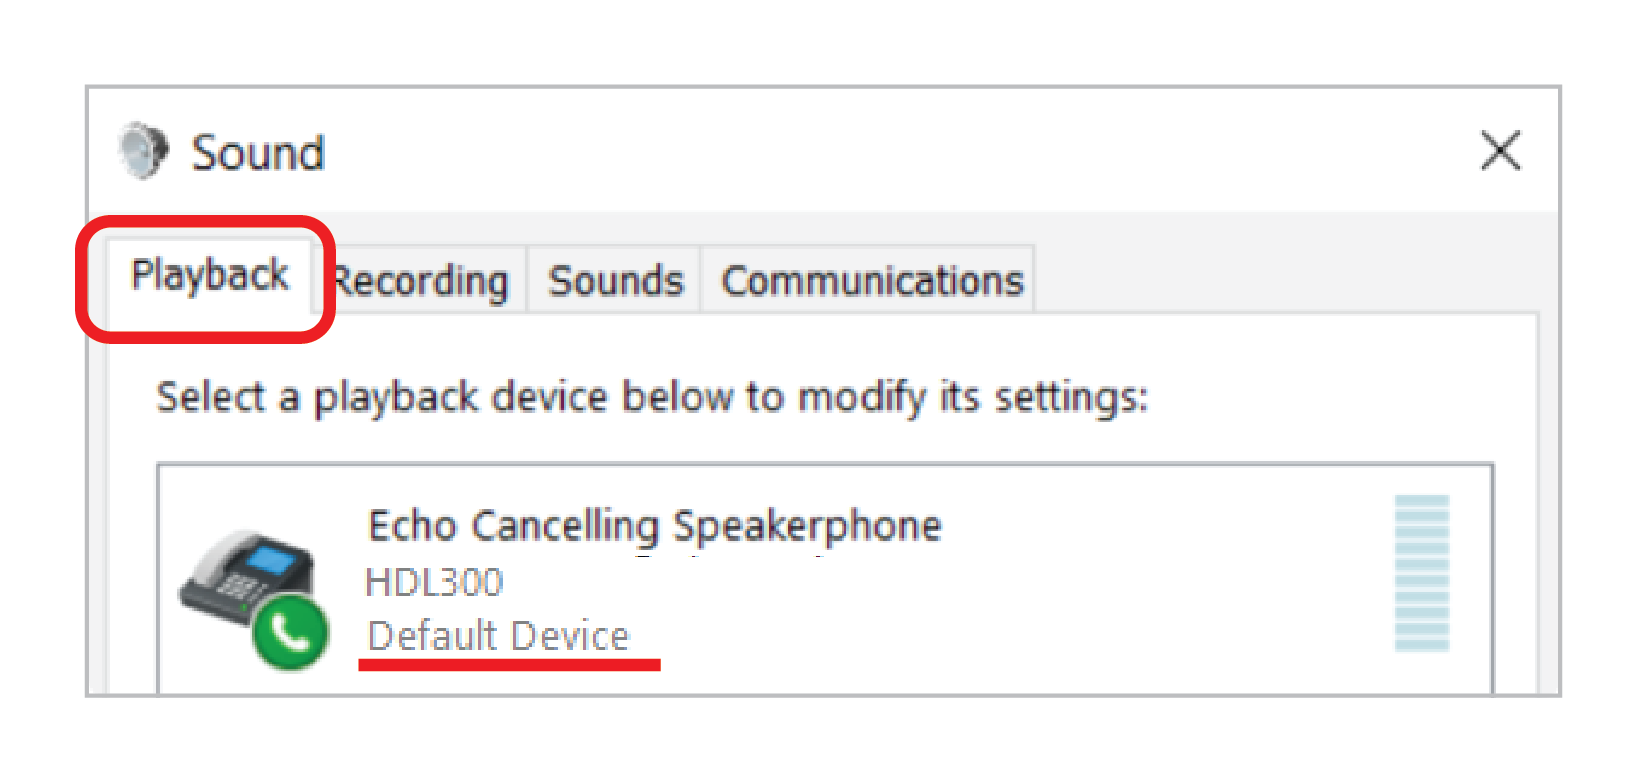
In Windows sound settings
- Select the Playback tab
- Select HDL300 (Echo Cancelling Speakerphone)
- Using the drop-down menu at the bottom of the panel, choose Set as Default Communication device
- Select HDL300 (Echo Cancelling Speakerphone)
- Using the drop-down menu at the bottom of the panel, choose Set as Default device
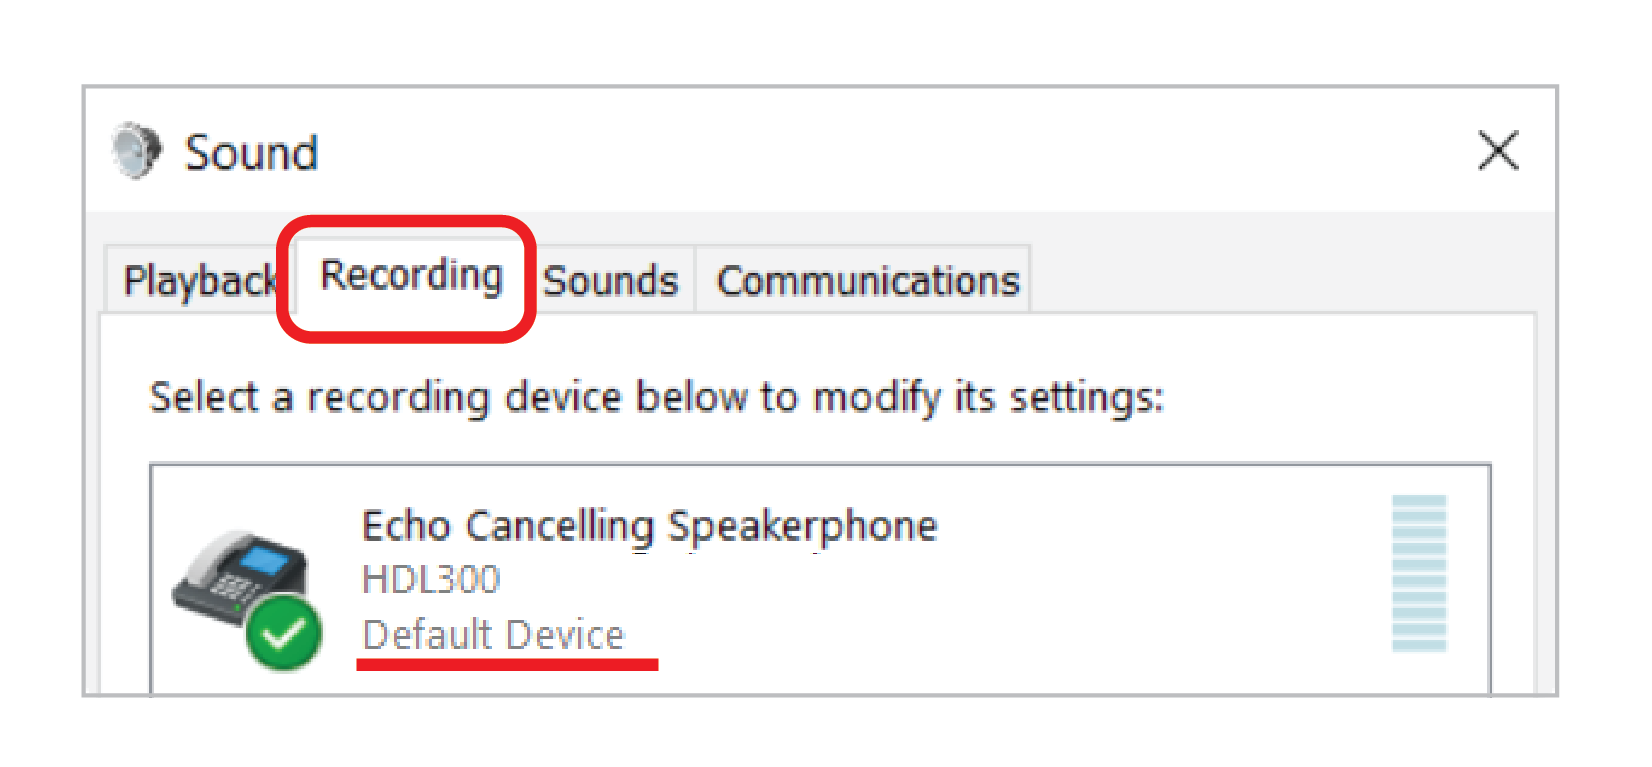
In Windows sound settings
- Select the Recording tab
- Select HDL300 (Echo Cancelling Speakerphone)
- Using the drop-down menu at the bottom of the panel, choose Set as Default Communication device
- Select HDL300 (Echo Cancelling Speakerphone)
- Using the drop-down menu at the bottom of the panel, choose Set as Default device
Once the sound settings have been set to the HDL300, return to the Nureva Console application.
Microphone
Configure the microphone system to be mono input or stereo input.- Mono (Default)
- Captures in-room audio as a single source
- Stereo
- Captures in-room audio as left and right sources
- Remote participants using headsets may be able to determine the approximate position of in-room participants while they speak
Speakers
Nureva Console offers a meeting room and classroom pre-sets for treble and bass output. If additional adjustment is required, select Custom to adjust the treble and the bass for your room.
- Meeting room (Default)
- Classroom
- Custom (Treble and bass sliders are available)
Adjusting the treble and bass can affect echo-cancellation performance. It is recommended to adjust these settings while on a test call.
Using the Play sound test button will play a series of tones through the HDL300's speakers, confirming that the speakers are functioning.See our How can I test my Nureva audio conferencing system's speakers and microphones? article to further test or debug the speakers.
Audio processing
The HDL300 continuously auto-calibrates for optimal audio quality. Adjust these audio processing settings only if you are experiencing problems.
Echo reduction
If remote users hear voices in the room cutting out while speaking, select a lower setting. If remote users can hear their own voices echo, select a higher setting.
- Low
- Medium (Default)
- High
Noise reduction
If remote users hear voices in the room cutting out, select a lower setting. If remote users hear background noises such as HVAC or fans, select a higher setting.
- Low
- Medium (Default)
- High
Recalibrate
Initiate the Recalibrate when the room has changed significantly to quickly optimize the audio performance of the Nureva audio conferencing system. More information about system calibration is available here.
Auxiliary ports
Aux in
Connect auxiliary input source to be output through the HDL300 speaker. The signals from the auxiliary in port will get mixed with any signals from a USB audio source.
Aux out
Select an auxiliary output mode for interoperability with other audio systems.
- Mic level (Echo-cancelled microphone output at mic level)
- Used for recorders and mixers
- Line level (Default echo-cancelled microphone output at line level)
- Used for external DSP's
- Speaker out (Speaker output at line level )
- Used for external speakers
- Mixed-signal (Mixed microphone and speaker signals at line level)
- Used for hearing aid transmitters
- Speaker reference (Speaker output at line level and HDL300 speaker still active)
- Used for acoustic camera tracking systems.
Sleep mode
This allows the system to go into power-saving mode and is defaulted to enabled.
Disable sleep mode if your HDL300 is connected using any auxiliary ports.
Active Zone Control
Active Zone Control enables a user to configure the microphone pickup of the HDL300 system for a specific part of the room. The microphone pickup in the active zone will be heard clearly while sounds outside the active zone will be reduced.
- Slide the toggle to Enable Active Zone Control to the on position
- Use the drag handles (or enter the length and width) to adjust the active zone size.
- Speak and walk around in your desired active zone location. Blue dots will appear in the zone overview to indicate where the sound is being heard. Adjust your partial zone size to ensure all speaking locations are heard clearly.
- Once the active zone is enabled, the remote can be used to toggle between full zone coverage and partial zone coverage by pressing the F2 button on the remote.
Need help determining zone size? Press Start mapping sound
- Blue dots will appear in the zone overview wherever the HDL300 system registers sound. No audio is being recorded.
- The dot locations can help to identify your ideal active zone size within the space.
- Press stop mapping to exit this sound visualization feature.
Learn more detailed information about Active Zone Control - HDL300.
Voice Amplification Mode
Voice Amplification Mode enables an instructor to wear a wireless headset or earset microphone connected to an HDL300 or Dual HDL300 system to have an amplified voice in the room.
- In-room students hear the instructor amplified through the HDL300 speakers
- Remote students hear the instructor and in-room classmates through the UC&C application, thanks to the HDL300 system’s full-room audio pickup
- Everyone – instructor, in-room students and remote students – can be recorded with the UC&C application or lecture capture solution
Voice Amplification Mode is only available while using the Nureva Console cloud application.
NOTE: Only the voice of the person wearing the microphone will be amplified.
Required before you start:- Nureva Console client version 1.3.171812 is required to enable voice amplification
- Confirm your HDL300 has the latest firmware version (version 2.4.67 or newer)
- Enroll your system into Nureva Console cloud to enable remote management
Supported systems
Headset and earset microphone systems are supported for this feature. The systems below have been tested for use, but are not the only microphone systems that are suitable for use with Voice Amplification mode. Users should verify with the microphone manufacturer that their microphone system and their transmitter are compatible.
 |
SHURE® BLX14/P31 WIRELESS HEADSET SYSTEM
|
 |
SENNHEISER XSW 1-ME3 WIRELESS HEADSET SYSTEM
|
- Navigate to Device settings and open Voice Amplification Mode
- Enable Voice Amplification Mode by sliding the toggle to the right
- Click on Apply at the top of the Device settings dashboard

Adjusting the Aux in level
- Choose the appropriate Aux in level as per the microphone system's manual

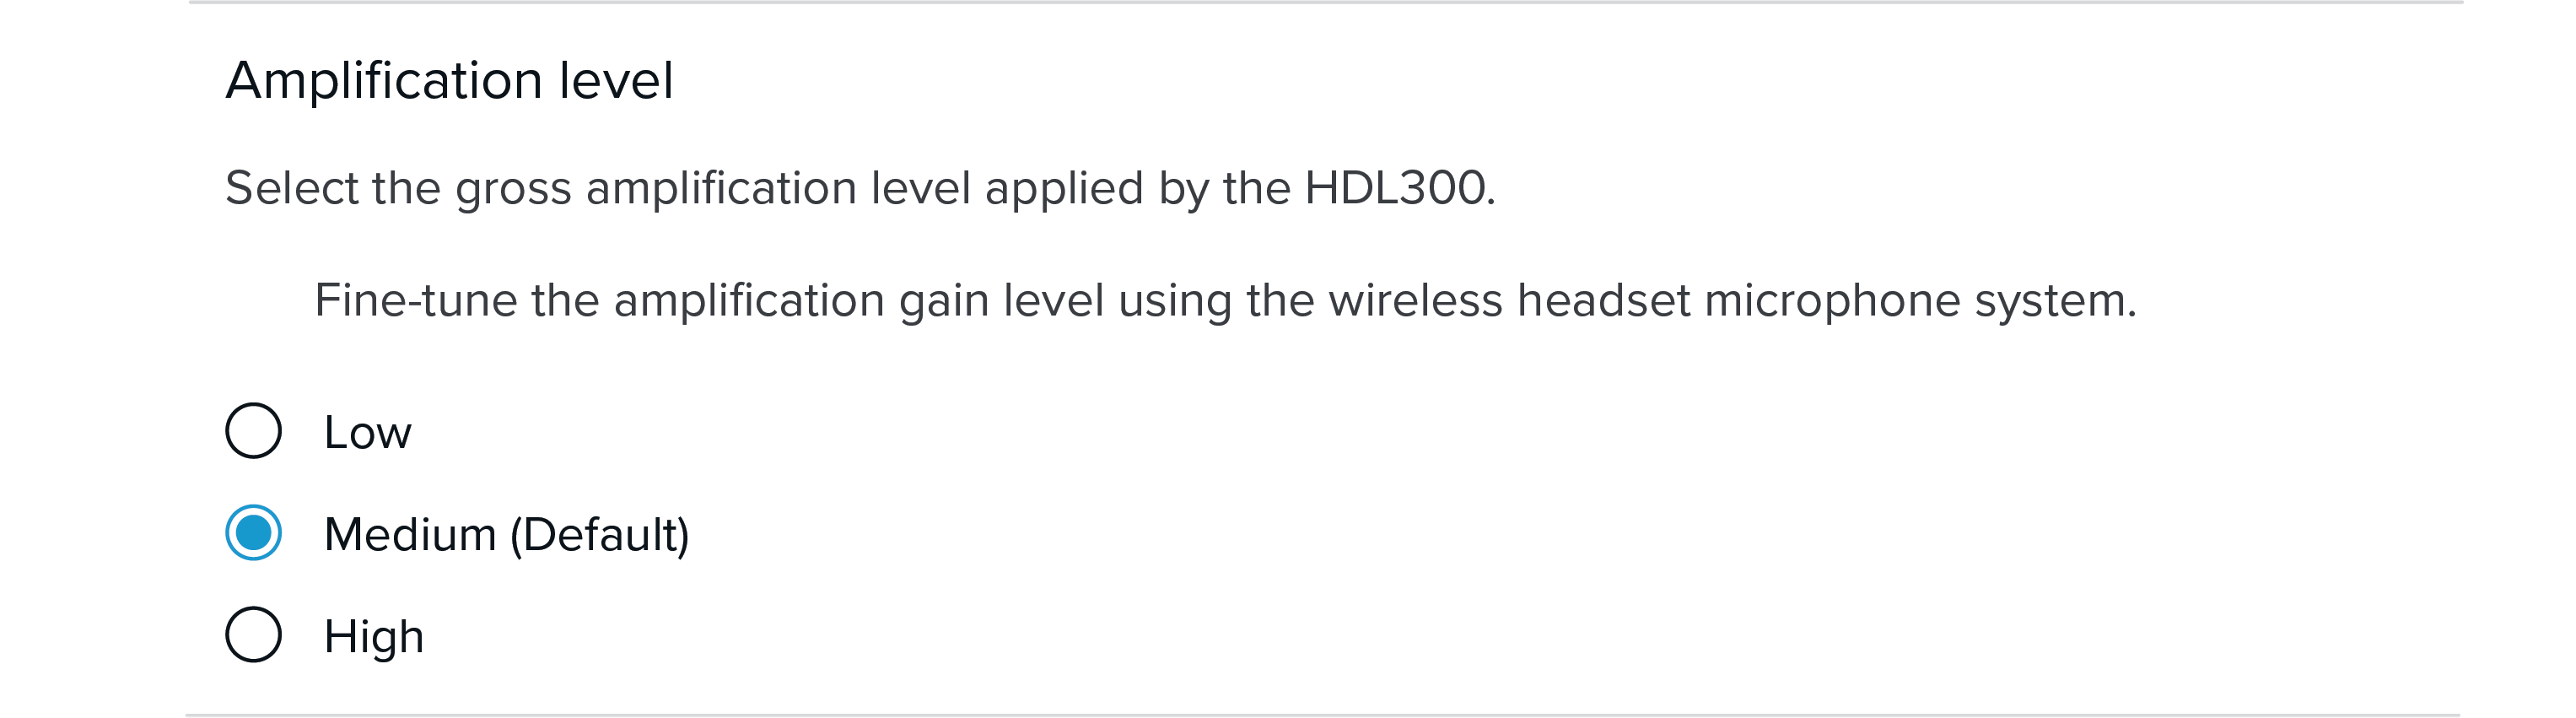
Adjusting the Amplification level
- Select the amplification level applied to your voice

Learn more about Voice Amplification Mode.
Explore Voice Amplification Mode FAQs.
DeleteKeeping your device settings
-
Back up current settings button
- Creates a backup of the current HDL300 settings
- Recommended for saving settings for future restoration
-
Restore backup settings button
- This is available once a backup is created
- This will bring back previously saved settings to your device.
-
Reset to factory settings button
- This will set the HDL300 back to factory settings
macOS
Learn how to optimize the HDL300 system's settings for your organization's unique space.
Before you start:
- Nureva Console is used to manage the HDL300 system's features and settings
- Additional setup information is available at Getting started with your HDL300 system
- All device settings can be adjusted back to the system defaults at any time
- It is recommended to adjust device settings while on a test call
Set HDL300 as your default audio device
Follow these steps to set up the HDL300 system as the default audio device.
Open Nureva Console client
- Select Device Settings
- Select Open sound settings
In the computer's sound settings
- Select the Output tab
- Select HDL300

- Select the Input tab
- Select HDL300

Once the sound settings have been set to the HDL300, return to the Nureva Console application.
Microphone
Configure the microphone system to be mono input or stereo input.- Mono (Default)
- Captures in-room audio as a single source
- Stereo
- Captures in-room audio as left and right sources
- Remote participants using headsets may be able to determine the approximate position of in-room participants while they speak
Speakers
The cloud version of Nureva Console offers meeting room and classroom pre-sets for treble and bass output. If additional adjustment is required, select custom to adjust the treble and the bass for your room.
- Meeting room (Default)
- Classroom
- Custom (Treble and bass sliders are available)
At this time the pre-sets are not available in the desktop client version of Nureva Console.
Adjusting the treble and bass can affect echo-cancellation performance. It is recommended to adjust these settings while on a test call.
Using the Play sound test button will play a series of tones through the HDL300's speakers, confirming that the speakers are functioning.
See our How can I test my Nureva audio conferencing system's speakers and microphones? article to further test or debug the speakers.
Audio processing
The HDL300 continuously auto-calibrates for optimal audio quality. Adjust these audio processing settings only if you are experiencing problems.
Echo reduction
If remote users hear voices in the room cutting out while speaking, select a lower setting. If remote users can hear their own voices echo, select a higher setting.
- Low
- Medium (Default)
- High
Noise reduction
If remote users hear voices in the room cutting out, select a lower setting. If remote users hear background noises such as HVAC or fans, select a higher setting.
- Low
- Medium (Default)
- High
Recalibrate
Initiate the Recalibrate when the room has changed significantly to quickly optimize the audio performance of the Nureva audio conferencing system.
More information about system calibration is available here.
Auxiliary ports
Aux in
Connect auxiliary input source to be output through the HDL300 speaker. The signals from the auxiliary in port will get mixed with any signals from a USB audio source.
Aux out
Select an auxiliary output mode for interoperability with other audio systems.
- Mic level (Echo-cancelled microphone output at mic level)
- Used for recorders and mixers
- Line level (Default echo-cancelled microphone output at line level)
- Used for external DSP's
- Speaker out (Speaker output at line level )
- Used for external speakers
- Mixed-signal (Mixed microphone and speaker signals at line level)
- Used for hearing aid transmitters
Sleep mode
This allows the system to go into power-saving mode and is defaulted to enabled.
Disable sleep mode if your HDL300 is connected using any auxiliary ports.
Learn more about Using the auxiliary ports on the HDL300 systemActive Zone Control
Active Zone Control enables a user to configure the microphone pickup of the HDL300 system for a specific part of the room. The microphone pickup in the active zone will be heard clearly while sounds outside the active zone will be reduced.
- Slide the toggle to Enable Active Zone Control to the on position
- Use the drag handles (or enter the length and width) to adjust the active zone size.
- Speak and walk around in your desired active zone location. Blue dots will appear in the zone overview to indicate where the sound is being heard. Adjust your partial zone size to ensure all speaking locations are heard clearly.
- Once the active zone is enabled, the remote can be used to toggle between full zone coverage and partial zone coverage by pressing the F2 button on the remote.
Need help determining zone size? Press "Start mapping sound"
- Blue dots will appear in the zone overview wherever the HDL300 system registers sound. No audio is being recorded.
- The dot locations can help to identify your ideal active zone size within the space.
- Press stop mapping to exit this sound visualization feature.
Learn more detailed information about Active Zone Control - HDL300.
Voice Amplification Mode
Voice Amplification Mode enables an instructor to wear a wireless headset or earset microphone connected to an HDL300 or Dual HDL300 system to have an amplified voice in the room.
- In-room students hear the instructor amplified through the HDL300 speakers
- Remote students hear the instructor and in-room classmates through the UC&C application, thanks to the HDL300 system’s full-room audio pickup
- Everyone – instructor, in-room students and remote students – can be recorded with the UC&C application or lecture capture solution
Voice Amplification Mode is only available while using the Nureva Console cloud application.
NOTE: Only the voice of the person wearing the microphone will be amplified.
Required before you start:
- Nureva Console client version 1.3.171812 is required to enable voice amplification
- Confirm your HDL300 has the latest firmware version (version 2.4.67 or newer)
- Enroll your system into Nureva Console cloud to enable remote management
Supported systems
Headset and earset microphone systems are supported for this feature. The systems below have been tested for use, but are not the only microphone systems that are suitable for use with Voice Amplification mode. Users should verify with the microphone manufacturer that their microphone system and their transmitter are compatible.
|
SHURE® BLX14/P31 WIRELESS HEADSET SYSTEM
|
|
SENNHEISER XSW 1-ME3 WIRELESS HEADSET SYSTEM
|
Enabling Voice Amplification Mode
- Navigate to Device settings and open Voice Amplification Mode
- Enable Voice Amplification Mode by sliding the toggle to the right
- Click on Apply at the top of the Device settings dashboard

- Choose the appropriate Aux in level as per the microphone system's manual.

Adjusting the Amplification level
- Select the amplification level applied to your voice
Learn more about Voice Amplification Mode.
Explore Voice Amplification Mode FAQs.
DeleteKeeping your device settings
-
Back up current settings button
- Creates a backup of the current HDL300 settings
- Recommended for saving settings for future restoration
-
Restore backup settings button
- This is available once a backup is created
- This will bring back previously saved settings to your device
-
Reset to factory settings button
- This will set the HDL200 back to factory settings