Recommended room size:
HDL300
- Minimum: 8.0ˈ x 8.0ˈ (2.4 x 2.4 m)
- Maximum: 25.0ˈ x 25.0ˈ (7.6 x 7.6 m)
Dual HDL300
- Minimum: 20.0' x 40.0' (6.1 x 12.2 m)
- Maximum: 30.0' x 50.0' (9.1 x 15.2 m)
Integrated microphone and speaker bar recommended installation height
- Minimum recommended installation height: 7.1ˈ (2.2 m)
- Maximum recommended installation height: 10ˈ (3.0 m)
Ceiling height
- Minimum: 8.0ˈ (2.4 m)
- Maximum: N/A
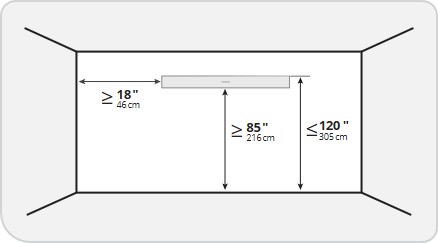
The microphone array is located along the bottom edge of the microphone and speaker bar. Ensure the installation location meets the following requirements and recommendations to optimize microphone pickup.
- Ensure there is adequate clearance below the microphones. When installing the system, ensure the integrated microphone and speaker bar has adequate clearance between the bottom of the bar and any objects located directly below the bar.
The clearance is calculated in a 3:2 ratio. For how deep your X value is, multiply that measurement by 1.5 to see how much space you need between the microphone and speaker bar and the object below (your Y value).

- Do not install the integrated microphone and speaker bar above hardware with fans. Hanging the product above hardware with fans, such as flat panel displays, can cause interference with the microphone pickup.
- Allow for adequate space between the outside edges of the speaker bar and the corners of the room. Installing the microphone and speaker bar against the corner of a room will impede the microphone pickup.
 |
 |
For optimal placement, position the microphone and speaker bar within 30" (76 cm) from the center of the wall. |
 |
Ensure the required distances from walls, corners, ceiling and floor are followed. |
- Install the microphone and speaker bar flush against the wall. The microphone array needs to be flush with the wall below to optimize microphone pickup. If you are hanging the unit on a mount or stand, ensure it has at least 4” (10.2 cm) of flush, flat space below the microphone array.

- For best performance, hard surfaces that are less reflective such as drywall are preferred for installing the integrated microphone speaker bar. Soft surfaces, such as cubicle wall paneling may absorb some of the sound but the integrated microphone speaker bar will still do well to capture audio in such environments.
- Avoid installing the integrated microphone and speaker bar in recessed areas. Placing the bar into a recessed area of the room will negatively affect the microphone pickup.
- For Dual HDL300 systems: leave approximately 20’ - 25’ (6.1 - 7.6m) between the integrated microphone and speaker bars.
See the HDL300 Installation Guide for more information.